


Maintenance 5. Replacing the Motors (Joint #2)
E2C Rev.6
113
5.4 Replacing the Joint #2 Motor
Removal
(1) Remove the arm top cover.
For details on the removal method, refer to
Maintenance: 3.1 Arm Top Cover
.
(2) Cut off the wire tie binding the duct plate,
motor, and cables together.
(3) Remove the duct plate.
Duct plate
3-M5
×
1
5
(4) Cut off the wire tie binding motor cables to the Joint #2 motor.
(5) Disconnect the connectors X121 and X21.
To disconnect the X121 connector, pull it out while pushing the projection next to the
connector.
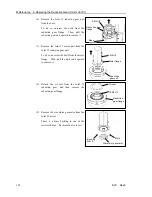
(6) Remove the Joint #2 motor unit from Arm
#2.
To do so, unscrew the bolts from the Joint
#2 motor flange. Then, pull out the motor
unit straight and upward.
If the motor cannot be pulled out easily,
pull it out while moving Arm #2 slowly by
hand.
3-M4×
1
0
Motor flange
Joint #2 motor unit
(7) Remove the waveform generator from the
Joint #2 motor.
There is a brass bushing in one of the
setscrew holes. Be careful not to lose it.
Bushing
M4
×
6
Waveform generator
Motor flange
M4
×
6
(8) Remove the motor flange from the Joint #2
motor.
2-M4
×
1
0
Содержание E2C Series
Страница 1: ...SCARA ROBOT E2C series MANIPULATOR MANUAL Rev 6 EM069R1409F ...
Страница 2: ...MANIPULATOR MANUAL E2C series Rev 6 ...
Страница 8: ...vi E2C Rev 6 ...
Страница 14: ......
Страница 81: ...Maintenance This volume contains maintenance procedures with safety precautions for E2C series Manipulators ...
Страница 82: ......
Страница 92: ...Maintenance 2 General Maintenance 80 E2C Rev 6 ...
Страница 118: ...Maintenance 4 Replacing the Cable Unit 106 E2C Rev 6 ...
Страница 194: ...Maintenance 11 Replacing the Signal Relay Board 182 E2C Rev 6 ...


