background image

Pearl User Guide                                     

Configure the touch screen

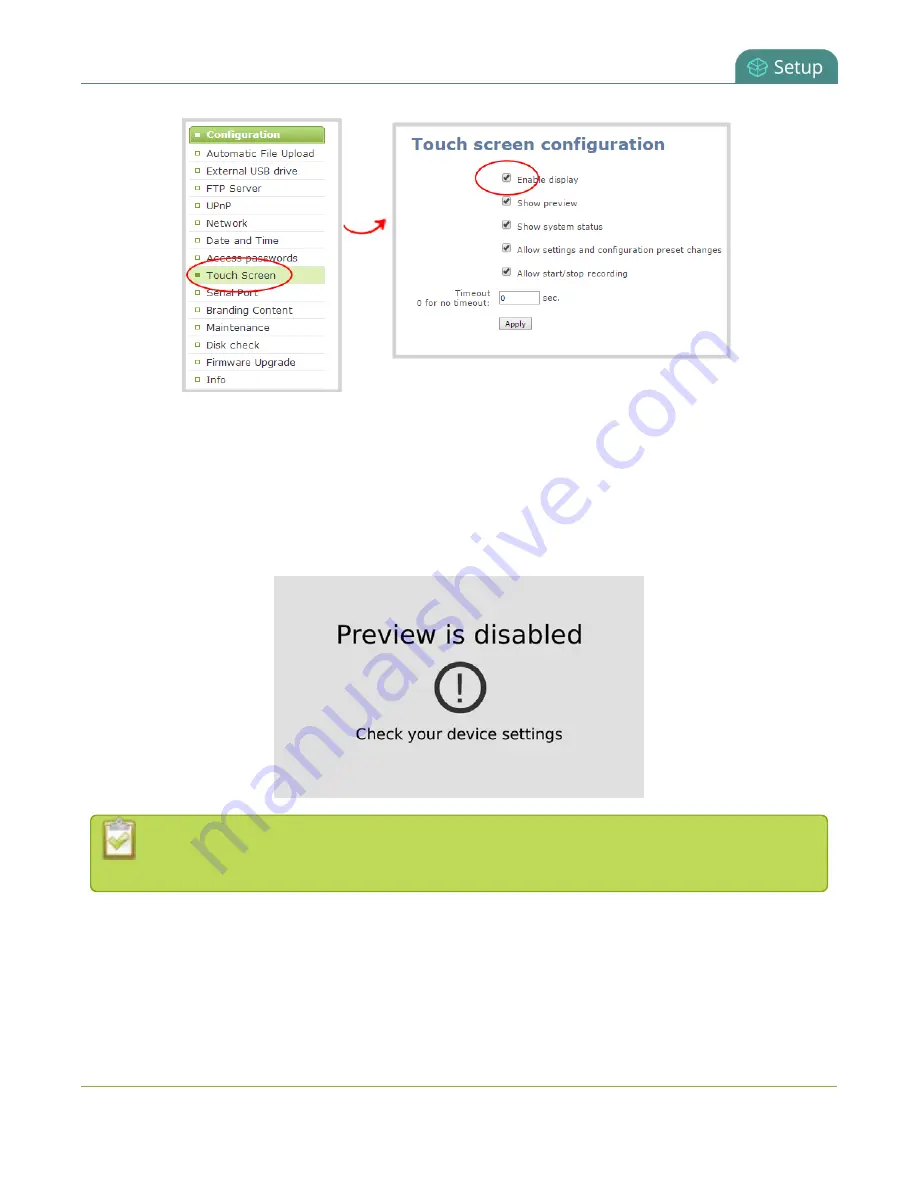
 4.  Uncheck 

Enable display 

to disable the display (or check the box to enable the display).

 5.  Click 

Apply

.

Hide (or show) channel previews on the touch screen

By default, Pearl shows previews of each configured channel. If this isn't suitable for your needs, you may 
disable channel preview. When channel previews are disabled, the touch screen shows the following image:

While preview is disabled, if 

system status

 or 

settings and configuration preset changes


are permitted, you can touch the screen anywhere to open the settings page.

To hide (or show) the channel previews on the touch screen:

 1.  Connect to the admin interface using your preferred connection mechanism. See 

Connect to the admin 

interface

.

46

Содержание Pearl

Страница 1: ...Epiphan Pearl User Guide Release 3 15 2 July 23 2015 UG100 009 ...

Страница 2: ...ATE AT TIME OF WRITING BUT ARE PRESENTED WITHOUT WARRANTY OF ANY KIND EXPRESS OR IMPLIED USERS MUST TAKE FULL RESPONSIBILITY FOR THEIR APPLICATION OF ANY PRODUCTS LIMITATION OF LIABILITY UNDER NO CIRCUMSTANCES SHALL EPIPHAN BE LIABLE FOR ANY INCIDENTAL SPECIAL CONSEQUENTIAL EXEMPLARY OR OTHER INDIRECT DAMAGES THAT RESULT FROM THE USE OF OR THE INABILITY TO USE THIS PRODUCT OR THE INFORMATION CONTA...

Страница 3: ...d additional information about Epiphan Pearl Warranty All Epiphan Systems products are provided with a 100 return to depot warranty for one year from the date of purchase Technical Support Epiphan s products are backed by our professional support team If you are having issues with your product please gather details about your system and contact our team by l Emailing support epiphan com l Live cha...

Страница 4: ...there are no special firmware update instructions to follow For systems with firmware release 3 14 4 or older read these special notes Firmware release 3 15 1 introduced the terrific new visual channel layout editor which adds the ability to have multiple layouts per channel and simplifies custom channel components like text overlays images and picture in picture layouts The firmware update proces...

Страница 5: ...ed it takes up to 15 seconds for the system to detect the audio Once detected the audio is properly synchronized with the video Workaround Start the SDI signal with audio enabled or check to ensure audio is detected before streaming or recording l Auto sources Auto A and Auto B do not have an audio source in firmware release 3 15 2 Workaround Add your desired audio source to your channel s layout ...

Страница 6: ...und If dropped frames are problematic for your application avoid the layout switching feature l CPU is under high load when rotating a source through the sources configuration menu Workaround If possible manually or programatically rotate the source image e g rotate the camera or use the source s software settings instead of rotating via the streaming system s configuration pages l If the hard dri...

Страница 7: ... create a full screen image that depicts the desired no signal message and switch to the live feed when it comes online Otherwise use the default no signal image l Text overlays in 3 15 2 do not support the c variable to show the channel name Workaround If channel name is desired in the text overlay type in the name manually into text overlay box in the layout editor l When using Internet Explorer...

Страница 8: ...What s Next 16 PART 1 Setup 17 The admin interface 18 Connect to the admin interface 18 User administration 23 Pearl s touch screen 36 Touchscreen overview 36 View system information 38 Channel monitoring 40 Pearl s audio jack 42 Control recording 43 Configure the touch screen 45 View system information 52 Configure network settings 53 Verify IP Address and MAC address via the touch screen 53 Veri...

Страница 9: ...reset 75 Delete a configuration preset 76 Configuration preset considerations 77 Configure date and time 82 Verify date and time via the touch screen 82 Verify date and time settings 83 Configure synchronized time NTP PTP v1 and RDATE 84 Configure the date and time manually 85 Change the time zone 86 Configure a Local NTP Server 86 PART 2 Capture 87 What is a channel 88 Use the automatic channels ...

Страница 10: ...ly 160 Remove the combing effect on images 161 Video looks squished VGA sources only 162 Video too bright too dark or washed out VGA sources only 163 PART 3 Stream 165 What is streaming 166 Choose a streaming option 166 Supported streaming formats 167 Stream to viewers 168 Stream content using HTTP or RTSP 168 Configure HTTP and RTSP streaming ports 170 Stream content using HLS HTTP Live Streaming...

Страница 11: ...ording 220 Recording basics 220 Record a channel via the web interface 221 Record a channel via the touch screen 223 Configure recording file size 225 Restart recording 227 Recorders 228 Add a recorder 228 Change the channels recorded by a recorder 229 Record with a recorder 230 Rename recorded files 232 Delete recorded files manually 232 Recorded files 235 View list of recorded files 235 Download...

Страница 12: ...perator interface 269 Connect to the tablet interface 269 Confidence monitoring using the tablet interface 271 Verify disk space via the tablet interface 273 Control recording via the tablet interface 273 Switch to the full admin interface 274 Power down and system restart 275 Restarting the device via the web interface 275 Shutting down the Device via the Web Interface 276 Shutting down the devic...

Страница 13: ...k maintenance 292 Check disk storage space 292 Check disk storage space via the touch screen 293 Schedule disk check 293 Perform disk check 294 Third party integration 295 Control with RS 232 serial port 296 Control with HTTP commands 302 Configuration keys for third party APIs 306 Troubleshooting 319 Releases and Features 321 Software and Documentation License 323 ...

Страница 14: ... the basic steps to get a single video and optional audio source configured as a streamable recordable output from Pearl Following the quick start section a set of task based procedures help you to tweak the system exactly how you want it These procedures are broken into five categories Setup Capture Stream Record and Maintenance About this Guide Warnings are depicted as follows This is a warning ...

Страница 15: ...rl User Guide About this Guide Throughout this guide there are situations where more than one solution will complete a task In those cases the guide describes the simplest or most common variation first 2 ...

Страница 16: ...want to record and stream them Keep them separate configure them in multi source layouts for live switching or do both The resulting streams can be viewed a number of ways through media players browsers on mobile devices and through Content Distribution Networks CDNs Recorded files can be downloaded via FTP or set to automatically upload via FTP RSYNC or CIFS and can be integrated into your Conten...

Страница 17: ...not HDCP protected What s in the Box Pearl is a compact portable system weighing only 3 4 lbs 1 54 kg and measuring 187 mm D 270 mm W 82 mm H 7 4 10 6 3 25 Pearl is shipped in a hard shell case that you can re use for storing or moving Pearl between jobs Inside the hard shell case under the foam tray you ll find the power cable and the following items 1 One SDI cable 2 One HDMI cable 3 One VGA cab...

Страница 18: ...s DVI male to HDMI female adapter Connects DVI sources to Pearl Connect the adapter to the output on your screen or device then connect the provided HDMI cable to the adapter and one of the HDMI ports on Pearl s back panel RJ 45 Ethernet cable Connects the system to your network Front and back view Pearl s front panel has the power indicator light audio monitor jack and touch screen display for co...

Страница 19: ...information and starting stopping recordings 3 5 mm audio jack For audio confidence monitoring Plays the audio for the currently vis ible channel Power light Glows when the system is powered on Power Button Press to turn on press and release to initiate a graceful system shut down Power jack The power supply is plugged in here The port requires a 19 V center positive DC power source Alway use the ...

Страница 20: ...ce using a laptop lock cable Row A B designators This manual and Pearl s web admin interface refer to row A and row B Ports above the line are part of row A ports below form row B Tech specs This table outlines the technical specifications for Pearl Go to www epiphan com pearl to get the most recent product specifications and additional information about Pearl Table 4 Specifications for Pearl Vide...

Страница 21: ...isplay Front touch screen display for live switching confidence monitoring quick con figuration system information and recording control Video Encoding Video Codecs H 264 MPEG 4 Motion JPEG Video Bit Rates 100 9 999 kbit sec Key Frame Intervals Programmable Color Resolution 4 2 0 Output Frame Size Configurable up to 3840x2160 Frame Rates per output stream 60 fps at 1920 1080 capturing and streamin...

Страница 22: ...utomatic or manual copy to local USB drives via the 2 USB 2 0 ports Network Storage FTP server and FTP client capabilities automatic and manual Playback and Recor ded Formats Download recorded videos AVI MOV MP4or MPEG TS using the Web UI and playback through any compatible player Administration Web UI for full administration On screen display and mobile UI for confidence monitoring and simple adm...

Страница 23: ...th America Canada Using HDMI port with the supplied adapter Requires component to VGA adapter not included The Internal 1TB HDD provides approximately 900GB of space for recording Recording space can be virtually unlimited with the use of networked storage 10 ...

Страница 24: ... Auto B This quick start uses these channels to get you streaming and recording as soon as possible Get started quickly with auto channels 1 Turn on your HD source and connect the output cable to a port in Row A on the back of Pearl if needed use an adapter such as the DVI to HDMI adapter 2 If desired plug a second source into one of the Row B inputs on the back of the system 3 optional Attach a s...

Страница 25: ...f you don t want to add audio to your channel you re done with configuration You can start viewing the channel s immediately by using a browser on a computer on the same network 1 Find the system s IP address from a single channel view or grid view touch the system settings gear button then touch System Status 2 Open a browser window on a computer on the same LAN or network 3 Browse to one of the ...

Страница 26: ...n follow other discovery methods described in the section Connect to the admin interface Connect to the admin interface 1 Find the system s IP Address l from a single channel view or grid view touch the system settings gear icon then touch System Status or l if your system doesn t have any channels showing touch the screen anywhere to move to the system settings screen then touch System Status 2 T...

Страница 27: ... sources configuration page opens 3 You re automatically editing the Default layout in the channel layout editor The Auto A source is previewed in the layout area 4 Scroll down and choose an audio source from the displayed list 5 Scroll down and click Save at the bottom right of the screen to save your changes 6 Click Status for your channel 7 Notice the Stream Info section has an item named Video...

Страница 28: ...rols for the channel 3 Touch the recording control button the touch screen will start a timer to indicate the length of the recording Touch the control again to stop recording If the button is not visible recording control via the touch screen is not enabled see Configure the touch screen To control recording from the web interface 1 From the web interface scroll to the Channels section 2 Click Re...

Страница 29: ...stream you can fine tune the system to your exact requirements You can look at topics such as l Create a simple channel l Create a custom channel l Live video mixing switching l What is streaming l File and recording transfer l User administration When you have completed system tuning make sure to back up the system configuration using the procedure described in l Save and restore device configura...

Страница 30: ... the channel or configure more this part of the manual helps you to get your Pearl properly configured for your network Topics covered l Connect to the admin interface l Configure the touch screen l User administration l View system information l Configure network settings l Configure date and time l Configuration presets l Restrict viewers by IP address ...

Страница 31: ...d service discovery l Connect via the Epiphan discovery utility For networks without DHCP use the following procedure l Connect via persistent static IP address You can also connect to a reduced Operator tablet interface See Connect to the tablet interface Connect using the touch screen To connect to the web admin interface you need to know your Pearl s IP address There are a number of ways to det...

Страница 32: ...Connect via DNS based service discovery Pearl uses DNS based messages to advertise details about itself including its host name With a compatible utility installed on your computer you can access the system simply by typing its serial number and the suffix local into the address bar of your browser To ensure you have compatible software refer to the following table Table 5 Installing Bonjour Print...

Страница 33: ...available on the system information display on the touch screen To access the serial number l from the no channels screen touch the screen anywhere to move to the system information screen l from a single channel view touch the system information button or l from the grid view select a channel then touch the system information button 2 Type the following string into the address bar of your web bro...

Страница 34: ...phan com downloads NetworkDiscovery exe To access the Pearl s web interface via the Epiphan discovery utility 1 Launch the discovery utility 2 Click Search to find all the Epiphan systems on the network a list similar to the following appears 3 If more than one system appears select the one you wish to configure by matching the serial number listed with the serial number marked on the back of the ...

Страница 35: ...y network settings Pearl is pre configured with the following static address defaults l IP Address 192 168 255 250 l Netmask 255 255 255 252 l Username admin l Password your admin password by default set to no password To access Pearl s web interface via the persistent static IP address 1 Establish an Ethernet connection between Pearl and the workstation by one of the following methods a Connect t...

Страница 36: ...orkstation User administration Pearl has three configured users l admin l operator l viewer By default none of these users have passwords For security purposes you should add passwords to the admin and operator accounts This section describes the following user administration topics l User types and privileges l Set or change user passwords l Remove user passwords l Overcome lost passwords l Confi...

Страница 37: ...The viewer username and password prompt appears only when there is a viewer password set In addition to the global viewer account each channel can set a viewer password that overrides the global value See What is streaming Current User When logged in to the web interface the current username is displayed at the top right corner of the screen User Privileges The following table outlines the privile...

Страница 38: ...iew Source Snapshot ü ü System Configuration Operations View System Configuration ü ü Configure Automatic File Upload ü Select External USB Drive Behavior ü Configure FTP Server ü Configure UPnP Sharing ü Configure Network Address ü Configure USB Tethering ü Perform Network Diagnostics ü ü Configure Date and Time preferences ü Set or Change User Passwords ü Configure the Touch Screen ü Configure S...

Страница 39: ...ator accounts Refer to your system administrator for your organization s specific password requirements In addition to setting global passwords for viewers you can also set access passwords and IP restrictions on a per channel basis from the channel s Streaming page See What is streaming Restrict viewers by IP address Passwords are case sensitive and can use all alpha numeric keys in the ASCII ran...

Страница 40: ...on field and confirm the new password 8 Click Apply 9 If you were logged in as the user whose password you just changed you are logged out and must log back in with the new password If you added or changed the viewer s password all viewer s stream will pause until they log in with the new password If desired you may specify multiple account passwords on the same page before clicking Apply Remove u...

Страница 41: ...n without a password To clear a user s password on a specific channel 1 Connect to the admin interface using your preferred connection mechanism See Connect to the admin interface 2 Login as admin 3 Click the Streaming link for the channel the channel s Streaming configuration page opens 4 From the Access control section do one of the two following things a clear the viewer password field or b sel...

Страница 42: ...AP users with the name admin operator or viewer are ignored The local accounts are used instead For security reasons you should configure passwords for the local accounts See Configure LDAP These instructions assume you have a pre configured LDAP server The server must support anonymous binding or have a special bind account with search access priveleges Note that Active Directory does not support...

Страница 43: ...d for LDAP bind in the Bind DN and Bind password fields The password masked as dots on the screen These fields are only needed if your LDAP server does not support anonymous binding 9 In Base DN specify the baseObject in which to search for entries The system will search this object and the whole subtree starting at the base DN 10 By default the search attribute is uid which is suitable for a unix...

Страница 44: ...red to authenticate once to the system and one time per channel they view Therefore users see a prompt to log in to the system the system name is shown and a second time to log in to the channel the channel name is shown In one case LDAP replaces the local viewer account instead of working side by side with it When LDAP is enabled and the viewer account has no password either there is no global vi...

Страница 45: ...g allow deny lists refer to the examples below this procedure for assistance with crafting your lists To restrict viewers by IP address 1 Connect to the admin interface using your preferred connection mechanism See Connect to the admin interface 2 Login as admin 3 Select the Access passwords link in the Configuration menu the password configuration page opens 4 Type allowed IP addresses or address...

Страница 46: ...exception to a rule in the allow list Deny IP s Enter individual IP Addresses or IP Address ranges separated by commas To specify a range use a hyphen Optional spaces improve readability Users connecting from addresses in this list are not allowed to view broadcasts from the system unless their IP address is in the Allow IP s list If a specific IP address is in both lists access to the stream is d...

Страница 47: ...also want to add the desktop laptop and tablet computers of the CEO IP addresses 192 168 1 50 192 168 1 51 and 192 168 1 75 respectively Note the first two IP addresses are consecutive so they can be added as a second range Add these IP addresses to the list as follows Allow 192 168 1 200 192 168 1 250 192 168 1 50 192 168 1 51 192 168 1 75 Your list can have multiple ranges and multiple distinct ...

Страница 48: ...vided they are separated by commas Deny List with a Range of IP Addresses Converse to the previous examples consider the situation where you want every computer on the network to access the broadcast with the exception of the CEO s desktop laptop and tablet computers Additionally boardroom computers should not be permitted with the exception of the cafeteria computer IP address 192 168 1 222 The d...

Страница 49: ...touch screen is capacitive Use your finger or a specially designed soft tipped capacitive stylus with firm but gentle pressure Pressing too hard or using something other than a fingertip or capacitive stylus can result in damage to the screen This section describes how to use the touch screen and provides an overview of the functionality available through the screen l Touchscreen overview l View s...

Страница 50: ...w A and row B the grid view looks more like this From this screen touch either channel to go to the individual channel screen or touch the gear symbol to go to the system settings screen From the single channel screen touch the gear to go to system settings or touch the button with four squares to return to the grid If you delete the automatic channels Auto A or Auto B and have no other channels c...

Страница 51: ...to go to the system settings screen View system information Useful when first setting up Pearl for finding the system serial number or to check the installed firmware version the touch screen shows you basic information about your Pearl If desired you can choose to disable this screen See Configure the touch screen Label Description Device Information l Serial number l video grabber number 38 ...

Страница 52: ... Pictogram of available disk space To show system information on the touch screen 1 If the system settings button gear is not on the screen tap the screen once to turn on the control buttons 2 If the system settings button is still not visible it is disabled in the system s Touch screen configuration See Configure the touch screen to enable system information 3 Touch the system settings button gea...

Страница 53: ...h channel Change between individual channels or view a grid of all channels using on screen navigation buttons You can also directly monitor audio quality using the 3 5 mm audio jack located at the front of the device Read more Pearl s audio jack You may also be interested in learning about video switching from the touch screen see Live video mixing switching Individual channel monitoring Table 8 ...

Страница 54: ... controls on the channel view 3 Touch the left or right controls on at the side of the channel display the screen displays the next channel To change from grid view to an individual channel view 1 If necessary tap the screen once to turn it on 2 Touch any channel in the grid view the screen displays the selected channel Grid view channel monitoring Depending on the number of configured channels th...

Страница 55: ...it on 2 If necessary tap the screen once to display controls on the channel view 3 Touch the grid view button the screen displays the grid view Pearl s audio jack Pearl s front panel includes a 3 5 mm audio jack for audio monitoring Audio monitoring To use the audio monitor plug speakers or a microphone into the 3 5 mm audio jack Use the touch screen to select a channel that channel s audio is pla...

Страница 56: ...relative to full scale and uses colored bars to represent the current level Table 10 Touch screen audio VU meter levels Color Decibel range Green 60 dB to 10 dB Yellow 10 dB to 4 dB Red 4 dB to 0 dB Control recording Pearl s touch screen gives you freedom to start and stop recording without needing to log in to the web interface Simply scroll to the channel you wish to control and press the start ...

Страница 57: ...ed record button see above at the top right of the screen recording starts and a timer is displayed to show the length of the recording To stop recording 1 If necessary tap the screen once to turn it on 2 If the grid view is showing tap the channel for which you wish to control recording the screen displays the channel 3 If necessary tap the screen once to display controls on the channel view 4 To...

Страница 58: ...uration functions from the touch screen l Block or allow recording control from the touch screen l Set touch screen timeout Disable or enable the touch screen You can prevent Pearl from displaying anything on the touch screen or you can re instate this feature by toggling the Enable display configuration option The display is always touch sensitive This control indicates whether or not the display...

Страница 59: ...t suitable for your needs you may disable channel preview When channel previews are disabled the touch screen shows the following image While preview is disabled if system status or settings and configuration preset changes are permitted you can touch the screen anywhere to open the settings page To hide or show the channel previews on the touch screen 1 Connect to the admin interface using your p...

Страница 60: ...pply Disable or enable system status on the touch screen Once you ve configured Pearl its possible you may no longer wish to show the system status screen on the touch screen To hide or show system information on the touch screen 1 Connect to the admin interface using your preferred connection mechanism See Connect to the admin interface 2 Login as admin 3 Select the Touch Screen link in the Confi...

Страница 61: ...guring network settings via the touch screen You can disable this ability If configuration is blocked and system status is permitted touch screen users see an i icon instead of the configuration gears icon in the lower right corner of the touch screen To block or allow the channel previews on the touch screen 1 Connect to the admin interface using your preferred connection mechanism See Connect to...

Страница 62: ... for channels You can disable this control to prevent unwanted interruptions in recordings or to stop users from switching the layout used Channel preview must be on for recording and live switching control to work To block or allow the recording and live mixing switching control via the touch screen 1 Connect to the admin interface using your preferred connection mechanism See Connect to the admi...

Страница 63: ... the Timeout field The values is in seconds Use 0 to keep the screen on whenever the system is on 7 Click Apply Set touch screen timeout Initially the touch screen is always on for easy monitoring However if you d like you can modify its configuration to cause it to shut off after a given amount of time To re enable it after timeout simply touch anywhere on the screen To set a timeout for the touc...

Страница 64: ...nnection mechanism See Connect to the admin interface 2 Login as admin 3 Select the Touch Screen link in the Configuration menu the touch screen configuration page opens 4 Enter a value in the Timeout field The values is in seconds Use 0 to keep the screen on whenever the system is on 5 Click Apply 51 ...

Страница 65: ... version if available and currently configured channels To view system information 1 Connect to the admin interface using your preferred connection mechanism See Connect to the admin interface 2 Login as admin 3 From the web interface scroll to the Configuration menu option 4 Click Info the system information page opens 3 Use the information displayed to get an overview of your system troubleshoot...

Страница 66: ... the touch screen Pearl s touch screen interface if enabled can quickly and easily show you the system s IP Address and MAC address To show system information on the touch screen 1 If the system settings button gears does not appear on the screen tap the screen once to turn on the control buttons from the no channels or preview disabled screen this will go directly to the system settings screen 2 ...

Страница 67: ...dmin interface using your preferred connection mechanism See Connect to the admin interface 2 Login as admin 3 Select the Network link in the Configuration menu the network configuration page opens 4 Note the MAC address and Current IP address listed at the top of the page Table 11 Network Information Fields Label Description Options MAC Address A media access control address MAC address is a uniq...

Страница 68: ...dure below For quick and easy setup of Pearl you can configure network settings via the web interface or via touch screen Using the touch screen you can choose to apply a configuration presets that uses DHCP see Configuration presets To configure network settings via the touch screen 1 If the system settings button gears does not appear on the screen tap the screen once to turn on the control butt...

Страница 69: ...already selected 5 Change the MTU Size value only if needed See the table below for information on maximum transmission unit MTU values 6 Click Apply to save the changes the changes are saved and a message appears asking you to reboot 7 Select the Maintenance link under the Configuration menu the maintenance page appears 8 Click the Reboot Now button near the bottom of the page 9 Wait for the syst...

Страница 70: ...ick and easy setup of Pearl you can configure network settings via the web interface or via touch screen Using the touch screen you can choose to apply a configuration presets that contains a static network IP see Configuration presets To configure network settings via the touch screen 1 If the system settings button gears does not appear on the screen tap the screen once to turn on the control bu...

Страница 71: ...r your network enter the same static IP address as in the previous step The default gateway cannot be left blank If no default gateway is specified unexpected behavior occurs 9 Enter the DNS Server address If you do not have a DNS server enter the new static IP address of the system 10 Touch Apply to apply the changes To configure a static IP address via the web interface 1 Connect to the admin in...

Страница 72: ...ay cannot be left blank If no default gateway is specified unexpected behavior occurs 7 Enter the DNS Server address If you do not have a DNS server enter the new static IP address of the system 8 Change the MTU Size value only if needed See the table below for information on maximum transmission unit MTU values 9 Click Apply to save the changes the changes are saved and a message appears asking y...

Страница 73: ... node that serves as an access point to the rest of the network This value cannot be blank unless you are using DCHP Specify the system s IP address if you don t have a default gateway on your network DNS Server The domain name system server DNS server translates human readable hostnames into corresponding IP addresses Specify the system s IP address if you don t have a DNS server on your network ...

Страница 74: ...he USB phone tablet section the following choices appear Table 14 Mobile Tethering Options Label Description Options Disabled Specifies that no USB tethering is permitted No tethering Specifies that USB tethering is available for connecting a mobile device as a con figuration utility i e using the web browser but no mobile data is used Prefer ethernet When chosen the system tries to use the Ethern...

Страница 75: ...termine the path taken to an address Note Not all networks support ping and traceroute To ping or traceroute an IP address 1 Connect to the admin interface using your preferred connection mechanism See Connect to the admin interface 2 Login as admin 3 Select the Network link in the Configuration menu the network configuration page opens 4 Click ping or traceroute an animation appears to the left o...

Страница 76: ...Pearl User Guide Perform network diagnostics 63 ...

Страница 77: ...n preset There are also some very important configuration preset considerations to review l Configuration preset considerations Configuration presets overview Configuration presets make it easy to use your Pearl in a variety of situations without needing to reconfigure it Configuration presets divide the system s settings into the following six configuration groups For a complete list of what is i...

Страница 78: ...omplete The company could bring Pearl in a factory configured state and get it ready between each session but this requires a trained operator and doesn t allow much time to get multiple operations completed Instead the company could connect the system to their own corporate network before the show upload the required backgrounds and create channel configuration presets for each conference track T...

Страница 79: ...rence prior to conference session 1 starting All other preset groups remain unchanged this preset only affects the channel s and their configuration This preset includes a channel with a link to the correct background filename the background file was uploaded during pre show configuration at the corporate office and has metadata specifying the speaker s name Conference session 2 preset The company...

Страница 80: ...tion group System Date and time settings serial port settings remote support settings custom disk check schedule access passwords deny allow lists and LDAP configuration settings Network Network settings and tethering configuration Sources All audio and video source configuration settings Channels All channel configuration data and current recording state all layouts all recorder configuration dat...

Страница 81: ...ny configuration presets as you need The system keeps track of which configuration groups are part of the preset and you provide a name that lets you know the significance of the preset Note that configuration presets that include network or system settings require a system reboot when applied To create a configuration preset 1 Connect to the admin interface using your preferred connection mechani...

Страница 82: ...stem are not affected For example if you apply a preset that includes the configuration groups channnels and automatic file upload your network settings passwords time server source configurations etc are not modified Similarly if you apply a configuration preset that has only network settings included only the network settings change If you apply a preset that has the network or system configurat...

Страница 83: ...a configuration preset from the web interface 1 Connect to the admin interface using your preferred connection mechanism See Connect to the admin interface 2 Login as admin 3 Select the Maintenance link in the Configuration menu the maintenance page opens 4 Scroll to the Configuration presets section 5 Click Apply next to the configuration preset you wish to apply 6 The system asks for confirmatio...

Страница 84: ... first method To apply a configuration preset via the touch screen 1 If necessary tap the screen once to turn it on or to turn on the screen overlay 2 If the system settings button gear is still not visible and an i icon is visible instead configuration by touch screen is disabled in the system s settings See Configure the touch screen to enable 3 Touch the gear icon at the bottom right of the scr...

Страница 85: ...uration preset includes the network or system configuration groups a reboot is necessary 8 Click OK to apply the preset the configuration preset is applied 9 The system reboots if required To apply a configuration preset that contains only the network configuration group you may use this process 1 If necessary tap the screen once to turn it on or to turn on the screen overlay 2 Touch the gear icon...

Страница 86: ...touch screen 3 Touch the Network line the network configuration page opens 4 Touch Network Presets a list of saved configuration settings with only Network settings opens 5 Touch the name of the preset you wish to apply a confirmation message is displayed 73 ...

Страница 87: ...on setting is similar to using the Factory reset method see Perform factory reset with a few important differences In short the Factory default configuration preset is less destructive than Factory reset This table describes the exact differences Table 16 Factory default configuration preset vs Factory reset Factory default configuration preset Factory reset function Deletes all created channels ü...

Страница 88: ...figuration preset and select the Factory default preset A reboot is required Update a configuration preset If you need to update a configuration preset to include different configuration groups or simply new settings for the same groups you can do so easily via the web interface To update a configuration preset 1 Connect to the admin interface using your preferred connection mechanism See Connect ...

Страница 89: ...n preset 9 Click OK your configuration preset is updated in the list Delete a configuration preset You may want to trim the list of configuration presets to only those that are needed for your ongoing needs You can delete all configuration presets at once by doing a factory reset or you can delete individual configuration presets from the Maintenance page To delete a configuration preset 1 Connect...

Страница 90: ...ations Configuration presets are groups of settings applied to the system leaving other settings intact The following considerations will help you get the most from your configuration presets Channel and recorder index number behavior Each channel and recorder has an index number The first channel created on a system is channel 1 subsequently channel 2 3 4 etc Recorders are also created starting a...

Страница 91: ...apter shows that each channel and recorder s recording state is included in the channels configuration group This means that if a channel or recorder is recording at the time you create a configuration preset it will immediately start recording when you apply that preset Similarly if a configuration preset is saved when channels or recorders are not recording those channels and recorders will not ...

Страница 92: ...create a new channel with index 3 or load a preset that contains a channel with index 3 you ll find it starts with five recorded files in the Recordings section These are the same recorded files that existed at the start of this example Furthermore if you delete any of the recordings you are deleting the only instance of those files Using our previous example if you delete one of the five recordin...

Страница 93: ...e Force the capture card to use a specific EDID If you apply a preset that needs a special EDID be sure to remember to upload that EDID after applying the configuration preset Configuration presets are not user profiles Configuration presets should not be confused with the concept of user profiles Specifically the following issues arise from trying to use configuration presets as user profiles l r...

Страница 94: ...security settings for the touch screen One such setting is the ability to use the touch screen It is therefore possible to apply a preset via the touch screen that effectively locks out any further use of the touch screen If this happens accidentally use the web interface to re enable the touch screen see Configure the touch screen 81 ...

Страница 95: ... RDATE l Configure a Local NTP Server l Configure the date and time manually Verify date and time via the touch screen Pearl s touch screen interface if enabled can quickly and easily show you the system s date and time settings To show system information including date and time on the touch screen 1 If the system information button i does not appear on the screen tap the screen once to turn on th...

Страница 96: ...o indicates whether the system is currently using synchronized or manually set time and whether or not a local network time protocol ntp server is running The following table describes the date and time configuration fields Table 17 Date and Time Options Label Description Options Time Zone The currently selected time zone Enable time syn chronization Whether or not a time synchronization protocol ...

Страница 97: ...e time synchronization radio button if it is not already selected 5 Choose one of the following choices from the Protocols drop down Table 18 Synchronized Time Options Label Description Options NTP Network Time Protocol NTP is used for clock synchronization over the internet There are many publicly available NTP servers you can use or your company may have its own NTP server For more information a...

Страница 98: ...dress 224 0 1 131 Alternative 3 PTP at multicast address 224 0 1 132 PTP uses UDP packets and ports 319 and 320 If the system is behind a firewall and accessing an external PTP server UDP packets must be permitted on ports 319 and 320 10 Click Apply Configure the date and time manually By default Pearl uses NTP for time synchronization If your system does not have access to a time synchronization ...

Страница 99: ...n mechanism See Connect to the admin interface 2 Login as admin 3 Select the Date and Time link in the Configuration menu the date and time configuration page opens 4 Select the new time zone from the Time Zone drop down box 5 Click Apply Configure a Local NTP Server Pearl can run a local NTP server To configure a local NTP server 1 Connect to the admin interface using your preferred connection me...

Страница 100: ... all the default capture and encoding settings or you tweak them to set the up exactly as you like You can capture a single source at once capture multiple sources in a custom channel or even switch between sources or groups of sources layouts while streaming and recording Techniques for creating channels to capture stream and record a single source to create custom channels with multiple sources ...

Страница 101: ...els can be streamed and recorded simultaneously Following the example above you could record any combination of those three channels and stream one two or all three of them using any available streaming methods In addition to creating multi source channels you can customize your channels by adding a images company information corporate colors and time stamps Pearl has a visual layout editor to hel...

Страница 102: ...els simply plug a source into one of the Row A inputs and if desired a second source into one of the Row B inputs The system automatically configures the channel s frame size to match the source resolution and calculates the best frame rate and bit rate In release 3 15 1 there is no audio automatically assigned to auto channels Add audio manually using the instructions Add an audio source custom c...

Страница 103: ...arl the following priority is used Priority Connector Type 1 HDMI 2 SDI 3 VGA The auto channel uses a source until the source has no signal then switches to the highest priority signal found For example if you attach SDI then VGA and TRS cables to Row A of your Pearl Auto A will show SDI and use SDI audio until such time as the SDI video signal is lost At that time Auto A switches to VGA video If ...

Страница 104: ...e 2 Login as admin 3 Scroll to the Channels section 4 Click Auto A or Auto B from the Channels section the channel s status page opens 5 Configure the channel as you would any other channel See below You can change the source used for the two auto channels by selecting a different source from the layout editor in the Sources page When you do this the channel name changes to reflect the new source ...

Страница 105: ...ons to configure encoding branding and CDN Streaming are described in separate procedures To create a simple channel 1 Connect to the admin interface using your preferred connection mechanism See Connect to the admin interface 2 Login as admin 3 Ensure a DVI HDMI VGA or SDI input source is connected to the device and you know the name of the source it is connected to If you re not sure see What is...

Страница 106: ...temto add a layer to the layout a drop down appears allowing you to choose the kind of item to add to your layout 8 Select Video Source from the drop down the new item is added to the layout and the Source settings box appears on the right side of the page 93 ...

Страница 107: ...ur source your source appears in the visual layout editor above 10 For best results keep the Keep aspect ratio when scaling checkbox checked in the Source settings box 11 Use the red and white source handles in the visual editor to stretch your image to the full size of the layout 94 ...

Страница 108: ...doesn t have a 16 9 aspect ratio the system automatically detects the correct aspect ratio and updates the layout after you leave and return to the layout editor screen This happens because the encoding page has the Use current signal resolution as frame size setting selected by default If you want to change the aspect ratio for your channel see Configure encoding There are a lot of creative thing...

Страница 109: ...screen If you re planning to do live switching with your channel we recommend you set the frame size to a fixed size instead of using the default automatic detection of source frame size Setting the frame size to a fixed value ensures you don t experience any stream interruptions if the source frame size changes due to layouts that contain a single source that has a different frame size than those...

Страница 110: ...ew layout within a channel to work with To add a new layout see Create a custom channel or layout To select a layout for editing 1 Connect to the admin interface using your preferred connection mechanism See Connect to the admin interface 2 Login as admin 3 Select your channel from the channels menu and click Sources for the channel 4 Select the layout you want to edit by clicking anywhere in the ...

Страница 111: ...e Visual channel layout editor Next is the channel layout editor where you can add pictures sources and text overlays to your layout You can also choose the background matte Note there is currently no way to change the order of items added we re working on it so you need to build from the bottom up First add a background image if you want to use one then your sources and lastly any text or picture...

Страница 112: ...the percent sign e g 4 or in pixels by typing a value followed by px e g 16px You can resize items by clicking and dragging the red and white circles at the corners of the items or by using the manual positioning values For example entering 0 in all four of the outside boxes will stretch the item to the full size of the layout area You can modify the settings for each item by clicking the row The ...

Страница 113: ...t without saving Pearl reminds you to save before leaving Ready to make some layouts of your own Try these topics l Create a custom channel or layout l Add a video source custom channel l Add an audio source custom channel l Add an image custom channel l Add a text overlay custom channel l Delete or move a layout custom channel l Set the background color custom channel l Rename a layout custom cha...

Страница 114: ...One source with a green background matte To get this look Select a background color Add a source to the layout and size appropriately leaving the background matte visible One source with a logo png with transparency in the bottom left corner To get this look Upload an image with transparency through the Branding Content page Follow the steps from the first example to add the source then add a pict...

Страница 115: ...e settings box and place it where desired One source with a background image To get this look Upload your backround image must have the right aspect ratio through the Branding Content page When creating the layout first add the picture and stretch it to the full screen Next follow the steps from the first example to add the source Two sources with a background image To get this look Follow the ste...

Страница 116: ...xamples this time including a 4x3 source Layout example Description One source at the full size of the channel Simple channel To get this look Add one source to the layout select keep aspect ratio and stretch to fit the full layout size Note the channel broadcasts in 4x3 if you have Use current signal resolution as frame size selected on the encoding page One 4x3 source in a 16x9 frame with a gree...

Страница 117: ...and position of the pictures sources and text overlays you add to your channel Use this procedure to help you create a new channel or layout then use the related procedures to add elements to your layout If you re planning to use live switching we strongly recommend you rename the channel rather than using the default channel name Rename a channel See the note at the bottom of this topic to avoid ...

Страница 118: ...tte Now that you ve created your layout you can start adding items to it See these topics l Add a video source custom channel l Add an audio source custom channel l Add an image custom channel l Add a text overlay custom channel l Delete or move a layout custom channel l Set the background color custom channel l Rename a layout custom channel Important note for channels with multiple layouts By de...

Страница 119: ...tom name Rename a channel This will ensure no automatic channel name changes Add a video source custom channel To stream a source you need to add it to a channel In the case of custom channels with layouts you can add one or more sources to the layout area You can add a source to a layout on an existing channel or you can create a new channel If you re not sure how to create a channel or a layout ...

Страница 120: ...rop down and select your source your source appears in the visual layout editor above 7 For best results select the Keep aspect ratio when scaling checkbox from the Source settings box 8 If desired select Crop from the Source settings box and use the red and white handles to draw a box around the section of the source you d like to have in the layout your cropped selection changes in the layout ar...

Страница 121: ...eded re order the items in your layout by clicking and dragging items in the item list under the Add new item link For example if you added your video source over a text overlay the video source could conceal the overlay To fix it drag the video source item below the text item in the list or vice versa 11 When your layout is complete scroll to the bottom of the page and click Save to save your wor...

Страница 122: ...right in the layout Changes are in increments of approximately 5 of the height or width of the layout area Make more refined movements by holding down the Ctrl key on your keyboard while pressing the up down left or right keys You can also hold the Shift key while using the arrow keys to control the size of the item on the layout Hold both Ctrl and Shift for fine grained size control Using percent...

Страница 123: ...channel To add an audio source to your layout 1 Connect to the admin interface using your preferred connection mechanism See Connect to the admin interface 2 Login as admin 3 Follow the steps in Custom channel layout editor or Create a custom channel or layout to get to the channel layout editor 4 Select the audio source s you want to add to your channel Sources are mixed at equal levels If you ha...

Страница 124: ...r channel frame size is set in the Encoding configuration page There are two ways to upload branding images You can upload images to the branding page as described in this procedure or you can drag and drop images using the procedure described in Add an image custom channel Note that using the procedure below is the only way to see whether or not you ll be overwriting an existing image To upload a...

Страница 125: ...formats are supported PNG and JPEG The maximum supported file size is 3840 2160 No warning or error message is displayed if your image is too large Files that exceed the maximum size do not appear in the drop down list when selecting an image 7 Click Open the file is added to the File template to upload field 8 Click Upload the file is uploaded and displayed in the Other files section 112 ...

Страница 126: ...custom channel layout and can be accomplished with the steps below You can add a picture to a layout on an existing channel or you can create a new channel If you re not sure how to create a channel or a layout start by reviewing the first few steps in the topic Custom channel layout editor or start with Create a simple channel To add a picture to your layout 1 Connect to the admin interface using...

Страница 127: ...x Note no warning is displayed if the image is too large or will replace another file 8 If you have already uploaded the image click the Use image drop down to select an image you have uploaded to the system 9 Your picture appears in the Picture settings preview and is added to the layout area It is selected for sizing and positioning If your uploaded image does not appear in the list ensure it do...

Страница 128: ...ea See the note below for more information on positioning techniques 12 If needed re order the items in your layout by clicking and dragging items in the item list under the Add new item link For example if you added your background image after adding a video source the background image conceals the video source To fix it drag the video source item above the background image item in the list or vi...

Страница 129: ...eyboard while dragging the item with the mouse To use the keyboard Use the arrow keys on the keyboard to move the item up down left or right in the layout Changes are in increments of approximately 5 of the height or width of the layout area Make more refined movements by holding down the Ctrl key on your keyboard while pressing the up down left or right keys You can also hold the Shift key while ...

Страница 130: ...l or you can create a new channel If you re not sure how to create a channel or a layout start by reviewing the first few steps in the topic Custom channel layout editor or start with Create a simple channel To add a picture to your layout 1 Connect to the admin interface using your preferred connection mechanism See Connect to the admin interface 2 Login as admin 3 Follow the steps in Custom chan...

Страница 131: ... default 9 In the layout area use the mouse or the manual position value fields to position and resize your text overlay You may first need to change the height of the text box handles before you can proceed with resizing or positoning See the note below for more information on positioning techniques 10 If needed re order the items in your layout by clicking and dragging items in the item list und...

Страница 132: ... k 08 minute M 40 second S 45 millisecond m 378 Other things you may want to add to your layout l Add a video source custom channel l Add an audio source custom channel l Add an image custom channel l Delete or move a layout custom channel l Set the background color custom channel l Rename a layout custom channel A note about item positioning and sizing There are four ways to position and size ite...

Страница 133: ...s Specify a whole number followed by a percent sign e g 4 in any of the manual positioning fields The image will move and resize to honor the space you specified For example to move the item in 12 from the left side of the layout area enter 12 in the bottom left positioning value square The image will resize to accomodate your change If you further enter 15 in the bottom right positioning value sq...

Страница 134: ...nd click Save to save your work Rename a layout custom channel Layouts you create are automatically given a default name the first one is Default You can keep these names or you can edit them to something more descriptive If you re using the touch screen for Live video mixing switching You can rename any layout even the currently active layout To rename a layout 1 Connect to the admin interface us...

Страница 135: ...so the order they are presented on the touch screen It s simple to re order layouts or erase layouts you re not using any more Reorder layouts To move a layout 1 Connect to the admin interface using your preferred connection mechanism See Connect to the admin interface 2 Login as admin 3 Follow the steps in Custom channel layout editor or Create a custom channel or layout to get to the channel lay...

Страница 136: ...d automatically based on the content in the channel When a channel has only one layout and that layout has only one source regardless of whether or not there are pictures or overlays in the layout the channel name is the same as the source name For example By default a channel with only layout that has only HDMI A in it will be named HDMI A When you add a second layout to a channel the channel nam...

Страница 137: ...or no image by using the drop down list in the Picture settings box within that channel s layout before deleting the file using the steps below 3 Click Branding Content under the Configuration menu the configuration page opens 4 Click Remove a confirmation dialog box opens 5 Click OK the dialog box closes and the image file is removed from the configuration page Configure encoding You can modify t...

Страница 138: ...ng options from the Codec drop down menu Value Description H 264 H 264 is the default value and provides high quality video while using low band width This is the preferred codec for the system Motion JPEG This is suitable for live streaming and video however may have low quality images while using high bandwidth Motion JPEG does not support audio MPEG 4 This may be suitable for presentations Prov...

Страница 139: ...tions particularly for high definition television application such as Blu ray disk storage format and HDTV broadcast service Video encoding profile and preset can be set only when the H 264 codec is selected 8 If all your changes are complete scroll to the bottom of the page and click Apply Configure frame size By default for channels with only one layout and when that layout has only one video so...

Страница 140: ...steps Using current signal resolution as the frame size only works for channel layouts with a single source If you re using multiple sources follow the steps below to set your frame size a Check the Use current signal resolution as the frame size check box Enabling this feature greys out the other frame size configuration fields The system automatically streams at the frame size of the input signa...

Страница 141: ...atte from the video 7 If all your changes are complete scroll to the bottom of the page and click Apply If you plan to use layout switching during a live stream it s best to choose a fixed layout size This avoids causing the stream restart due to frame size change when you switch between single source layouts that use frame sizes Fine tune stream settings Along with video audio codecs and frame si...

Страница 142: ...ey frame interval feature specifies how often a key frame a frame that contains all the pixels is sent when streaming the video This setting also impacts how quickly a video moves through the frames when a viewer uses the search function of their media player Increasing the number of seconds between key frames can significantly reduce your bandwidth and system resource usage with minor impact to y...

Страница 143: ...tandard definition DVD is usually 6 mbps If you don t know what value to use a good place to start is 5000 kbps slightly less than a typical DVD Test to see how this works for your viewers and adjust Configure audio codec If your channel sources included audio see Create a simple channel or Create a multi source channel your stream will be default use the AAC audio codec at 48 kHz You can modify t...

Страница 144: ...d sound will come through both the left and right channels If you have only one mono analog input use the left TRS jack and select mono encoding to have the same sound come from both the left and right channels If stereo sound is chosen the sound will only come through on the left channel 8 Select an Audio bitrate from the drop down menu The table at the end of this procedure gives some guidance o...

Страница 145: ... 48 kHz MP3 audio When selecting this value you ll need to use a media player or install ASF browser plugins to preview your channel PCM Pulse Code Modulation PCM is a standard for digital audio in computer and other devices such as digital telephone systems Most digital signals HDMI or SDI sources use 48 kHz audio Matching the encoded level with the source level provides the best sound quality by...

Страница 146: ...CM ü MPEG 4 MP3 ü MPEG 4 AAC ü MJPEG No audio codec ü The following table displays the compatibility between the video audio codecs and formats supported for recording Video Codec selected Audio Codec selected MP4 AVI MOV MPEG TS H 264 No audio codec ü ü ü ü H 264 PCM ü ü ü H 264 MP3 ü ü ü ü H 264 AAC ü ü ü ü MPEG 4 No audio codec ü ü ü MPEG 4 LPCM ü ü ü MPEG 4 MP3 ü ü ü MPEG 4 AAC ü ü ü MJPEG No ...

Страница 147: ... Add channel metadata l To remove metadata from a channel Add channel metadata Using the Branding feature you can apply a logo to your channel and specify the following meta data that the media player displays for your viewers l title of the presentation l company website l presenter s name l copyright date or other labels such as proprietary information preliminary etc and l additional informatio...

Страница 148: ...min interface using your preferred connection mechanism See Connect to the admin interface 2 Login as admin 3 From the web interface select a channel the menu expands 4 Click the Branding menu option the Branding configuration page opens 5 Scroll to the Content metadata section 6 Click the Author Copyright or Comments field 7 Highlight the text and press delete on the keyboard The field is empty 8...

Страница 149: ...fo from the Configuration menu option the information window opens 4 Scroll to the channel you want to preview 5 Click View the corresponding channel is displayed in the window Preview a channel from the Status page The channel s status page gives a wealth of information about the channel including bit rate frame size a snapshot of the channel and links to preview the channel To preview a channel ...

Страница 150: ...ng web page can be very large You may wish to be aware of your web browser s zoom hot keys Many browsers will zoom out with Ctrl control minus and zoom in with Ctrl control equals To preview all channels at the same time 1 Open a new browser window 2 Type the following string into the address bar of your web browser on your admin computer ipaddress is the IP address of your Pearl http ip address o...

Страница 151: ...tion 4 Click on the channel you want to rename the menu expands 5 Click any link for the channel the corresponding channel status or configuration page opens You can change a channel s name from any of it s configuration pages 3 Click the channel name at the top of the channel configuration page the name text becomes red to indicate that it is editable 4 Highlight the old name and press backspace ...

Страница 152: ... to delete the menu expands 3 Click Status the Status page opens displaying the service state and stream info for the channel 4 Click Delete this channel a confirmation dialog box appears to remind you that all recorded files for this channel will be removed You cannot undo this command 5 Click OK to continue or Cancel to stop If you proceed a message indicating that the channel was successfully d...

Страница 153: ...reated See Create a custom channel or layout Now on to the fun part There are two ways to perform live switching You can use either the web UI or the touch screen Switching mixing using the touch screen Switching live video inputs or video mixing is simple and intuitive using Pearl s touch screen Simply scroll to the channel you want to work on select the layout switching mode and apply the layout...

Страница 154: ... to display your layouts 5 Initially your live layout which is displayed on the right side is the same as your preview or on deck layout It appears in the list at the bottom with a green bar on the frame to show it is in preview Touch any other layout the touchscreen updates to show your new layout in preview 141 ...

Страница 155: ...any time or when you are done video mixing Switching mixing using the web UI Switching live video inputs or video mixing is fast and easy using the web UI For best results you may wish to be in a location where you can see the live action and have a solid understanding idea of what is in each of your layouts Good layout names can help with this See Rename a layout custom channel To do live video m...

Страница 156: ...red button in the rightmost column 5 Touch the empty circle for another layout to make it the active layout the layout changes in the live stream and recording and the new row gets the red button 6 Continue to switch layouts as needed for the duration of your event or recording 143 ...

Страница 157: ...ts row A or B and input type SDI HDMI or VGA For example the SDI input from row A is labeled SDI A Input sources display their captured images at the bottom their respective source page It is a good practice to view the images from each source to confirm what is captured See below When a source is connected the system automatically detects and adjusts the image capture settings at start up and con...

Страница 158: ...ect sources to Pearl at any time either before or after the system is powered on Similarly you can disconnect a source from a port and even connect a different source at any time Changing the source connected to a port that is being streamed or recorded can result in the recording stopping or the stream frame size changing depending on how your channel is configured If the frame size changes viewe...

Страница 159: ...o the admin interface 2 Login as admin 3 Ensure a source is connected to the input port see Table Preview a source 4 From the web interface click the source name from the Sources menu the source configuration page opens 5 Scroll to the bottom of the source configuration page to see the preview Configure a source Generally the captured stream doesn t require any additional configuration but if need...

Страница 160: ...name of the source or optionally change the source name to reflect the data it is capturing You ll need to know this name to add the source to a channel See Create a simple channel 8 In most cases the video is ready to add to a channel and broadcast If fine adjustments are required refer to the table below to make minor configuration changes The only configurable item for SDI and HDMI sources is r...

Страница 161: ...r down on the screen The values range from 20 moves the image up to 20 moves the image down Horizontal shift When an image is not aligned in the window use this feature to move an image left or right on the screen The values range from 999 moves the image to the left to 999 moves the image to the right Phase Specifies phase adjustments for VGA signals Generally not used unless value is provided by...

Страница 162: ...torted or stretched Configurable for VGA sources only HSync threshold Adjust horizontal sync detection VSync threshold Adjust vertical sync detection Rotate This feature is useful when a source captures video that is rotated 90 or is displayed upside down Choose one of the following values to change the video orientation while streaming l No rotation l 90 clockwise l 90 counter clockwise l 180 SDI...

Страница 163: ...elpful to configure the source name to match the data it s capturing so it s clear what the channel is capturing too Alternately you can change the channel s name See Rename a channel To change a source name 1 Connect to the admin interface using your preferred connection mechanism See Connect to the admin interface 2 Login as admin 3 From the web interface scroll to the Sources menu option 4 Clic...

Страница 164: ...d connection method See Connect to the admin interface 3 Login as admin 4 From the web interface scroll the Sources section 5 Select an audio source the audio configuration page opens 6 For Analog audio sources TRS select the Input source from the drop down menu Choose Line default setting unbalanced audio to capture system audio or choose Balanced to capture audio from a microphone or other balan...

Страница 165: ...left corner of the channel preview You may need to touch the screen once to turn on decorations before you can see the audio meter If the channel has stereo audio the meter is split horizontally into two bars The top bar is the left channel and the bottom bar is the right channel VU Meter mono audio VU Meter stereo audio To confirm audio signal through the touch screen 1 If needed touch the screen...

Страница 166: ...specific EDID l Unstretch the output video l Video not centered VGA sources only l Remove the combing effect on images l Video looks squished VGA sources only l Video too bright too dark or washed out VGA sources only Remove black bars matte from the video By default for channels with only one layout and only one source Pearl makes sure that the aspect ratio of input signals is preserved when the ...

Страница 167: ...ect ratio of the input 2 Stretch the image to fit the output frame size aspect ratio These two options are described below Match the output frame size to the aspect ratio of the source signal The frame size is matched only for layouts that have only one source Note that if you have layouts with different frame sizes switching them while live streaming will cause an interruption and restart of the ...

Страница 168: ...ze parameter 10 The simplest option is to select Use current signal resolution as frame size and click Apply You can alternatively select it briefly to note the current video signal resolution then deselect it and follow the steps below 11 Look for the source aspect ratio in the list of aspect ratios provided a If the source resolution is on the list choose another resolution on the same line i e ...

Страница 169: ...ta provided by a video display device usually a monitor to describe its capabilities to a video source usually a graphics or video output card in a PC or another device The video source uses the EDID to determine the capabilities of the monitor to determine the resolution color depth and other settings that the monitor can support EDID is crucial for DVI sources but mostly ignored by VGA sources L...

Страница 170: ...il you replace them with another EDID or specifically choose to restore the facotry EDID for a given source Not even a system level factory reset removes the configured EDIDs 1 To download a new EDID file go to the Epiphan support web page The support page opens 2 Select the support page for Pearl 3 Scroll to the EDID section 4 Click on an EDID from the list The file is saved to your downloads fol...

Страница 171: ...ure card in the Sources list to the default EDID Currently there is no way to tell if your capture card is using a custom EDID If you are unsure restoring to factory default is the best approach To restore the default EDID 1 Connect to the admin interface using your preferred connection mechanism See Connect to the admin interface 2 Login as admin 3 From the web interface scroll to the Sources sec...

Страница 172: ...aspect ratio of input signals is preserved when the output is streamed If this default was overridden the image is stretched to match the output frame size The effect may be subtle and may not be problematic for you but if you want to resolve this it is very simple to do To preserve the source aspect ratio 1 Connect to the admin interface using your preferred connection mechanism See Connect to th...

Страница 173: ...eep aspect ratio when scaling is selected 8 Scroll to the bottom of the page and click Save Unstretching the image causes a matte black bars to appear on the sides or top and bottom of the output To remove these see Remove black bars matte from the video Video not centered VGA sources only The image from the source is displayed too high or low or too far to the left or right 1 Connect to the admin...

Страница 174: ... change to confirm the results 9 To move the video up or down scroll to Vertical shift 10 Enter incremental values to shift the video image down use a negative value or up use a positive value 11 Click Apply View the output in the Snapshot preview below You may need to make further adjustments to move the video up or down Remove the combing effect on images When frames are interlaced artifacts fro...

Страница 175: ...rces only The image is squeezed horizontally on the screen This distortion occurs when there s a mismatch between the aspect ratio Pearl detects and the aspect ratio that is sent from the source signal To compare the two signal values you must know the aspect ratio that the source is sending 1 Connect to the admin interface using your preferred connection mechanism See Connect to the admin interfa...

Страница 176: ...der than what is being displayed in the preview or Live View 11 Click Apply View the output in the Snapshot preview below Video too bright too dark or washed out VGA sources only If the video from the source is too light too dark or washed out use the offset and gain controls together to optimize image quality Increasing the gain amplifies weak signals but also increases noise you must balance off...

Страница 177: ...ge opens 5 Scroll to Gain 6 Enter a small value for example 1 to 25 in the field to brighten the image 7 Scroll to Offset 8 Enter a small value for example 1 to 15 to balance the gain setting The Offset value behaves as a contrast to the Gain value 9 Click Apply View the output in the Snapshot preview below You may need to make further adjustments to fine tune the brightness and contrast 164 ...

Страница 178: ...s to multiple users and devices such as web browsers media players set top boxes Smart TVs and Content Distribution Networks The tool s flexibility is further enhanced by its ability to support standard codecs used by most sharing destinations and media players This section discusses the following topics related to publishing your content l Stream l Samples of stream settings ...

Страница 179: ...nd enable streams for viewers o Restrict access to streams for viewers o Stream content using HTTP or RTSP o Configure HTTP and RTSP streaming ports o Stream content using HLS HTTP Live Streaming o Stream content using UPnP Stream to a server o Stream to a server o What is streaming o What is streaming Stream to a media player o Stream to a media player Choose a streaming option Each method of str...

Страница 180: ...ormats When you set up your channel the system generates and displays a list of available video formats and standards specific to the selected audio and video codecs used by your channel To view the video formats and standards specific to your selected codec 1 Connect to the admin interface using your preferred connection mechanism See Connect to the admin interface 2 Login as admin 3 From the web...

Страница 181: ...it has power and a configured channel No other settings are required Your audience need only copy and paste the URL of the stream into a media player For more information about using a RTSP and HTTP streaming refer to Stream content using HTTP or RTSP HTTP Live Streaming HLS Stream live over the standard HTTP port 80 making it possible to cross firewalls and proxies that are normally accessible to...

Страница 182: ... the serial number of the system and channel number is the provided from the GUI see below IP address http IP Address of Pearl preview cgi channel 2 rtsp IP Address of Pearl port stream sdp Where the IP address is the IP address of the system and the port and channel number informationis provided on the channel s status page To retrieve the stream URL for your viewers 1 Connect to the admin interf...

Страница 183: ...ng ports For RTSP streaming the only information required to view the broadcast is the URL and the port number used to stream the broadcast Port numbers are also used for HTTP streaming methods such as FLV ASF and MPEG TS By default each channel has a unique HTTP and RTSP port number If needed you can modify these port numbers Be sure to always use unique numbers for each channel To set the HTTP a...

Страница 184: ...re streaming live video via RTSP This value along with the URL is used by viewers to access the broadcast The default for channel one is 554 7 Click Apply Stream content using HLS HTTP Live Streaming Stream live over the standard HTTP port 80 making it possible to cross firewalls and proxies that are normally accessible to other HTTP traffic HLS is supported with the H 264 codec and MP3 or AAC aud...

Страница 185: ... channel The status page opens 8 Provide the HLS stream link to your viewers Send stream URLs to viewers For participants to log in and view a stream you must provide a stream URL The URL that you send depends on the device the participant uses to view the stream You can provide separate URLs for the stream coming from each channel or one URL that includes all the streams for the channel 1 Connect...

Страница 186: ...on compatibility between codec and file formats see Send stream URLs to viewers 5 Copy the URL and provide to viewers Based on their media player viewers can access the broadcast using a URL specific to their media player Viewers may now view the stream using a digital media player or browser See Viewing with a web browser and Viewing with a media player RTSP View the Flash stream There are two me...

Страница 187: ...m the web interface click Info menu option the info window opens with a list of all configured channels 4 Click on the channel you want to preview A page opens displaying the live broadcast and broadcast URL 5 Copy the URL and provide to viewers Based on their media player viewers can access the broadcast using a URL specific to their media player View your broadcast using the Live broadcast link ...

Страница 188: ...eam URL 5 When HTTP live streaming for the channel is enabled the status page also shows the HTTP Live Streaming link See Stream content using HLS HTTP Live Streaming When HLS is enabled and with no viewer password set viewers can access the stream using a tablet or smart phone device 6 Click on the Live broadcast or HTTP Live Stream link if it configured The window opens displaying the live broad...

Страница 189: ...8 kHz audio flash streaming which is used for browser viewing may not work In this case we recommend you view the channel with a media player instead See below 1 Open a web browser 2 Enter the IP address of the broadcast stream refer to the example below To locate the IP address for the broadcast refer to Viewing with a web browser If the IP address of the broadcast is 172 20 1 33 then browse to h...

Страница 190: ...word to log in along with the IP address or the URL to be copied to the media player For example purposes the following procedure describes the steps using a VLC media player 1 Launch a media player 2 Click the Media tab a drop down menu opens 3 Choose Open Network Stream a dialog box opens 4 Enter the stream URL rtsp 49E7B8E4 local 554 stream sdp 177 ...

Страница 191: ...ream URL You can choose to disable streaming to viewers through the channel s streaming configuration Disabling streams for viewers disables all viewer formats including HTTP RTSP HLS and UPnP To disable or enable streams for viewers 1 Connect to the admin interface using your preferred connection mechanism See Connect to the admin interface 2 Login as admin 3 From the web interface click Streamin...

Страница 192: ...or viewer authentication the viewer must pass global autentication using LADAP credentials or the viewer global password if there is one and must meet the local channel settings come from an allowed IP address See User administration for more information on LDAP configuration To restrict viewers for a channel 1 Connect to the admin interface using your preferred connection mechanism See Connect to...

Страница 193: ...e fields blank 3 If desired specify allow and deny IPs for viewers of this channel See Restrict viewers by IP address for more information about allow and deny lists 4 Click Apply at the bottom of the page To return a channel to the default global access control settings 1 Connect to the admin interface using your preferred connection mechanism See Connect to the admin interface 2 Login as admin 3...

Страница 194: ...eating allow deny lists refer to the examples below this procedure for assistance with crafting your lists To restrict viewers by IP address 1 Connect to the admin interface using your preferred connection mechanism See Connect to the admin interface 2 Login as admin 3 Select the Access passwords link in the Configuration menu the password configuration page opens 4 Type allowed IP addresses or ad...

Страница 195: ...n exception to a rule in the allow list Deny IP s Enter individual IP Addresses or IP Address ranges separated by commas To specify a range use a hyphen Optional spaces improve readability Users connecting from addresses in this list are not allowed to view broadcasts from the system unless their IP address is in the Allow IP s list If a specific IP address is in both lists access to the stream is...

Страница 196: ... also want to add the desktop laptop and tablet computers of the CEO IP addresses 192 168 1 50 192 168 1 51 and 192 168 1 75 respectively Note the first two IP addresses are consecutive so they can be added as a second range Add these IP addresses to the list as follows Allow 192 168 1 200 192 168 1 250 192 168 1 50 192 168 1 51 192 168 1 75 Your list can have multiple ranges and multiple distinct...

Страница 197: ...rovided they are separated by commas Deny List with a Range of IP Addresses Converse to the previous examples consider the situation where you want every computer on the network to access the broadcast with the exception of the CEO s desktop laptop and tablet computers Additionally boardroom computers should not be permitted with the exception of the cafeteria computer IP address 192 168 1 222 The...

Страница 198: ...content allows you to reach a large geographically diverse audience and because CDNs perform format conversion the stream is platform independent For more information about streaming to a CDN see Stream to a server The following options are available to stream video to a CDN Epiphan TV test your video stream using Epiphan s portal using RTSP announce stream live video to a content delivery network...

Страница 199: ...ideo when unicast or multicast streaming is used Each viewer retrieves an SDP file SDP files can be stored on a streaming server or opened by a media player For multicast the destination address is where the broadcast can be viewed l MPEG TS UDP transport standard is used to stream MPEG 4 video when unicast or multicast streaming is used Each viewer retrieves a UDP address to add to their media pl...

Страница 200: ...ed here http epiphan tv cdn partners php Contact your CDN for a list of supported audio codecs and ensure your Encoding configuration uses one of the supported codecs To publish content to a CDN provider ensure you have l a path to the mount point or an XML configuration file provided by the CDN provider l verify which transport protocols your CDN supports l a current flash player and l select the...

Страница 201: ...p down menu 5 Enter the ingestion point url provided by the CDN or media server 6 Check the Use TCP for RTP stream checkbox Verify which transport protocols your CDN provider supports 7 Enter a user name and password 8 The CDN provider assigns a user name and password to authenticate the publisher Contact the CDN provider for your log in credentials 9 Click Apply To stream content to a CDN using R...

Страница 202: ...Enter the CDN user name and password The CDN provider assigns a user name and password to authenticate the publisher Contact the CDN provider for your log in credentials 6 Click Apply Stream to a CDN using an XML profile 1 Connect to the admin interface using your preferred connection mechanism See Connect to the admin interface 2 Login as admin 3 From the web interface click a Channel the menu ex...

Страница 203: ... via Wowza Cloud you first need to sign in to the Wowza Streaming Cloud web site and create a new Live Stream Retain the connection code that is provided upon applying the configuration settings this code is required to complete the streaming set up process 1 Connect to the admin interface using your preferred connection mechanism See Connect to the admin interface 2 Login as admin 3 From the web ...

Страница 204: ...64 Configuring audio is optional Supported formats are limited to MP3 and AAC Due to RTMP restrictions MP3 48 kHz is not supported 6 Click Apply 7 Under the selected channel click Streaming the channel s Streaming page opens 8 Click the Publish drop down menu 9 Select to Wowza Cloud from the drop down list 191 ...

Страница 205: ...ion code field 11 Click Set to pair the channel on Epiphan s encoder with the live stream on Wowza Cloud 12 Click Apply When the connection to Wowza Cloud has been established the stream name appears on the channel s Status page After clicking Apply there may be a short 2 3 minute delay before the live stream is displayed 192 ...

Страница 206: ...erred connection mechanism See Connect to the admin interface 2 Login as admin 3 From the web interface click a Channel the menu expands 4 Click Encoding the channel s Encoding page opens 5 Configure Encoding settings accordingly ensuring the Codec selected is H 264 Configuring audio is optional Supported formats are limited to MP3 and AAC Due to RTMP restrictions MP3 48 kHz is not supported 6 Cli...

Страница 207: ...established the stream name appears on the channel s Status page similar to this example from wowza streaming cloud After clicking Apply there may be a short 2 3 minute delay before the live stream is displayed Test using Epiphan TV CDN Epiphan tv is a service provided by Epiphan to help our customers to experiment with content distribution networks bandwidth performance limits and viewer limits a...

Страница 208: ... the channel s Streaming page opens 5 Scroll to the Stream to a server section of the page 6 Click the Publish drop down menu 7 Choose to serial Epiphan tv Where serial is the serial number of the system 8 Click Apply a connection through the media tunnel is established The system streams to the Epiphan s portal epiphan net You must set audio format to MP3 when streaming through epiphan net see Co...

Страница 209: ...erred connection mechanism See Connect to the admin interface 2 Login as admin 3 From the web interface click a Channel the menu expands 4 Click Streaming the channel s Streaming page opens 3 Click the link to view the broadcast 4 A web page opens displaying the broadcast Specify a multimedia player to view your Epiphan TV broadcast 1 From the Epiphan TV portal click Switch To on the bottom of the...

Страница 210: ...ns displaying the code 3 Highlight and right click on the code in the dialog box A drop down menu appears 4 Choose Copy 5 Paste the content into the HTML code for your website A link to your broadcast on Epiphan TV is added to your web page Retrieve a list of addresses based on video stream encapsulation 1 Go to the Epiphan TV portal 2 Click Direct URLs on the bottom of the screen a dialog box ope...

Страница 211: ...To configure your channel for MPEG TS using RTP UDP push 1 Connect to the admin interface using your preferred connection mechanism See Connect to the admin interface 2 Login as admin 3 From the web interface click a Channel the menu expands 4 Click Streaming the channel s Streaming page opens 5 Click the Publish drop down menu 6 Choose using MPEG TS RTP UDP push 7 Enter the destination multicast ...

Страница 212: ...roup name Since media players simply present a list of available streams you can organize your streams into multiple folders or in cases where folders are not displayed use dot separator hierarchy to help your viewers filter out unwanted streams by category 14 Click Apply 15 Click the Info menu option of the web interface An Info page opens displaying stream information To view the stream from a m...

Страница 213: ...our System Administrator for the specific address to use 8 Enter the destination port number through which the media will stream 9 Perform one of the following a If you do not want to advertise your stream to a media player over a local network go to the last step of this procedure or b To advertise your stream to a media player over a local network follow the steps below 10 Enable the SAP announc...

Страница 214: ... name Since media players simply present a list of available streams you can organize your streams into multiple folders or in cases where folders are not displayed use dot separator hierarchy to help your viewers filter out unwanted streams by category 14 Click Apply To view the stream open the URL in a media player for example udp ip port For example udp 226 10 24 32 7000 To view the stream when...

Страница 215: ...umber through which the video will stream Audio and video use nearby port numbers port number and port number 2 The minimum distance between audio and video ports must be 2 8 Click Apply an SDP file is generated and available from the Status page of the web interface 9 Select a name and location for the SDP file and save it 10 Share the link to the file with viewers 202 ...

Страница 216: ...ide of your LAN use a CDN or configure port forwarding on your router Refer to your Network Administrator network configuration is beyond the scope of this guide Stream content using multicast A multicast stream consists of one stream distributed to many viewers via a multicast capable network Pearl supports the following multicast streaming options l Using RTP UDP push l Using MPEG TS UDP push l ...

Страница 217: ...able the SAP announcement checkbox to advertise your stream over a local network When the checkbox is enabled and a multicast IP address is configured your stream is displayed in the playlist of local media player 11 Enter a multicast IP address in the SAP announcement IP field If your media player is configured to receive multicast streams from an IP address that is different from the default add...

Страница 218: ...ia player set top box or Smart TV refer to Viewing with Session Announcement Protocol SAP MPEG TS streams using UDP push Before configuring your channel for the MPEG TS streaming ensure the following codecs are configured l Video H 264 l Audio MP3 or AAC if audio is configured To configure MPEG TS with UDP push 1 Connect to the admin interface using your preferred connection mechanism See Connect ...

Страница 219: ... to a media player over a local network follow the steps below 10 Enable the SAP announcement checkbox to advertise your stream over a local network When the checkbox is enabled and a multicast IP address is configured your stream is displayed in the playlist of local media players 11 Enter a multicast IP address in the SAP announcement IP field If your media player is configured to receive multic...

Страница 220: ...t unwanted streams by category 14 Click Apply To view the stream open the URL in a media player for example udp ip port For example udp 226 10 24 32 7000 To view the stream when SAP announce has been set and the stream is advertised from a media player set top box or Smart TV refer to Viewing with SAP Announce Multicast streaming using RTP UDP 1 Connect to the admin interface using your preferred ...

Страница 221: ...e file with viewers Viewing with Session Announcement Protocol SAP When SAP Announce is configured for a stream that uses UDP streaming the stream is advertised over the local network Local viewers can view the stream using a software or hardware media player Viewers are presented with a list of available channels similar to a television menu Viewers need only click on a stream and the video is st...

Страница 222: ...f your audience is using Exterity to view your stream you must change the SAP announcement IP address to 239 255 255 255 4 Launch a media player The following steps are based on a VLC media player and may be different for other media players 5 Click View from the menu a drop down menu opens 6 Select Playlist A Playlist window opens The right hand panel indicates the playlist is empty 7 From the si...

Страница 223: ...r l Auto restart playback to a UPnP device l Change UPnP device name Some players will not be able to access the stream or saved recordings if a view password is set If needed see User administration to clear the viewer password The topics in this chapter include how to enable and disable UPnP and how to control media players from Pearl To choose recordings or live streams from your media player s...

Страница 224: ...he Server name field If no name is provided the server name will be the system s serial number 5 Select whether you want to share live video and recorded files 6 Click Apply 7 If no live stream is available that meets the criteria for UPnP a message is displayed in the Play on service start section of the page 8 Otherwise the Play on service start section shows a drop down list of what can be stre...

Страница 225: ...lick Recording for the desired channel the channel s recording page opens b Click the word change next to the list of what is being recorded the recording options expand c Click the Share via UPnP check box if not checked d Click Apply 3 For recorders a Click the link for the recorder from the Recorders menu the recorder s configuration page opens b Click the word change next to the list of what i...

Страница 226: ...red channel the Streaming page opens b Deselect the Share via UPnP check box if checked c Click Apply 2 For recorders a Click the link for the recorder from the Recorders menu b Click the word change next to the list of what is being recorded the recording options expand a Deselect the Share via UPnP check box if not checked b Click Apply To disable UPnP globally for the whole system 1 Connect to ...

Страница 227: ...d by the server name you set or it s product serial number For example when browsing from a Windows computer you will see a list of media devices that includes Pearl Live Streams When you open the device from Windows Media Player you ll see a list of the available channels you can stream under the Videos tab From other digital media players the channel list can be under a Live Streams folder With ...

Страница 228: ...ct to the admin interface 2 Login as admin 3 Ensure Share recorded files through UPnP is enabled on your Pearl and for the channel or recorder you wish to share See Play directly to a media player 4 Go to the recorded files list for the desired channel or recorder See Recorded files 5 From the list of files select the file you want to play and click on the Play To icon for the file a list of visib...

Страница 229: ...ed for auto play The channel s UPnP configuration must be enabled for it to appear Change UPnP device name You can configure the UPnP server name that appears for your Pearl By default if you left the server name field blank when enabling UPnP the server name is the system s serial number To change the UPnP server name 1 Connect to the admin interface using your preferred connection mechanism See ...

Страница 230: ...ng tables list the recommended settings when streaming video and slide content from a PC Mac or tablet Streaming video content The table below provides suggested settings to maximize your video quality while minimizing system resource usage when streaming video content from a PC Mac or tablet Setting PC and Mac Tablet Codec H 264 Motion JPEG Video encoding preset High Speed Video encoding profile ...

Страница 231: ...rce usage when streaming slide content from a PC Mac or tablet Setting PC and Mac Tablet Codec H 264 Motion JPEG Video encoding preset High Quality Video encoding profile High Enhanced compatibility mode h 264 slicing for RTP Disable for PC Enable for Mac Key frame interval 2 sec Limit frame rate 15 15 Bitrate auto Rate control mode Balanced Audio format PCM 44 KHz 218 ...

Страница 232: ...ach input at full frame size and with a high bitrate so you have the best possible digital media for future re use or post processing If you choose to record your channels Pearl stores the recorded files on the system s amply sized hard drive and provides you a variety of automatic or manual mechanisms to download the files This section discusses the following topics related to recording l What is...

Страница 233: ...ol is easily performed through the Web admin interface but can also be set up for third party tools using our APIs See Control with HTTP commands and Control with RS 232 serial port for information on controlling recordings with third party tools See Recorded files to learn how to download the recorded files Recording can also be controlled via the tablet interface See Control recording via the ta...

Страница 234: ... QuickTime 10 3 for streams less than 1080p l VLC 1 0 0 for all streams Windows l QuickTime 7 6 6 l VLC 2 1 5 l Windows Media player 12 except MOV files Linux l MPlayer l VLC 2 0 8 Android l DICE 2 0 21 l VLC 0 9 9 works only with MOV files that have no audio HTML 5 Browsers Win dows l Google Chrome 37 works with MOV and MP4 files using H 264 codec Record a channel via the web interface Each chann...

Страница 235: ...ing starts and a timer indicates how long it has been recording If the start button is not active there are no active sources for this channel or recorder Check your inputs to ensure signals are working as expected b You may browse away from the page without affecting the recording When the page refreshes the channel number is displayed in red to indicate recording is underway 222 ...

Страница 236: ... the channel configuration See Record a channel via the web interface 6 To Stop Recording a Click the Stop button on the given channel s Recording page The channel number changes to black next time the web interface is refreshed by clicking a link or refreshing the page Record a channel via the touch screen Pearl s touch screen gives you freedom to start and stop recording without needing to log i...

Страница 237: ...trol recording the screen displays the channel 3 If necessary tap the screen once to display controls on the channel view 4 Touch the red record button at the top right of the screen recording starts and a timer is displayed to show the length of the recording To stop recording 1 If necessary tap the screen once to turn it on 2 If the grid view is showing tap the channel for which you wish to cont...

Страница 238: ...ng configuration 1 Connect to the admin interface using your preferred connection mechanism See Connect to the admin interface 2 Login as admin 3 For a channel recording a Click the desired channel the channel menu expands b Click the Recording link for the channel the Recording page opens 4 For a recorder a Click the desired recorder link from the Recorders section the recorder configuration page...

Страница 239: ...system waits before the recording file is saved and a new one is started assuming the size limit has not yet been reached Values range from 5 minutes to six hours Size limit Specifies the file size a recording can become before it is saved and a new one is started assuming the time limit has not yet been reached Values range from 50 MB to 64 GB File type Specifies the recording file type Select fr...

Страница 240: ...m time to time you may need to close the current recording and restart a new one to facilitate file downloads The system supports this through the recording reset option which closes the current recording file and opens a new one without missing any frames To close the current recording and start a new file 1 Connect to the admin interface using your preferred connection mechanism See Connect to t...

Страница 241: ...face This section describes the following topics for creating and managing multi channel recorders l Add a recorder l Change the channels recorded by a recorder l Record with a recorder l Rename a recorder l Delete a recorder See What is a recording to learn how to create recordings and configure recording file sizes Add a recorder Each channel has its own built in recorder that is accessible from...

Страница 242: ...e you can edit the channels recorded by a recorder To change the channels recorded by a recorder 1 Connect to the admin interface using your preferred connection mechanism See Connect to the admin interface 2 Login as admin 3 Select the desired recorder link from the Recorders section the recorder configuration page opens 4 Click change next to the list of what is currently being recorded 5 If the...

Страница 243: ... Recorders are stopped and started via their configuration page Multiple recorders and channel recordings can occur concurrently The number of channels being recorded is displayed below the recording stop start buttons To configure the channels being recorded see Change the channels recorded by a recorder To start and stop recorder 1 Connect to the admin interface using your preferred connection m...

Страница 244: ...ge without affecting the recording When the page refreshes the recorder number is displayed in red to indicate recording is underway c The system continues to record this recorder and any concurrent recordings until it is stopped If the system runs out of storage space the oldest recorded file is deleted to make room for the new recording The recording is broken into multiple files as defined by t...

Страница 245: ...name recordings 1 Connect to the admin interface using your preferred connection mechanism See Connect to the admin interface 2 Login as admin 3 Find the recordings by channel or by recorder See Rename recorded files 4 Select the pencil and paper icon next to the filename you wish to change 5 Type the new file name and press enter when finished The web interface keeps track of the filename extensi...

Страница 246: ...on to the right of a file entry to request deletion a confirmation dialog appears b Click OK on the confirmation dialog 5 To delete multiple files for the current channel or recorder a Select the check box next to the recordings you wish to delete from this channel or recorder b Click Delete Selected a confirmation dialog appears c Click OK on the confirmation dialog The list may not update immedi...

Страница 247: ...Pearl User Guide Delete recorded files manually The list may not update immediately You can refresh the list by reloading the Recording page for channels or the recorder settings page for recorders 234 ...

Страница 248: ...act tracks from a recording l Rename recorded files l Delete recorded files manually For information on automatic file transfers see File and recording transfer View list of recorded files Recordings for Pearl are stored for each channel and each recorder separately To view all the recordings stored follow the procedures below for all channels and all recorders you have configured To view the reco...

Страница 249: ...Recordings can be manually downloaded from the web interface You should consider deleting them from internal storage after you complete the download See Download recorded files manually below This procedure explains how to download files to your admin computer See File and recording transfer for information on transferring files to a USB drive connected to the system To download recordings to your...

Страница 250: ...lti track file If desired you can create a copy of a recording with only select tracks This feature is supported for AVI MP4 and MOV recordings only Specific track versions of recorded files are not included in any automatic file transfers See Extract tracks from a recording To create a duplicate recording file with only select tracks 1 Connect to the admin interface using your preferred connectio...

Страница 251: ...ect the track s you want to extract Tip To deselect all tracks click the check box for the top track then hold SHIFT and click the check box for the bottom track 6 Click Extract tracks a duplicate of the recording is made with only the selected tracks 238 ...

Страница 252: ...onnection mechanism See Connect to the admin interface 2 Login as admin 3 Find the recordings by channel or by recorder See Rename recorded files 4 Select the pencil and paper icon next to the filename you wish to change 5 Type the new file name and press enter when finished The web interface keeps track of the filename extension i e avi so you do not need to include it when renaming the file Dele...

Страница 253: ... the current channel or recorder a Select the check box next to the recordings you wish to delete from this channel or recorder b Click Delete Selected a confirmation dialog appears c Click OK on the confirmation dialog The list may not update immediately You can refresh the list by reloading the Recording page for channels or the recorder settings page for recorders 6 To delete all files for the ...

Страница 254: ...FU And the following specific configurations based on the location of upload l AFU to an FTP server l AFU using RSync l AFU using CIFS l AFU to a secure FTP server l AFU using SCP l AFU or copy to USB drive l Automatic l As a one time copy l Manually Lastly this section describes how to view file upload logs and manage the AFU queue l View the AFU log l Manage the AFU queue Automatic file upload A...

Страница 255: ...or recorder you wish to include in your automatic file transfers If recorded files are selected for upload while the AFU is at maximum upload capacity or when the AFU is unavailable they are added to an upload queue Files and their relevant information are displayed in a list format and each file will be uploaded when upload capacity becomes available Choose files to include in AFU When configurin...

Страница 256: ...e recorder setup section expands The setup page looks slightly different for Recorders but the options are the same 6 Check the Automatic file upload check box 7 Click Apply the Recording page is refreshed and the new settings are reflected Now that AFU is enabled for your desired set of files enable AFU and configure your desired mechanism Enable and set timing for AFU After configuring the chann...

Страница 257: ...e that AFU is enabled for at least one channel or recorder return to Enable and set timing for AFU 4 Select the Enable Automatic File Upload checkbox 5 Specify how often automatic updates should happen The first transfer occurs after the specified amount of time expires or after the current file completes recording I e if the value is set to every hour and five videos are saved the first hour thos...

Страница 258: ...ver or USB drive the file transfer fails 7 If desired check Remove after upload to have the files deleted from local storage when upload completes 8 If desired check Mark file as downloaded to have the color of the file link in the recording list change to show the files are downloaded This only applies if the files are not deleted after upload is complete 9 Select the protocol or destination for ...

Страница 259: ...you have completed the steps in Enable and set timing for AFU and wish to continue with configuration of upload to an FTP Server To configure upload to an FTP server 1 Select FTP Client from the protocol drop down list in the Automatic File Upload configuration page the lower half of the page reflects the selection 2 Specify the target Server address If your system is configured with DHCP or has a...

Страница 260: ...ons Name Description Options Server address The IP address or fully qualified domain name of the FTP server Server port The port used by the target FTP server Standard port is 21 Login Username for the FTP server Password Password for the FTP user Use temp file Causes files to be named with part extension on the server during active upload When the upload completes the file is renamed to the appro...

Страница 261: ...cksum check box to add a checksum validation to the transfer between the system and the recipient server 7 Click Apply if there are any problems the system notifies you with a message One or more parameter values are not valid and those were not applied The following table describes the options applicable to configuring upload to an RSync server Table 29 RSync Automatic File Upload Configuration O...

Страница 262: ...stead of the IP address 3 Enter the target Server port if you have configured the server to use something non standard Leave this value blank to use the default port 4 Specify the Server share This is the CIFS share name or the name of the shared folder on the server If needed request this value from the network administrator 5 If the system is in a different domain than the server or if it is par...

Страница 263: ...r on the CIFS server Domain The CIFS server s Windows domain or Work Group name Needed if the server is part of Active Directory or a Domain Controller Login Username for the CIFS server Password Password for the CIFS user Use temp file Causes files to be named with part extension on the server during active upload When the upload completes the file is renamed to the appropriate extension mov mp4 ...

Страница 264: ... for authentication 6 Select Use temp file to name files with a temporary filename extension part on the server until upload is complete For secure file transfer you can upload an SSH identity for your Pearl This key must be trusted by the destination server Details for generating the key and setting up this trust are beyond the scope of this document 7 If desired scroll down to the section labell...

Страница 265: ...ualified domain name of the SFTP server Server port The port used by the target SFTP server Standard port is 22 Login Username for the SFTP server Password Password for the SFTP user Use temp file Causes files to be named with part extension on the server during active upload When the upload completes the file is renamed to the appropriate extension mov mp4 or avi AFU using SCP This procedure assu...

Страница 266: ...uthentication For secure copy you can upload an SSH identity for your Pearl This key must be trusted by the destination server Details for generating the key and setting up this trust are beyond the scope of this document 6 If desired scroll down to the section labelled SSH identity for SCP and SFTP clients 1 If no identity is uploaded or to upload a new identity overwrites the old identity a Clic...

Страница 267: ...equipped with USB ports that can be used to copy files from internal storage to external USB flash drives or hard drives An example use of this feature is to provide speakers with a copy of their presentation before they leave the presentation venue The external drive must be formatted with one of the following file systems l FAT16 l FAT32 l XFS l EXT2 l EXT3 l EXT4 l NTFS Only the first attached ...

Страница 268: ...in Enable and set timing for AFU and wish to continue with configuration of upload to a USB drive To configure automatic upload to a USB drive 1 Insert the properly formatted USB drive into one of the system s USB ports 2 Select External USB Drive from the protocol drop down list in the Automatic File Upload configuration page the lower half of the page reflects the selection 3 If your Automatic F...

Страница 269: ...til all are copied the specified maximum number of files is copied or the target drive runs out of storage space The file currently being recorded if any cannot be transferred until recording is completed This procedure is separate from automatic file upload and does not need any pre configuration in the automatic file upload page Ideally only USB drives with visible activity indicators should be ...

Страница 270: ...sfer a move instead of a copy mark file as downloaded If checked the files that are downloaded are marked with a downloaded icon when viewing file lists This has no effect if remove after copying is checked ignore already down loaded files If checked files that were previously downloaded or marked as down loaded are not included in subsequent downloads 6 Click Apply the changes are saved If a conf...

Страница 271: ...y selected files via web interface from the drop down list 5 Click Apply the changes are saved If a conflict is reported regarding the Automatic file upload go to the Automatic File Upload configuration page and disable automatic file upload or switch it to a non USB based upload type Repeat the steps above 6 Insert your USB drive in an available USB port on the system It is recommended you only u...

Страница 272: ...SB storage space When you insert a USB drive in an available port of Pearl and select an External USB Drive action other than ignored i e manual copy automatic copy etc the total and free space are calculated and displayed in the Web Interface To see the available USB storage space 1 Connect to the admin interface using your preferred connection mechanism See Connect to the admin interface 2 Login...

Страница 273: ...terface page To safely eject the USB drive 1 Connect to the admin interface using your preferred connection mechanism See Connect to the admin interface 2 Login as admin 3 Scroll to the bottom of the Web Interface page click the eject link below external storage space 4 When prompted click OK to confirm that you want to eject the USB drive 5 Disconnect the USB drive from the system 260 ...

Страница 274: ... automatic file upload link the log page opens Note the page will be blank if there are no logs present 5 Click the browser s back button when you are done Manage the AFU queue The AFU queue displays a list of recording files waiting to be uploaded Individual file details can be viewed using the web interface Access the AFU queue Accessing the AFU queue allows you to view the list of files queued ...

Страница 275: ...w you see your queued content To control how you view content in the AFU queue 1 Navigate to the bottom of the upload queue list and manipulate the list view using the Newer 5 and Top of the List buttons The upload queue can display only 15 files at one time Additional content is still stored and is viewed in increments of five files using the Newer 5 button Delete content in the AFU queue Files c...

Страница 276: ...er Guide Manage the AFU queue 1 Navigate to the bottom of the upload queue and click Empty Queue to delete the entire upload queue or click the red X icon at the end of each row to remove files individually 263 ...

Страница 277: ...n discusses the following FTP Server topics l Configure the local FTP server l Using the local FTP Server Configure the local FTP server To configure your sysetem s local FTP server 1 Connect to the admin interface using your preferred connection mechanism See Connect to the admin interface 2 Login as admin 3 Select the FTP Server link in the Configuration menu the FTP Server configuration page op...

Страница 278: ... Enable FTP DELETE command check box b Click Apply Any currently logged in users will continue to have access to the delete command until they log out and log in again The following table summarizes the options for configuring the local FTP server Table 34 FTP Server Configuration Options Name Description Options Enable FTP access The check box controls whether or not the system acts as an FTP ser...

Страница 279: ... Recorders To get started you will need l The IP address of your system found in the Network configuration menu l An FTP tool l The username and password for your FTP user See Using the local FTP Server In the example below the IP address of Pearl is 192 168 1 210 the username is admin there is no password and the Windows command line ftp utility is used To connect to the FTP server 1 Open a comma...

Страница 280: ...r your tool s transfer mechanism to transfer files to your computer 8 If enabled in the FTP configuration page delete the file after downloading it by issuing the delete command or using your tool s delete mechanism If the delete command is not enabled attempting to delete a file will result in an Unknown Command error 267 ...

Страница 281: ...nterface and ways to configure and operate your system using third party tools via HTTP or RS 232 Specific topics covered are l Mobile tablet operator interface l Power down and system restart l Save and restore device configuration l Perform factory reset l Firmware upgrade l Support l Storage disk maintenance l Third party integration ...

Страница 282: ...can connect to it in one of the following ways The device connecting to the tablet interface must be on the same network as the Pearl or must be physically connected to it via USB l Use the browser over Ethernet l Use tethering on your device l Use the mobile version of Epiphan Connect Use the browser over Ethernet You can connect to the tablet interface with a browser on your admin computer table...

Страница 283: ...ion page opens 4 Select No tethering or any option except Disabled from the Use phone tablet connection See Tether to a mobile network for descriptions of the options 5 Click Apply To use your mobile device or tablet via tethering 1 Turn on tethering on your device See device user manual for instructions 2 Connect the device to your Pearl via USB 3 Use the EpiphanConnect utility from the Google Pl...

Страница 284: ... to which you d like to connect 4 Select the system by touching the system name a login prompt is presented 5 Login as admin or operator the tablet interface appears Confidence monitoring using the tablet interface When connected to the tablet interface you can use the INPUTS section to monitor the inputs to your system An auto updating snapshot of video inputs and an audio level meter is provided...

Страница 285: ...For audio inputs without signal nothing appears in the audio input bars 5 For audio inputs with signal the level is shown next to the source name in the audio input bar 6 If a video source has no signal the name appears red and a note next to the name says NO SIGNAL 272 ...

Страница 286: ...ace lets you know the firmware version serial number and IP Address of your system It also shows you the currently available disk space To monitor inputs 1 Connect to the tablet interface See Connect to the tablet interface 2 Login as admin or operator 3 Scroll to the INFO section the currently available disk space is shown 4 If disk space is low the green bar will be nearly full Control recording...

Страница 287: ...and recorders match the names set in the full admin interface 5 Click the down arrow in the row for the desired channel or recorder 6 Use the START STOP and RESET buttons to control recording Switch to the full admin interface To switch from the tablet interface to the full admin interface 1 Connect to the tablet interface See Connect to the tablet interface 2 Login as admin or operator 3 Click th...

Страница 288: ...wn the device manually Restarting the device via the web interface Pearl s web interface allows you to reboot the system To restart the system 1 Connect to the admin interface using your preferred connection mechanism See Connect to the admin interface 2 Login as admin 3 Select the Maintenance link in the Configuration menu the maintenance page opens 4 Click the Reboot Now button a confirmation di...

Страница 289: ...3 Select the Maintenance link in the Configuration menu the maintenance page opens 4 Click the Shutdown Now button a confirmation dialog appears 5 Click OK Shutting down the device manually You can manually shut down the Pearl via the button physically located on the system To shut down the system manually 1 Press and release the power button on the system to initiate a safe power down the system ...

Страница 290: ...tion and before doing a firmware update The resulting backup file includes all non default configuration settings for the system except the user passwords which are reset when a configuration is restored Configuration backup files are only guaranteed to work with the same firmware version with which they were created Normally there is no issue loading an older configuration file on a newer release...

Страница 291: ...ion file saved from the system Select the correct configuration file and know where it is accessible from your local computer before starting this procedure Backup files include all non default configuration settings for the system except the user passwords All passwords are reset to blank after the configuration is loaded To load a saved system configuration 1 Connect to the admin interface using...

Страница 292: ...and a new page appears asking you to reboot the system 7 Reboot the system by clicking the link in the message on the web page or by using the power button on the system when the system comes back up the restoration is complete 8 Login as admin with no password 9 Reset your user passwords See User administration 279 ...

Страница 293: ...ource settings channels configuration presets network settings and all saved files Consider using the factory default configuration preset if you want to preserve files See Configuration presets EDIDs are not restored to factory settings with the factory resets Re apply factory EDIDs manually using the Source s configuration page Only proceed if you know this is what you want to do To restore the ...

Страница 294: ...ser Guide Restore factory configuration via the web inter face 5 Click OK on the warning dialog the system resets to factory defaults and reboots 6 Wait for the system to reboot and begin re configuration 281 ...

Страница 295: ...dure below The system will also automatically check for firmware updates if the Maintenance page option Enable connection to maintenance server is checked This is the preferred method of checking for firmware updates The built in firmware update mechanism checks for updates that match your specific product and hardware revision To check for new firmware 1 Connect to the admin interface using your ...

Страница 296: ... firmware update is applied the touch screen displays a firmware update in progress notice and no other interaction is possible Install firmware directly from the web interface If your Pearl has internet access the easiest method of installing new firmware is to use the download link provided when you check for new firmware To download new firmware directly 1 Connect to the admin interface using y...

Страница 297: ...take much longer than usual 10 Connect to the admin interface using your preferred connection mechanism See Connect to the admin interface 11 Login as admin 12 Select the Firmware Upgrade link in the Configuration menu the firmware upgrade page opens 13 Verify that the firmware version is the expected new version Although unexpected it is possible the firmware update fails In this case the touch s...

Страница 298: ...estore device configuration 4 Select the Firmware Upgrade link in the Configuration menu the firmware upgrade page opens 5 Note the current firmware version listed 6 Click the Choose File button next to Select firmware upgrade file a file selection box opens 7 Select the firmware upgrade file from your local computer 8 Click Apply the file is uploaded The system unpacks and verifies the file If th...

Страница 299: ... Upgrade link in the Configuration menu the firmware upgrade page opens 14 Verify that the firmware version is the expected new version Although unexpected it is possible the firmware update fails In this case the touch screen reports the failure Please collect system information such as device serial number and if known the previous firmware version along with the new firmware version and contact...

Страница 300: ... supports remote troubleshooting by Epiphan s support team This service is only available to systems covered by ServicePlan Remote support allows Epiphan to assist in troubleshooting issues you experience with the system and can also assist with resetting lost admin passwords No private information is sent to the Epiphan maintenance server By default all systems are setup with remote support confi...

Страница 301: ...link in the Configuration menu the maintenance page opens 4 Select the Permanent Logs check box 5 Click Apply the page updates to let you know the changes were applied 6 Select the Maintenance link again the maintenance page opens 7 Click Download permanent logs a zip file containting system logs begins to download 8 From your browser run the allinfo script a file is saved to your computer 288 ...

Страница 302: ...d permit remote support Remote support uses port 30 therefore this port must be available for communication If your system is protected from the Internet by a firewall speak to your network administrator to configure the firewall appropriately Remote support is available from Epiphan only if your device is covered by ServicePlan or ServicePlan To configure remote support 1 Connect to the admin int...

Страница 303: ...figure DHCP to ensure DHCP is selected or a DNS server is listed and try again Consult with your network administrator if problems persist 11 If the system reaches the maintenance server ensure your firewall if you have one has port 30 open for the system 12 Confirm with Epiphan support that they are able to access your Pearl for remote troubleshooting Disable Remote Support By default remote supp...

Страница 304: ...Pearl User Guide Disable Remote Support 5 Click Enable connection to maintenance server to deselect it This prevents outgoing links to Epiphan 6 Click Apply 291 ...

Страница 305: ...able storage is low consider removing some unneeded recordings or setting up an automatic file transfer with deletion after transfer See Recorded files and File and recording transfer Disk space can also be checked via the tablet interface See Verify disk space via the tablet interface To check disk storage space 1 Connect to the admin interface using your preferred connection mechanism SeeConnect...

Страница 306: ...the previous screen Schedule disk check A disk maintenance schedule is used to check the system storage drives for errors Two values are supplied one to specify the number of system restarts that should occur before disk check and the second to specify the number of months before performing a disk check The disk check happens based on whichever event occurs first For example the restart setting is...

Страница 307: ...y resets the timers for the scheduled disk check i e next check won t happen automatically until either the number of restarts or months passes If the system is recording when you start a disk check it will stop recording and resume after the check is complete Frames presented during the disk check are not part of any recording To start a manual disk check 1 Connect to the admin interface using yo...

Страница 308: ...P or RS 232 commands to configure your system exactly how you need it For example you can start and stop recordings you can configure meta data on a channel or even change a channel s frame size and encoding settings The following topics are covered in this section l Control with RS 232 serial port l Control with HTTP commands l Configuration keys for third party APIs 295 ...

Страница 309: ...e serial port cable 1 Attach the null modem cable to the control interface 2 Connect the USB to RS 232 serial adapter to the null modem cable 3 Connect the USB to RS 232 serial adapter to one of the system s USB ports The only configuration available for the serial port is flow control Flow control changes the rate of data transfer over the cable Some communication settings are static and cannot b...

Страница 310: ...alue for various settings Each command sent to Pearl via RS 232 must be terminated with a line feed LF character ASCII code 10 Your software may need to be configured to add the line feed to each command Some commands require a channel or recorder name as an argument In those commands the channel or recorder name is separated from the command name by a period as shown in the table The channel name...

Страница 311: ...ding the current recording file is closed and a new file is started STOP channel START recorder Stops recording for the provided channel or recorder This can alternatively be accomplished with the following set commands SET channel rec_enabled SAVECFG STOP Stops recording for all channels and recorders SNAPSHOT channel Takes a snapshot image of the current channel supported only if the channel is ...

Страница 312: ...UNNING l STOPPED l UNINITIALIZED STATUS Reports the recording status of each channel and recorder Status is one of l RUNNING l STOPPED l UNINITIALIZED FREESPACE Reports the free storage space in bytes RECTIME channel RECTIME recorder Reports the elapsed recording time for the current file on the specified channel or recorder RECTIME Reports the elapsed recording time for the current file on each c...

Страница 313: ...rminated with a line feed LF character ASCII code 10 Your software may need to be configured to add the line feed to each command For values with spaces enclose the value in quotation marks For empty values use empty quotation marks with nothing between 1 To start recording on channel 2 START 2 2 To stop recording on channel 2 STOP 2 3 To start recording on all channels and recorders START 4 To ge...

Страница 314: ...Pearl User Guide Control with RS 232 serial port SET 2 audio on SAVECFG 7 To disable broadcasting audio on channel 2 SET 2 audio SAVECFG 301 ...

Страница 315: ...ion item Syntax for the get and set commands follows Many commands require a channel or recorder index as an argument A channel s index is found by looking at the Channels list in the web interface In the screen capture below the channel with index 1 is currently recording it s index number is red To address this channel via http commands use the index channel1 For commands requiring a recorder in...

Страница 316: ...lude multiple key value pairs in a single command by separating the statements with For example the key for product name is product_name and the key for firmware version is firmware_ version To send a request for both the product name and the firmware version use the following command http address admin channel1 get_params cgi product_name firmware_version Or to turnoff publishing set to 0 and set...

Страница 317: ...a system IP address of 192 30 23 45 and admin password pass123 1 To get the type of stream being published and frame size for channel 1 wget http user admin http passwd pass123 http 192 30 23 45 admin channel1 get_ params cgi publish_type framesize 2 To set the publish stream type to RTMP Push 6 and at the title System Stream for channel 2 wget http user admin http passwd pass123 http 192 30 23 45...

Страница 318: ...Pearl User Guide Control with HTTP commands wget http user admin http passwd pass123 http 192 30 23 45 admin channelm2 set_ params cgi rec_enabled on 305 ...

Страница 319: ...0x 20480 The following sections describe the API keys supported by the system in each of these categories l System level settings keys read only l System level settings keys read write l Touch screen settings keys read write l Recording configuration keys l HTTP server configuration keys l IP based access control configuration keys l UPnP configuration keys l SAP configuration keys l Frame grabber...

Страница 320: ...d from the command when requesting the value for these keys Table 38 Supported Read Only System level Settings Configuration Keys Key Values Description firmware_version String including the text FIRMWARE_ VERSION The system s firmware version The value is read only mac_address String The system s mac address Useful for debugging The value is read only product_name String The product s name Useful...

Страница 321: ...0 255 Specify the touchscreen backlight level touchscreen_enabled on empty string Enables or disables the touch screen To enable the touch screen set to on To disable the touch screen set to an empty string touchscreen_info on empty string Enables or disables system information from the touch screen To enable system info from the touch screen set to on To disable system info from the touch screen ...

Страница 322: ...To enable recording set to on To disable recording set to an empty string rec_format avi mov mp4 ts Specifies the format of the saved file rec_prefix string Specifies a prefix for the recorded filenames rec_sizelimit integer Specifies the file size limit in kilobytes kB rec_timelimit integer Specifies the time limit in seconds before a new recording file is created HTTP server configuration keys T...

Страница 323: ...addresses To clear allowed IP restriction set to an empty string denyips string comma sep arated list of IP addresses and or ranges empty string Specifies the IP addresses to deny access To restrict access provide a list of denied IP addresses To clear denied IP restriction set to an empty string UPnP configuration keys The following settings are supported for UPnP streaming Table 44 Supported UPn...

Страница 324: ...ip string Specify the SAP annoucement IP Frame grabber configuration keys The following configuration settings are supported by the system See Configure a sourcefor more information on each variable Table 46 Supported Frame Grabber Configuration Keys Key Values Description gain 0 255 Specifies ADC gain adjustments 0 is brightest 255 is darkest hshift 999 999 Specifies horizontal shift For shifts t...

Страница 325: ...557 Specifies the port for RTSP streaming Note port 5557 is used for network discovery and cannot be used for streaming streamport 1000 65535 but not 5557 Specifies the port used for streaming Note port 5557 is used for network discovery and cannot be used for streaming Channel encoder configuration keys The following encoder settings are supported for each channel For more information on individu...

Страница 326: ...e in the value keep_aspect_ratio deprecated nosignal deprecated timelabel deprecated slicemode on empty string Enables or disables h 264 slicing for RTP To enable slicing set to on To disable slicing set to empty string vbitrate Integer integerK i e 64K integerM i e 1M Gets or changes the video bit rate in kbit s Short forms such as 64K or 1M can be used vbufmode 1 low delay 2 storage Specifies th...

Страница 327: ... quality for M JPEG videos Channel layout configuration keys The following settings are channel layout configuration To work with layouts you need to know the integer identifier for the layout To find your layout s identifier select the layout from the web UI and look for the identifier in the browser s url bar Table 49 Supported channel layout configuration keys Key Values Description active_layo...

Страница 328: ... audio set to an empty string audiobitrate 32 64 96 112 128 160 192 Specifies the audio bitrate for the stream Not applicable for PCM audio codecs audiochannels 1 mono 2 stereo Specifies the number of audio channels For mono set to 1 For stereo set to 2 audiopreset CODECS pcm_s161e PCM libmp3lame MP3 libfacc AAC RATES 32 64 96 112 128 160 192 Specifies an audio code preset in the format CODEC RATE...

Страница 329: ...ngs see What is streaming Table 52 Supported RTSP Announce Configuration Keys Key Values Description announce_by_tcp on empty string Enables or disable RTSP over TCP To enable TCP transport set to on Otherwise set to empty string announce_host string Specifies the RTSP server address Set to the appropriate IP address announce_name string Specifies the RTSP resource name This field is named Mount P...

Страница 330: ...ot 5557 Specifies the UDP port for RTP UDP video streaming Note port 5557 is used for network discovery and cannot be used for streaming MPEG TS configuration keys Publish types 4 and 5 The following settings are supported when the publish type is set to MPEG TS For more information on MPEG TS and these settings see What is streaming Table 54 Supported MPEG TS Configuration Keys Key Values Descrip...

Страница 331: ... the RTMP server Content metadata configuration keys The following keys are available for configuration of the content s metadata Table 56 Supported Content Metadata Configuration Keys Key Values Description author string Specifies the name of the author for the stream recording Refer to description above on handling white space spaces in the string comment string Specifies a comment for the strea...

Страница 332: ...n interface for audio monitoring or use the 3 5 mm audio jack on the front of Pearl to verify audio See Touchscreen overview Too much noise is present in the audio output Modify the Input Amplifier Volume parameter in the Audio menu Start with setting it to 40 and reduce until the noise is no longer present See for details on this setting Image quality is poor or insufficient The following tips ca...

Страница 333: ...cannot see the stream try disabling your local computer firewall If the issue is still not resolved contact Epiphan Support at support epiphan com The stream interrupts or the image breaks up The following tips can help diagnose image problems 1 Ensure the source resolution is used as the output or recorded resolution Up scaling and down scaling can affect picture quality Configure encoding 2 Incr...

Страница 334: ...ource cropping l Use a picture as a video source l Transparent PNG overlays l Stream background logo and text overlay improvements l New multi source layout designer Release 3 14 4 Features l Live Streaming via Wowza Cloud Release 3 14 3 Features l Configuration presets l Network configuration via the touch screen l Stereo audio encoding l Support for 256 kbps and 320 kbps audio sampling l LDAP su...

Страница 335: ... 14 0 Features l Touch screen display l HDMI input l Automatic channels l Hardware acceleration for H 264 encoding l Stream access control improvements Release 3 12 Features l RTMP live streaming l SAP Announce ...

Страница 336: ...REEMENT AND PERFORM ITS OBLIGATIONS UNDER THIS AGREEMENT 1 Definitions In this Agreement Agreement means this Epiphan Software License Documentation means the technical publications delivered to You with the Software relating to the installation and operation of the Software such as reference user installation and technical guides and release notes Epiphan means Epiphan Systems Inc Software means ...

Страница 337: ...the Software are granted to You You acknowledge and agree that the rights in respect to use of the Software and Documentation are granted only for use in conjunction with Epiphan hardware You shall not distribute lease rent grant a security interest in assign or otherwise transfer the Software except as expressly provided in this Agreement You shall not modify or create any derivatives works of th...

Страница 338: ...NTATIONS WARRANTIES AND CONDITIONS AND LIMITATION OF LIABILITY CONSTITUTE AN ESSENTIAL PART OF THIS AGREEMENT YOU ACKNOWLEDGE THAT BUT FOR THE DISCLAIMER OF REPRESENTATIONS WARRANTIES AND CONDITIONS AND LIMITATION OF LIABILITY NEITHER LICENSOR NOR ANY OF ITS LICENSORS OR SUPPLIERS WOULD GRANT THE RIGHTS GRANTED IN THIS AGREEMENT 7 Term and Termination This Agreement shall continue for as long as Y...

Страница 339: ...eveloped exclusively at private expense and are trade secrets of Epiphan Systems Inc for the purpose of any Freedom of Information legislation or any other disclosure statute regulation or provision 12 Export Restrictions The Software Documentation and related information are subject to export and import restrictions By downloading installing or using the Software Documentation and or related info...

Страница 340: ... a court in Ottawa Ontario Canada and You consent to the jurisdiction of such courts for any such action or proceeding You waive all rights that You may have or that may hereafter arise to contest the jurisdiction of such courts for any action or proceeding brought by You You hereby waive any right You may have to request a jury trial with respect to any action brought by You in connection with th...

Страница 341: ...dation This document may contain links to non Epiphan web sites These links are provided to you as a convenience and Epiphan is not responsible for the content of any linked web site Any outside web site accessed from the Epiphan web site is independent from Epiphan and Epiphan has no control over the content of that web site In addition a link to any non Epiphan web site does not imply that Epiph...

Страница 342: ...s application may be made to any court for a judicial acceptance of the award or order of enforcement Notwithstanding the foregoing Epiphan shall be entitled to seek injunctive relief security or other equitable remedies from any court of competent jurisdiction If any part of these terms is unlawful void or unenforceable that part will be deemed severable and will not affect the validity and enfor...

Отзывы: