


14
Operating Instructions
a
iR
s
hutteR
(V
entuRi
):
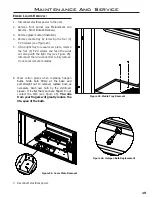
The air shutter plays a very important role in flame appearence and combustion quality. The shutter
adjusts how much air gets mixed with the gas before it ignites; adjustments can be made to accomodate
various climates and vent configurations.
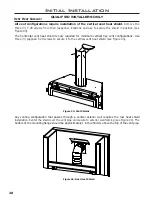
Remove surround to access the air shutter. Find the two levers underneath the firebox (see Figure 18).
The front and rear burners can be controlled independently. Moving either lever inward will make the flame
appear more yellow and tall; moving the lever outward will make the flames appear more blue and short.
Typically natural gas flames will require
the shutter to be more closed.
Typically LP flames will require the shutter
to be more open.
If you cannot attain a healthy flame by making
air shutter adjustments, you may have the
incorrect restrictor setting or venting problem.
If the flame is very flickery, fast moving, and
low then increase the restriction.
If the flame is very tall, lazy, and dirty then
decrease the restriction.
More details can be found in the venting section
of this manual.
Caution: Wear heat resistent gloves when
making adjustments to the air shutter.
Perform adjustments after 15 minutes.
Figure 18. Air Shutter Location
p
iLot
L
iGht
(
Does
not
appLy
to
G42LiD
moDeLs
):
B
DETAIL
B
SCALE
2 : 5
Front Burner
Rear Burner
+
_
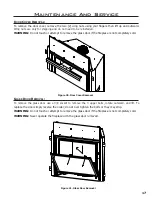
The pilot flow adjustment is set to maximum at the factory and
should not need to be adjusted. The pilot flame should cover
⅜” to ½” (10 to 13mm) of the flame sensor (see Figure 17).
However, should the need arise, turn the adjustment screw
to alter the pilot gas flow (not applicable for G42LID models).
Figure 17. Pilot Light
.375-.500
(10-13mm)
Flame Sensor