background image

77

017-220-J0    Rev C

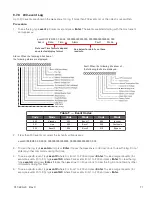
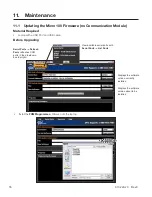
•  Copy the upgrade firmware file (only .sx or .fbin files NOT .ezip) to a folder on the laptop.

Procedure:

1.  On the Alpha Micro 100, put the battery breaker in the OFF position.

2.  Turn off the AC input to the Alpha Micro 100.

3.  Short the jumper JP1 on the board.

4.  Connect the USB cable between the Alpha Micro 100 and the laptop.

5.  Put the battery breaker in the ON position.

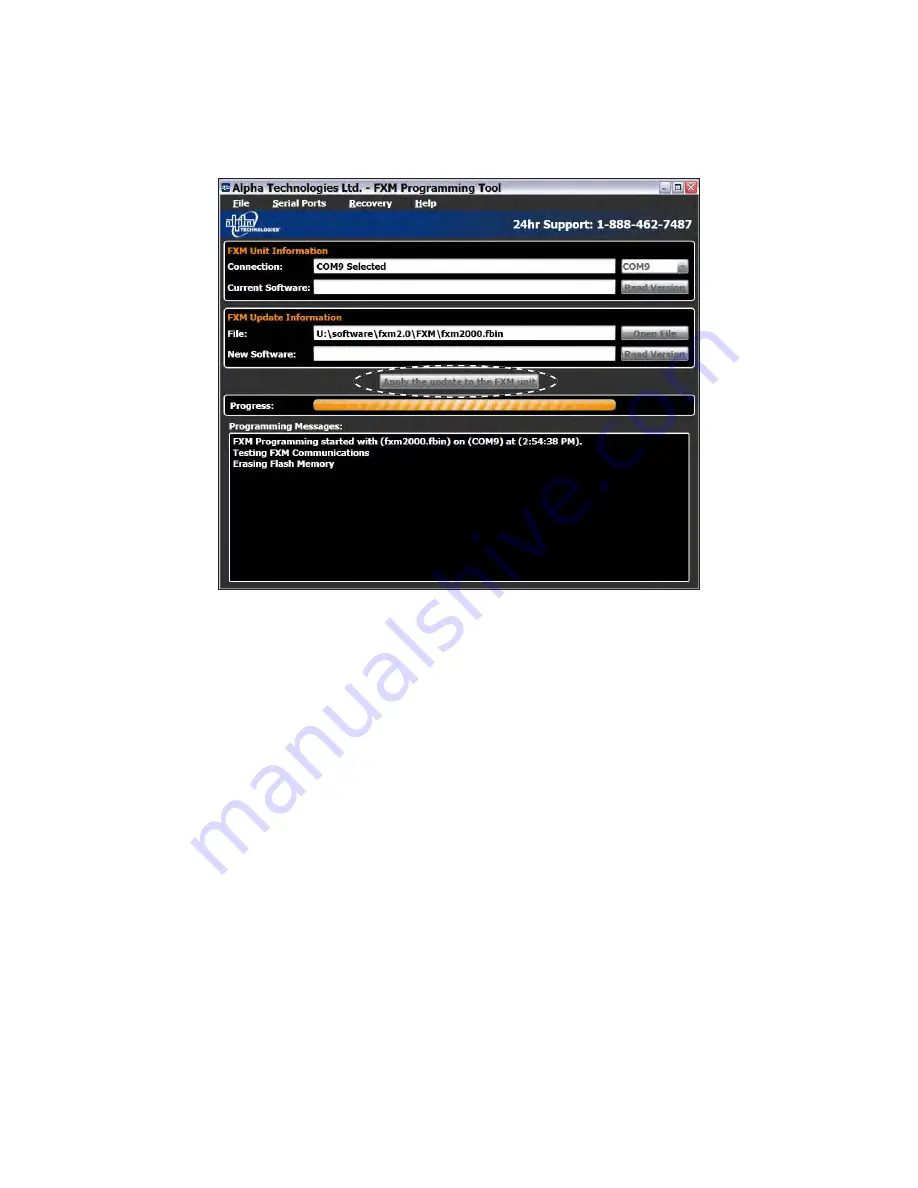
6.  Start the 

FXMProgrammer

 software.

7.  Select a COM port from the drop-down list of available ports.

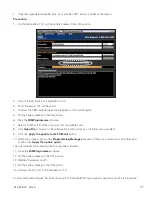
8.  Click 

Open File

 to browse to the software file location (only .sx or .fbin files are supported).

9.  Click the  

Apply the update to the FXM unit

 button.

10.  Watch the progress bar and the 

Programming Messages

 window. (If there is a connection or any other kind 

of error, click 

Apply the update again

).

The unit will reset automatically once the upgrade is finished.

11.  Close the 

FXMProgrammer

 software.

12.  Put the battery breaker in the OFF position.

13.  Remove the jumper on JP1.

14.  Put the battery breaker in the ON position.

15.  Connect the AC input to the Alpha Micro 100.

Contact Alpha Technologies’ Technical Support at 1-800-667-8743 if you have any questions about this procedure.

Содержание Alpha Micro 100

Страница 1: ...Alpha Micro 100 UPS Technical Guide 017 220 J0 Effective 09 2020...

Страница 2: ......

Страница 3: ...egistered trademark of Alpha Technologies Services Inc No part of this documentation shall be reproduced stored in a retrieval system translated transcribed or transmit ted in any form or by any means...

Страница 4: ...unting Options for the Alpha Micro 100 14 5 Inspection 15 5 1 Packing Materials 15 5 2 Check for Damage 15 5 3 General Receipt of Shipment 15 6 Unpacking the Alpha Micro 100 16 7 Installation 17 7 1 T...

Страница 5: ...mber 73 10 3 Using the Equation 74 10 4 Using the Spreadsheet 75 11 Maintenance 76 11 1 Updating the Micro 100 Firmware no Communication Module 76 11 2 Testing and Replacing the Batteries 78 11 3 Prev...

Страница 6: ...34 Figure 14 Web Interface Bulk Charging Menus 35 Figure 15 Web Interface Bulk Charging Menus 36 Figure 16 Web Interface UPS Specification Screen shown 37 Figure 17 Communications Screen 38 Figure 18...

Страница 7: ...ure 40 Upgrade Communication Module 53 Figure 41 Site Information 53 Figure 42 Configure SNMP Screen 54 Figure 43 Email Notification Screen 54 Figure 44 Test Email Feature 55 Figure 45 Keep Alive Feat...

Страница 8: ...ION indicates specific regulatory code requirements that may affect the placement of equipment and or installation procedures WARNING WARNING presents safety information to PREVENT INJURY OR DEATH to...

Страница 9: ...ways assume electrical connections or conductors are live Switch off all circuit breakers and double check connections with a voltmeter before performing installation or maintenance Place warning labe...

Страница 10: ...ve watches rings or other metal objects b Use tools with insulated handles c Wear rubber gloves and boots d Do not lay tools or metal parts on top of batteries e Disconnect the charging source before...

Страница 11: ...Front View Without Door Figure 2 Output Connectors and Monitoring LEDs Bottom View 0 875 22mm holes to accept incoming conduit RJ 45 Connector Green and Red LEDs IP Reset Dry Contacts USB Port Output...

Страница 12: ...Alpha Micro 100 conditions the utility input to provide regulated AC voltage at the output While the utility is present the Alpha Micro 100 keeps the batteries fully charged In the event of a utility...

Страница 13: ...Optional factory installed RJ 45 Dry contacts Two programmable dry single pole double throw relays C NO NC Contacts are rated at 28Vdc or 250Vac 1A The factory default settings are C1 On battery C2 Lo...

Страница 14: ...VAC 98 VAC 186 VAC 180 VAC INV to Boost 2 Boost 2 to INV 92 VAC 87 VAC 163 VAC 158 VAC Table D Regulatory Parameter Value Electrical Safety UL 1778 CSA 22 2 107 3 EN62040 1 Emission FCC Part 15 Subpa...

Страница 15: ...ucture that supports the total weight 4 2 Electromagnetic Compatibility EMC Requirements Observe the following EMC requirements when setting up the Alpha Micro 100 and its internal equipment All AC wi...

Страница 16: ...oduct is packed with at least three inches of shock absorbing material to prevent shipping damage Alpha Technologies is not responsible for damage caused by improper packaging of returned products 5 2...

Страница 17: ...ip does not match the items you received or any items appear damaged immediately notify your carrier agent and the supplier who prepared your shipment 6 3 1 Checking the Package Contents Before starti...

Страница 18: ...rsonal injury or damage to the equipment always use at least two installa tion personnel to remove the unit from its container Batteries must not be installed until the Alpha Micro 100 enclosure has b...

Страница 19: ...st 22 7 kg 50 lb Use appropriate tools to ensure that the Alpha Micro 100 is installed level to the floor 2 pole wall Using the Alpha Micro 100 case as a template secure the case to the wall with the...

Страница 20: ...he optional mounting bracket as well as two bolts not provided to fit the pole 1 Using the mounting bracket as a template mark the positioning of the two holes on the pole 2 Drill holes into the pole...

Страница 21: ...21 and 2 straps Band It C20499 straps C00369 Tool and C25499 Buckle or equivalent 1 Attach the straps to the mounting bracket 2 Attach the bracket to the pole Tighten the strap as per manufacturer s...

Страница 22: ...hree openings 2 Hand tighten first then use the open wrenches to tighten an additional 1 4 turn 3 Route input wire through the liquid tight fitting on the left and wire according to its label L N G To...

Страница 23: ...e line wire is attached to the line terminal block the ground wire is attached to the ground terminal block and the neutral wire is attached to the neutral terminal block to prevent accidental shock o...

Страница 24: ...23 017 220 J0 Rev C Figure 8 Battery Locations and Wiring Battery breaker Battery 1 Battery 3 Battery 4 Battery 2 RED BLACK RED BLACK Battery Breaker 1 2 Bracket...

Страница 25: ...ith two wires on the positive terminal of battery 1 Push battery half way in slowly making sure wires are not pinched under the battery breaker bracket 3 Connect jumper wire from the negative of batte...

Страница 26: ...Push battery half way in 5 Connect jumper wire from the positive terminal of battery 3 to negative terminal of the 4th battery Route wire in front of the batteries as shown push both batteries all the...

Страница 27: ...on the negative terminal of battery 2 8 With the multimeter in DC range 200V measure the DC voltage between negative terminal of battery 2 and positive terminal of battery 4 should be between 24 27Vdc...

Страница 28: ...ws the interconnection between the four PCB assemblies input output and the transformer in the Alpha Micro 100 Figure 9 Micro 100 block diagram 8 2 Modes of Operation The following list of operation m...

Страница 29: ...de The output is equal to the input AC EMI Battery Input Output s Inverter Charger INV N 8 2 3 Boost Mode When the input voltage reduces below 10 of the nominal value the microprocessor changes the ta...

Страница 30: ...ll power to the AC load and charge the batteries at full capacity simultaneously 8 2 5 Back Up Inverter Mode When the Alpha Micro 100 detects loss of utility it opens the Grid Relay preventing AC powe...

Страница 31: ...t using the web interface or the graphic user interface 8 2 8 Fault Mode The Alpha Micro 100 enters the fault mode if it encounters a fault see Table P for list of faults and will remain in Shutdown m...

Страница 32: ...tery power to the load perform a manual start using the Inverter command via HyperTerminal or web interface See Figure 52 Menu Tree on page 63 The Alpha Micro 100 uses auto frequency detection When it...

Страница 33: ...ameters Web Interface Description AC Output Shutdown When this function is switched on the Alpha Micro 100 inverter is shut off Neither Line nor Inverter power is supplied to the load DC Output Shutdo...

Страница 34: ...5 mV C Cell Max charge current Allows you to set the battery charger current NOTE Setting the battery charger to 0 A will turn the charger off The default value is set to 3A DC Output Connect Voltage...

Страница 35: ...default float is 26 4V both at 25 C Constant default from factory When BATT FLOAT is set to Constant the default max charge voltage is 27 3V and float is 27 1V both at 25 C Temperature compensation wi...

Страница 36: ...35 017 220 J0 Rev C Figure 14 Web Interface Bulk Charging Menus...

Страница 37: ...017 220 J0 Rev C 36 Figure 15 Web Interface Bulk Charging Menus...

Страница 38: ...over the light to determine the detail of the fault alarm Double clicking the light takes you to the Alarms and Faults screen D Current values B B A D C 9 5 Operating via the Communication Module Intr...

Страница 39: ...e Default Gateway and the DNS Server addresses Procedure 1 Connect the Alpha Micro 100 to a personal computer with either the Ethernet cable or hub 2 Configure the computer network card to talk to the...

Страница 40: ...39 017 220 J0 Rev C 9 5 2 UPS Specifications This screen displays factory default specification of Alpha Micro 100 Figure 18 UPS Specification Screen...

Страница 41: ...resent operating mode Figure 19 UPS Monitoring Input and Output Screen Figure 20 UPS Monitoring Battery and Inverter Screen Standard Charging UPS Monitoring Battery and Inverter Shows the battery stri...

Страница 42: ...enced by the Alpha Micro 100 It does not take into account duration unit ran on batteries if input voltage is not within the acceptable range In the section USB Mainte nance power outage users can set...

Страница 43: ...Sets the name input output parameters and how often the webpage refreshes Figure 23 UPS Maintenance Unit Configuration screen Figure 24 Restore all default commands 9 5 5 Restoring All Parameters to D...

Страница 44: ...day action period 1 0 Start hour of rush hour of time of day action period 2 0 Start minute of rush hour of time of day action period 2 0 End hour of rush hour of time of day action period 2 0 End mi...

Страница 45: ...ing algorithm attempts to calculate the health of the battery to get a more accurate prediction of the remaining battery runtime An accurate estimate of the battery health requires that at least one b...

Страница 46: ...t drained NOTE Battery runtime calculation are not performed if Bulk charging mode is selected Inverter Enabled Disabled Enabled the inverter can function depending on the setting of the Inverter On O...

Страница 47: ...of all available dry contact functions C3 C6 not available on the Alpha Micro 100 Inverter Cutoff Threshold Defines the point where the unit will switch from Inverter to Standby when the battery is c...

Страница 48: ...ying backup power to the traffic light Since the batteries supplying the backup power have limited capacity a timer controlled dry contact is usually configured to switch the traffic light into the fl...

Страница 49: ...6 PM 2 Select ON under each time period Click the Update Configuration button under the time periods to store the settings Figure 30 Time Of Day Configuration Figure 31 Time Of Day Action Status 3 Con...

Страница 50: ...ha Micro 100 password which is limited to 4 alpha numeric characters The factory set password is 1111 Figure 32 UPS Maintenance Time and Date Screen UPS Maintenance Time and Date used to set the Alpha...

Страница 51: ...Power Outage Users can set up a time in minutes during which the unit will ignore any power outages Vin 0Vac of shorter durations to avoid logging nuisance alarms The default time is set to 1 minute F...

Страница 52: ...button displays the updated information about the selected event Figure 35 Alarms and Faults Screen 9 5 6 Event Manager Alarms and Faults This read only screen shows the operating status of the Alpha...

Страница 53: ...To save the event log once all events are downloaded click on Export Events to save to csv file 3 To choose which events are logged click the check boxes in the Event Configuration screen Once an ala...

Страница 54: ...end file The upgrade will not affect the operation of the UPS Figure 39 Alpha Web Interface Upgrade Firmware To upgrade the Communication module browse to the ezip file and click OK to start the uploa...

Страница 55: ...ations click Add Destination and then fill in the required fields Enter a To address Check off at least one of the Notify boxes CC and Subject fields are optional To edit an existing destination selec...

Страница 56: ...Notification and Test Email Destinations 3 If necessary modify the mail server settings and press the Update Configuration button to save the settings 4 In the Test Email Destinations box use the def...

Страница 57: ...ications when a communication failure is detected A reset temporarily removes power and resets the local communications equipment powered by this unit Figure 45 Keep Alive Feature CAUTION Enabling the...

Страница 58: ...re field enter the number of pings to repeat before power cycling Minimum 1 Maximum 20 Keep Alive action to attempt to restore communication a The Action field has 3 options reset all power AC and DC...

Страница 59: ...nated in the Fault or Alarm fields the Alpha Micro 100 has a malfunction Hover your mouse cursor over the light to learn the type of malfunction or double click on it to go straight to the Alarms and...

Страница 60: ...date web site before installing the software Figure 47 Add or Remove Programs Window Alpha UPS Monitor Installation Procedure 1 Install the Alpha UPS Monitor onto your computer Restart the computer If...

Страница 61: ...e when selecting File Save As To view a previously saved event log without downloading any new events from the Alpha Micro 100 and overwriting the saved event file select File Open and navigate to the...

Страница 62: ...ting systems Running HyperTer minal on any other operating system requires a 3rd party application designed for this purpose The following subsections describe the operation of the Alpha Micro 100via...

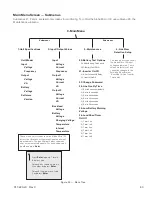
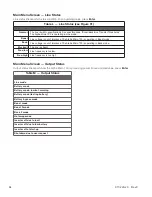
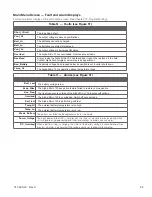
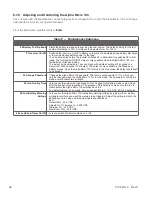
Страница 63: ...the submenu number and press Enter To update the main menu screen press Enter The complete menu tree is shown in Figure 52 There are also tables describing the Line Status Table L Output Status Table...

Страница 64: ...ult 2 Set to 10 seconds 3 Set to 20 seconds 4 Set to 30 seconds 5 Set to 40 seconds 6 Set to 50 seconds 35 Low Battery Warning Voltage 36 Load Shed Timer On Off 1 Timer 1 on 2 Timer 1 off 3 Timer 2 on...

Страница 65: ...ne voltage is out of tolerance The Alpha Micro 100 is operating in Buck mode Blackout The line is absent Freq low Line frequency is too low Freq high Line frequency is too high Main Menu Screen Output...

Страница 66: ...is operating above temperature range Table O Alarms see Figure 51 Batt_Low The battery voltage is low Keep_Alive The Alpha Micro 100 keep alive feature failed to restore communication Line_Freq The li...

Страница 67: ...10 minutes The delay is only available in the Standby or Battery modes Once the Alpha Micro 100 returns to the Line mode the delay resets itself to 0 seconds 32 Change Password Changes the Alpha Micr...

Страница 68: ...ion of a Fault condition 6 Disabled Dry contact is disabled i e never energizes 7 Timer 2 See Setting the Timer Contact on page 68 8 Timer 3 See Setting the Timer Contact on page 68 9 External Vdc Not...

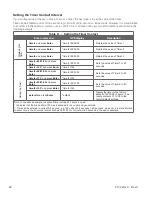
Страница 69: ...ng the Timer timer1 00 01 00 and press Enter timer1 00 01 00 Sets the value of Timer 1 to 60 seconds timer1 120 and press Enter timer1 120 timer2 00 01 00 and press Enter timer2 00 01 00 Sets the valu...

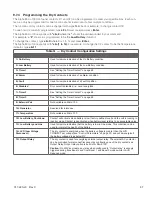
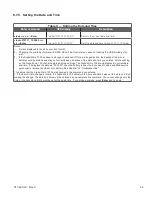
Страница 70: ...drained and may not correctly keep a backup of the date and time you entered After switching on the Alpha Micro 100 check the date and time settings The Alpha Micro 100 should display the current date...

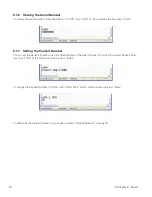
Страница 71: ...etting the Peukert Number You can set the Peukert Number using the USB interface or the web interface To display the current Peukert Num ber type QY6 at the command line and press Enter To change the...

Страница 72: ...4 Buck 1 009 Shutdown 002 Boost 2 005 Buck 2 010 Bypass 2 If less than 200 events occurred the last entry will appear as 3 To clear the log type eventclr and press Enter It takes the Alpha Micro 100 3...

Страница 73: ...ues The purpose of this command is to reset the Alpha Micro 100 to the factory default state See Table K for a list of parameters that will be restored to their default values CAUTION This command res...

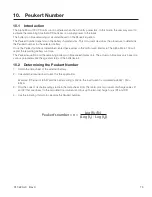
Страница 74: ...l report the remaining battery run time The Peukert equation and the remaining battery run time are estimates only The actual run time may vary based on various parameters like the age and status of t...

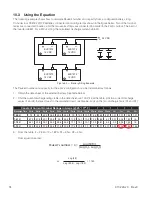
Страница 75: ...le in the data sheet use 1 75V From the table pick two current discharge values I1 and I2 that are closest to the calculated load current value Look up the two discharge hours R1 and R2 3 From the tab...

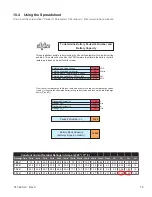
Страница 76: ...ank Capacity battery strings in parallel 16 520 Enter battery string voltage Enter nominal load on inverter Enter number of parallel battery strings Enter battery capacity at 20 hour rate Calculated n...

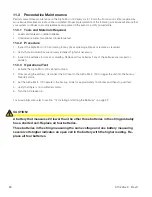
Страница 77: ...vailable serial ports with Serial Ports List Ports Serial Ports Refresh Ports refreshes COM ports in the drop down box top right 11 Maintenance 11 1 Updating the Micro 100 Firmware no Communication Mo...

Страница 78: ...ports 8 Click Open File to browse to the software file location only sx or fbin files are supported 9 Click the Apply the update to the FXM unit button 10 Watch the progress bar and the Programming M...

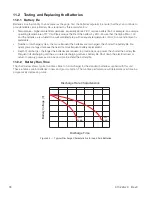
Страница 79: ...e batteries are discharged the shorter the battery life Fre quent power outages increase the need for more frequent battery replacement Depth of discharge the longer the batteries are required to prov...

Страница 80: ...the batteries The Alpha Micro 100 cannot provide backup battery power while the batteries are being replaced If the line be comes unqualified while the batteries are being replaced the Alpha Micro 10...

Страница 81: ...s for cracks or swelling Replace all four batteries if any of the batteries are cracked or swollen 11 3 3 Operational Test 1 Activate the Alpha Micro 100 self test function 2 After passing the self te...

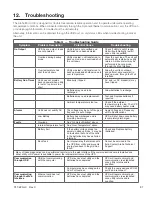
Страница 82: ...need replacement Test and Replace batteries if required Ambient temperature is too low Check if the ambient temperature is too low The UPS may need battery heater mats Alarms Unit does not qualify AC...

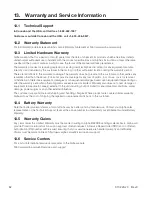
Страница 83: ...mages or consequential damages based upon equipment failure during or after the warranty period No other obligations are expressed or implied Warranty also does not cover damage or equipment failure d...

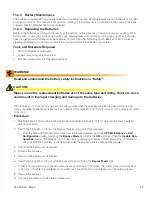
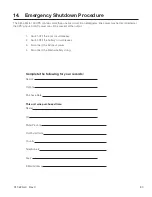
Страница 84: ...Fax E Mail Address 14 Emergency Shutdown Procedure The Alpha Micro 100 UPS contains more than one live circuit In an emergency line power may be disconnected at the UPS s input but AC power can still...

Страница 85: ......

Страница 86: ......

Страница 87: ......

Страница 88: ...00 667 8743 Outside North America 1 604 436 5547 Technical Support 1 888 462 7487 For more information visit our website at www alpha com 2020 Alpha Technologies Ltd All Rights Reserved Trademarks and...

Отзывы: