


1
www.enelx.com
Phone: +1-844-584-2329
Important safety instructions and
specifications. Save these instructions
This manual contains important
instructions for the JuicePump electric
vehicle fast charger.
These instructions must be followed
during installation of the unit.
For charger operating instructions, see
JuicePump Operating Manual.
For charger maintenance instructions, see
JuicePump Maintenance Manual.
Identifying symbols
CAUTION
RISK OF ELECTRIC SHOCK
Equipment Grounding
Conductor Symbol
ø
Phase Symbol
Alternating Current Supply
Symbol
CAUTION
The JuicePump fast charger must be
installed and serviced only by qualified
electrical personnel. To achieve EMC
compliance, the chassis of the JuicePump
must be bonded to Earth locally at the
charger.
CAUTION
In the event of a circuit breaker trip, the
charger must be inspected by an Enel
X-certified service agent before the char
-
ger is re-energized.
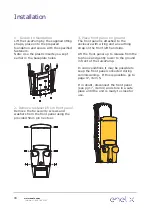
Grounding instructions
This unit is to be connected to a
grounded, metal, permanent wiring
system; and an equipment-grounding
conductor is to be run with circuit
conductors and connected to
equipment-grounding terminal or lead on
battery charger. Connections to the bat
-
tery charger shall comply with all local
codes and ordinances.
Observe all pertinent national,
regional and local safety laws and
regulations when installing and
commissioning the JuicePump fast char
-
ger.
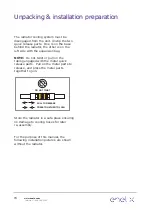
Wiring size
3ø: 4 AWG
Use 90°C Copper Wire
Use 4 AWG insulated
grounding conductor
1ø: 18 AWG
Use 90°C Copper Wire
An insulated grounding conductor that is
identical in size, insulation material and
thickness to the grounded and
ungrounded branch-circuit supply
conductors except that it is green with or
without one or more yellow stripes is to
be installed as part of the branch circuit
that supplies the unit or system. This
grounding conductor is to be grounded to
earth at the service equipment or, when
supplied by a separately derived system,
at the supply transformer.
Содержание JuicePump
Страница 1: ...50kW DC RT www enelx com Phone 1 844 584 2329 Installation Manual TRI93 50 01 UL ...
Страница 2: ......


