background image

Page 13

BasX  MC1 Cinema Processor

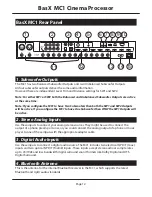
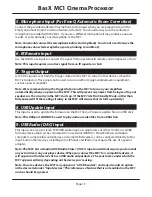
 5. Microphone Input (For EmoQ Automatic Room Correction)

Connect the provided calibrated microphone to this input when you are preparing to run the 

EmoQ Automatic Room Correction feature in the MC1. You should always use the calibrated 

microphone provided with the MC1. If you use a different microphone it may produce unusual 

results, or even damage your microphone or the MC1.

Note: You should connect the microphone before starting EmoQ. You do not need to leave the 

microphone connected except when you’re planning to run EmoQ.

 6. IR Remote Input

Use the IR Remote Input to connect the signal from an external IR remote control repeater or hub.

Note: This input requires an active signal from an IR repeater or hub.

 7. Trigger Output

A 12 VDC signal is sent from the Trigger Output of the MC1 to turn on other devices when the 

MC1 is turned on. This signal can be used to turn on other trigger-enabled audio equipment - 

such as a power amplifier.

Note: We recommend using the Trigger Output on the MC1 to turn on your amplifiers 

automatically when you power on the MC1. This will prevent any noises from being sent to your 

speakers as the circuitry in the MC1 starts up. (If the MC1 is left in Standby Mode, rather than 

fully powered Off, the muting circuitry in the MC1 will ensure that it starts up silently.) 

 8. USB Update Input

This input is used to update the firmware on the MC1 from a firmware update file on a USB stick.

Note: This USB port CANNOT be used to play audio or video files from a USB stick.


 9. USB Audio (DAC) Input

This input can accept a stereo PCM USB audio input, at sample rates of either 16/44k or 16/48k, 

from any device that can be connected to “an external USB DAC”. Most Windows and Apple 

computers, some tablets and phones, and some USB streamers, can be connected directly to this 

input. Some other devices, including some iPhones and IPads, may require the use of a special 

adapter.

Note: The MC1 has a standard USB Audio Class 1 (UAC1) input and will not require you to install 

any extra drivers on your player device. When you connect the MC1 to a compatible device, it 

will appear on that device’s list as a USB audio output device. The exact name under which the 

MC1 appears will vary depending on the device you’re using.
Note: On some devices, the MC1 may appear as “a USB headset”, and may also add an option 

in the device list under “input devices”. This references a feature that is not enabled on the MC1 

and so should be ignored. 


Содержание BASX MC1

Страница 1: ...13 2 Channel Cinema Processor with Dolby Atmos and DTS X Technology User Manual...

Страница 2: ......

Страница 3: ...es such as radiators heating vents or other apparatus that produce heat Do not block any ventilation openings or heat sinks Avoid installing the unit directly above other heat producing equipment unle...

Страница 4: ...a marked change in performance 5 The unit has been dropped or its enclosure or chassis is damaged NOTE TO COMPLETELY DISCONNECT THE MC1 FROM THE AC POWER MAINS DISCONNECT THE AC POWER CORD FROM THE A...

Страница 5: ...and if not installed and used in accordance with the instructions may cause harmful interference to radio communications However there is no guarantee that interference will not occur in a particular...

Страница 6: ......

Страница 7: ...5 Unpacking 6 Getting Started 7 Special Features 9 BasX MC1 Front Panel 10 BasX MC1 Rear Panel 12 BasX MC1 Remote Control 16 BasX MC1 Front Panel Display And Menu System 20 EMO Q Advanced Automatic Ro...

Страница 8: ...Page 2 BasX MC1 Cinema Processor...

Страница 9: ...gure and operate using either the front panel controls and the large bright blue front panel VFD display or the included illuminated infrared remote control and the clear concise on screen display The...

Страница 10: ...ort and direct as possible Even if you are an expert user you will probably find some interesting information and useful suggestions If you are really in a hurry to get started please read the Getting...

Страница 11: ...with fast error free switching for up to six HDMI inputs all of which support HDMI 2 0b and HDCP 2 2 4k UHD video and HDR including HDR10 HDR10 and Dolby Vision An internal Bluetooth receiver for stre...

Страница 12: ...hipping damage or other issues when you unpack it please contact Emotiva immediately Gently remove your MC1 from the packing carton and remove all wrappings and shipping material It is important to sa...

Страница 13: ...t your MC1 to your projector or TV set The MC1 has two HDMI outputs both of which deliver the same HDMI signal but only HDMI Output 1 supports eARC 5 Connect some high quality video and or audio sourc...

Страница 14: ...MC1 will work well for most systems so there is no need to adjust them at this time Note By default if you have one or more subwoofers then all of your other speakers are configured with a Bass Manage...

Страница 15: ...a 1080p TV and only the 4k TV is turned on it will receive a 4k signal however if both TVs are turned on then both will receive a 1080p video signal because that is the highest resolution format that...

Страница 16: ...t status of the MC1 Note By default this display shows the selected audio source the Volume setting and the status of the incoming audio and video signals The information that is shown and the brightn...

Страница 17: ...find it more convenient to navigate the Setup Menu using the remote control the front panel Input Select Buttons Mode Select Buttons and Volume Control can also be used to enter and navigate the Setu...

Страница 18: ...preamp or tuner or you could connect the analog output of a phone or music player to one of these inputs with the appropriate adapter cable 3 Digital Audio Inputs Use these inputs to connect a digita...

Страница 19: ...g sent to your speakers as the circuitry in the MC1 starts up If the MC1 is left in Standby Mode rather than fully powered Off the muting circuitry in the MC1 will ensure that it starts up silently 8...

Страница 20: ...lanced inputs then you may connect the outputs of the MC1 to those inputs using passive unbalanced to balanced adapters or adapter cables with no loss of audio quality Note The SW1 and SW2 Unbalanced...

Страница 21: ...ull support for 4k UHD video up to 4k 60 including HDR HDR and Dolby Vision 14 Power Cable Receptacle The MC1 uses a standard removable power cable A high quality commercial power cable is provided wi...

Страница 22: ...n 3 Direct Input Select Buttons These buttons provide direct access to each of the HDMI video and audio inputs on the MC1 These buttons can be configured in the Setup menu 4 Mode Button The Mode Butto...

Страница 23: ...cted to the two HDMI outputs on the MC1 Pressing this button once will display the current status pressing it repeatedly will cycle through the available options Note When one of the HDMI outputs on t...

Страница 24: ...to allow you to customize the audio content from a particular movie or audio program to your personal listening taste will not be retained after you switch to a different source Use the Setup Menu to...

Страница 25: ...Volume using the remote control Press the Mute button on the remote control to toggle muting on and off Selecting an Input To select an Input using the front panel controls Use the two front panel Inp...

Страница 26: ...rts of the Setup Menu can be navigated using the front panel display and controls However the amount and type of information that can be shown on the front panel display is limited and the front panel...

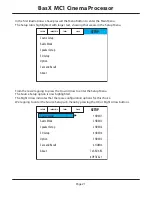
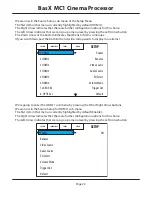
Страница 27: ...e in the Setup Menu From there we re going to press the Down Arrow to enter the Setup Menu The Source Setup option is now highlighted The Right Arrow indicates that there are configuration options for...

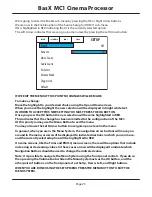
Страница 28: ...SOURCE SOUNDFIELD TRIMS EMO Q SETUP 2 HDMI 2 3 HDMI 3 4 HDMI 4 5 HDMI 5 6 HDMI 6 7 eARC ARC Enable Rename Video Source Audio Source EQ Select Volume Mode Trigger Out Default 1 HDMI 1 8 OPTICAL 1 We re...

Страница 29: ...in RED This indicates that the change has been committed to the configuration of the MC1 At this point you may use the Menu Button to exit the menu You may also use the Left Arrow button to navigate u...

Страница 30: ...ntrol and Lipsynch Delay options Channel Levels The Trims Menu allows you to individually set the level of each speaker DRC Allows you to set Dolby Range Control to On Off or Auto Lipsynch Allows you...

Страница 31: ...ws you to associate audio from a different audio source with a specific HDMI Input The default setting for HDMI sources is HDMI which assigns the current HDMI signal as the Audio Source Options includ...

Страница 32: ...ow you to temporarily select different modes to use with the content you are currently playing This menu enables you to change the default SoundField modes that the MC1 will use with various types of...

Страница 33: ...your listening position Note Configure the Distance to each speaker from your primary listening position If you have a large seating area then set the distance from each speaker to the center of your...

Страница 34: ...You DO NOT have to connect the calibrated microphone included with your MC1 in order to manually enter values here However if you wish to take measurements you must make sure that the microphone is c...

Страница 35: ...and set the default brightness for the front panel display No Signal Standby This is where you can configure how long the MC1 will wait before switching into Standby when it sees no input signal on th...

Страница 36: ...d then selecting Software Update from this menu NOTE The firmware update will take several minutes and will display a progress indicator DO NOT DISCONNECT POWER TO THE MC1 OR REMOVE THE STICK DURING T...

Страница 37: ...TION OPTION THEREFORE YOU SHOULD MAKE SURE THAT YOU HAVE ATTACHED YOUR CALIBRATED MICROPHONE TO YOUR MC1 BEFORE SELECTING THIS MENU ITEM WARNING THE EMO Q ROOM CORRECTION SYSTEM ON THE MC1 IS DESIGNED...

Страница 38: ...with digital sources but not with analog sources and EQ is bypassed Direct delivers the source signal with minimum modification while still applying system equalization and room correction to both an...

Страница 39: ...tive 2 Place the firmware update file on a USB stick formatted with the Fat32 operating system any commercial USB stick formatted to work on both Apple and Windows computers should work fine Place the...

Страница 40: ...HDR10 and Dolby Vision 2 HDMI 2 0b compliant HDMI video outputs primary output supports both ARC and eARC Audio Inputs 4 stereo unbalanced analog audio inputs 2 S PDIF coaxial digital audio inputs 2 T...

Страница 41: ...ion Automatic Room Correction with graphical interface Manual Room Correction EQ Three Separate Manual Speaker Presets Each Of Which Offers 11 Bands of Full Parametric EQ Left Front and Right Front 11...

Страница 42: ...RCHANTABILITY AND FITNESS FOR A PARTICULAR PURPOSE ARE EXPRESSLY LIMITED TO THE TERM OF THIS LIMITED WARRANTY SOME STATES DO NOT ALLOW LIMITATIONS ON HOW LONG AN IMPLIED WARRANTY LASTS SO THE ABOVE LI...

Страница 43: ...otiva where the non Emotiva product is the cause of the damage ii to damage caused by service or maintenance performed by anyone who is not a representative of Emotiva iii to damage caused by accident...

Страница 44: ...on the way to you Emotiva is not liable for damages that may incur while an item is in transport to us Please purchase insurance when you ship your item If your Product was not adequately packaged we...

Страница 45: ...mited for all other companies DTS DTS X and the DTS X logo are registered trademarks or trademarks of DTS Inc in the United States and other countries 2020 DTS Inc ALL RIGHTS RESERVED The terms HDMI a...

Страница 46: ...to the best of our knowledge at the time of publication In keeping with our policy of ongoing product improvement we reserve the right to make changes to the design and features of our products witho...

Страница 47: ......

Страница 48: ......

Отзывы: