61
Installation
B
T
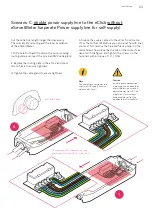
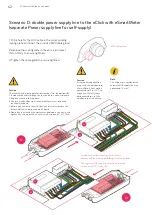
Scenario C: double power supply line to the eClick without
eSmartMeter (separate Power supply line for self-supply)
Cut the cable to a length longer than necessary:
This will simplify rerouting and the later installation
of the eSmartMeter.
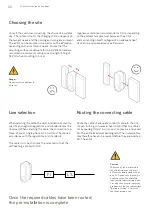
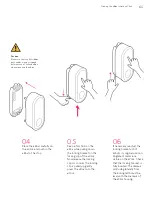
1. Drill a hole for the AUX cable in the corresponding
routing plate, and insert the provided M20 cable gland.
2. Replace the routing plate in the eClick, and press
this on firmly to ensure tightness.
3. Tighten the cable gland to ensure tightness.
Introduce the supply cable into the eClick from the top
(T) or the bottom (B). Before you can route the AUX lines,
you must first remove the blue and black jumper on the
mains board. Now place the strands on the contacts as
depicted in the figure, and tighten the screws on the
terminals with a torque of 1,2 - 1,5 Nm.
The separate AUX supply line must be
protected with its own RCD rated at 6 A.
M20 cable gland
Note
The cable cross-section of the
separate AUX supply line may
not exceed 1.5 mm².
Caution
If single-phase connection
is required, the mainboard or
eSmartMeters must not be
connected to L2 or L3! The
supply line L1 must always
be connected to L1 of the
mainboard or eSmartMeter.
Содержание eClick
Страница 2: ...2 Installationsanleitung eClick ...
Страница 36: ...36 ...
Страница 37: ...eClick installation instructions for eBox smart professional and touch 37 ...
Страница 38: ...38 eClick installation instructions ...
Страница 73: ...Instruction d installation eClick pour eBox smart professional et touch ...
Страница 74: ...2 Instruction d installation eClick ...
Страница 109: ...Instrucciones de instalación eClick para eBox smart professional y touch ...
Страница 110: ...2 Instrucciones de instalación eClick ...
Страница 145: ...Istruzioni per l installazione di eClick per eBox smart professional e touch ...
Страница 146: ...2 Istruzioni per l installazione di eClick ...
Страница 181: ...Installatiehandleiding eClick voor eBox smart professional en touch ...
Страница 182: ...2 Installatiehandleiding eClick ...
Страница 217: ...Installering af eClick Til eBox smart professional og touch ...
Страница 218: ...2 Installering af eClick ...
Страница 253: ...Installasjonsanvisning eClick for eBox smart professional og touch ...
Страница 254: ...2 Installasjonsanvisning eClick ...
Страница 289: ...Installationsanvisning eClick för eBox smart professional och touch ...
Страница 290: ...2 Installationsanvisning eClick ...
Страница 325: ...Οδηγίες εγκατάστασης eClick για eBox smart professional και touch ...
Страница 326: ...2 Οδηγίες εγκατάστασης eClick ...
Страница 361: ...Instalační návod eClick pro eBox smart professional a touch ...
Страница 362: ...2 Instalační návod eClick ...
Страница 397: ...Návod na inštaláciu eClick pre eBox smart professional a touch ...
Страница 398: ...2 Návod na inštaláciu eClick ...
Страница 433: ...eClick telepítési útmutató eBox smart professional és touch készülékekhez ...
Страница 434: ...2 eClick telepítési útmutató ...
Страница 469: ...Instrukcja instalacji modułu eClick do produktu eBox smart professional i touch ...
Страница 470: ...2 Instrukcja instalacji modułu eClick ...
Страница 505: ...Instrucțiuni de instalare pentru eClick pentru eBox smart professional și touch ...
Страница 506: ...2 Instrucțiuni de instalare pentru eClick ...

