INSTALLATION & SETUP
VistaGRAPHX 2500 User's Manual
2-14
Once the VistaGRAPHX 2500 is properly set up and projecting an image on
screen, you are ready to make quick manual display adjustments.
If you are using a zoom lens, turn the outer shell of the lens barrel to decrease or
increase the size of the image at the current throw distance. Note: Do not touch
the lens surface as it can be easily damaged.
Turn the Focus adjustment knob (next to lens barrel) until you obtain the best
overall image clarity.
VistaGRAPHX 2500 includes a Vertical Offset adjustment knob to provide
vertical image shifting (raising and lowering) without causing keystone
distortion. Proper adjustment can also maximize display brightness. Turn the
knob until you achieve the best overall brightness without causing a distortion in
picture geometry.
For further display adjustments through keypad commands and on-screen menus,
refer to Section 3, Operation.
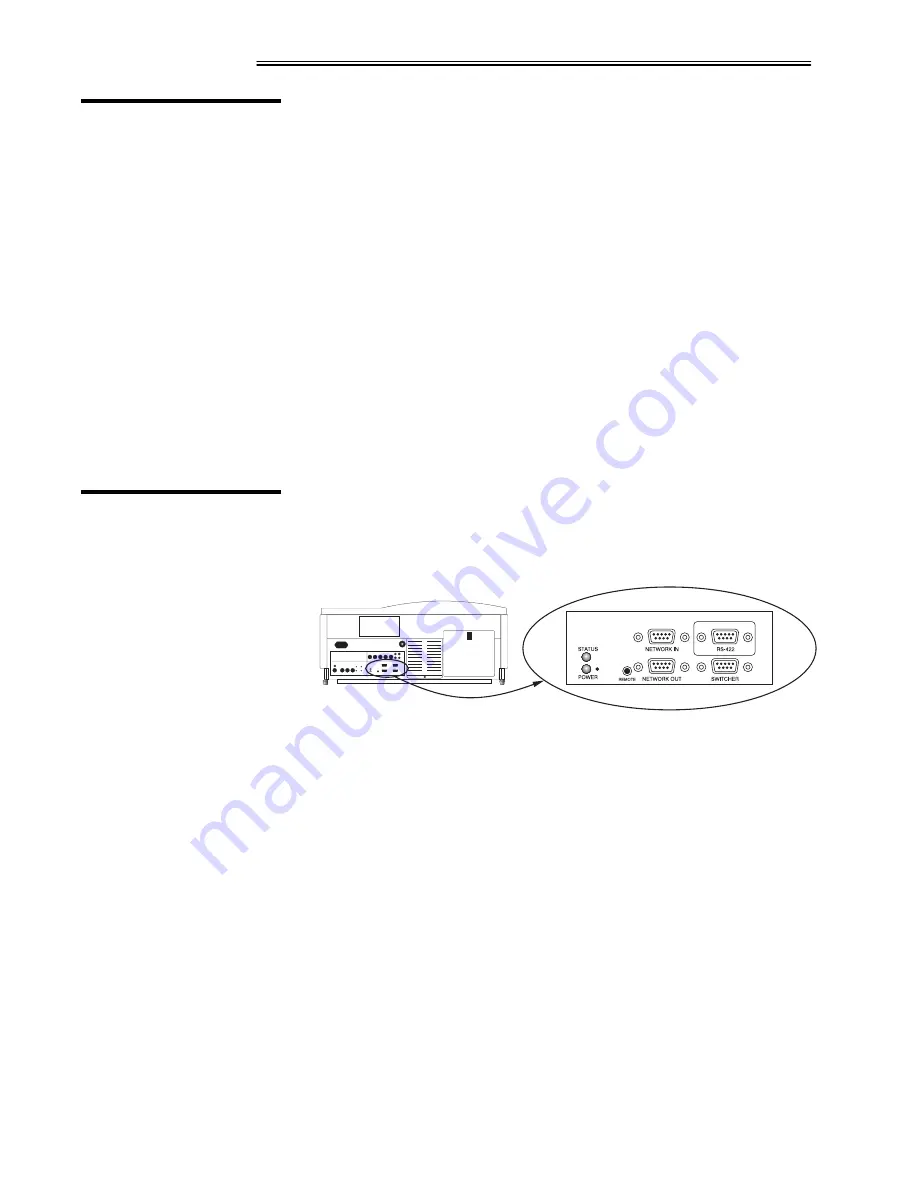
Use serial communication ports when controlling VistaGRAPHX 2500 with a
personal computer having a serial interface or when using the projector with a
Marquee switcher. VistaGRAPHX 2500 serial ports are located on the lower
right portion of the projector's rear control panel as shown in Figure 2-14.
Figure 2-14. Serial Port Connections RS-232 and RS-422
NOTES: 1) All VistaGRAPHX 2500 serial connections require a 9-pin D
connector. Refer to Appendix D for complete cable wiring requirements. 2) The
"NETWORK OUT" port is provided for networking applications only — see "If
using multiple projectors", below.
The RS-232 Port
You may wish to use a computer rather than a keypad for controlling the
projector and for performing other special functions. From most computers,
connect an RS-232 serial communication cable between the computer and the
projector serial port labeled "NETWORK IN" (Figure 2-15). Then set the
projector baud rate to match that of the computer. Changing the baud rate is
described in 3.7, Adjusting and Checking System Parameters.
NOTE: In rare instances, some computers can provide RS-422 serial
communications (generally through a plug-in adapter or external converter). See
The RS-422 Port, below.
2.8
Zoom, Focus &
Vertical Offset
Zoom
'
Focus
'
Vertical Offset
'
2.9
Serial Port
Connections
If using a computer
'
Содержание VistaGRAPHX 2500
Страница 81: ...KEYPAD REFERENCE B 2 VistaGRAPHX 2500 User s Manual Figure B 2 Built in Keypad ...
Страница 82: ...Appendix C Menu Tree VistaGRAPHX 2500 User s Manual C 1 ...
Страница 84: ...SERIAL COMMUNICATION CABLES D 2 VistaGRAPHX 2500 User s Manual ...
Страница 87: ...THROW DISTANCE CHARTS E 2 VistaGRAPHX 2500 User s Manual ...
Страница 88: ...THROW DISTANCE CHARTS VistaGRAPHX 2500 User s Manual E 3 ...
Страница 89: ...THROW DISTANCE CHARTS E 4 VistaGRAPHX 2500 User s Manual ...
Страница 90: ...THROW DISTANCE CHARTS VistaGRAPHX 2500 User s Manual E 5 ...
Страница 91: ...THROW DISTANCE CHARTS E 6 VistaGRAPHX 2500 User s Manual ...
Страница 92: ...THROW DISTANCE CHARTS VistaGRAPHX 2500 User s Manual E 7 ...
Страница 93: ...THROW DISTANCE CHARTS E 8 VistaGRAPHX 2500 User s Manual ...
Страница 94: ...THROW DISTANCE CHARTS VistaGRAPHX 2500 User s Manual E 9 ...


