background image

Maintenance 

Note: 

Allow this appliance to completely 

cool before performing maintenance. 

Cleaning the Cooking Chambers 

The  cooking  chambers  should  be  cleaned  periodically 

with  warm  soapy  water  and  a  non-abrasive  scrubber. 

Remove masonry to ensure that soap does not contact 

the masonry.  Allow unit to dry thoroughly after cleaning. 

Cleaning External Surfaces 

Keep  your  Wood-Fired  Pizza  Oven  &  Smoker  looking 

clean  by  regularly  washing  it  with  warm  soapy  water. 

Again,  avoid  using  an  abrasive  scrubber  as  this  may 
damage the surface finish. 

Care and Maintenance of the Masonry 

Light Cleaning 

•Scrape  off  food  particles  with  a  plastic  scraper  or

spatula.  A  soft  wire  or  fiber  brush  can  also  be  used  to

lightly release particles from the stone surface.

•Remove loose particles with a vacuum or with a hand
broom and dust pan.

•Use a clean, damp rag to wipe the stone.

•Allow stone to 

dry completely 

before heating the pizza

oven.

Thorough Cleaning 

•Carefully remove the pizza stone. Be sure to allow your
pizza stone to completely cool before removing it for

cleaning.

•Carefully clean the pizza stone with a wire pizza stone

brush and damp rag. Use a damp rag to wipe the three

bricks if necessary. Do not use soap or detergent as this

will damage the masonry.

•Scrape off food particles with a plastic scraper or
spatula. A soft wire pizza stone brush can also be used

to lightly release of particles from the stone surface.

•Carefully dry the pizza stone and three bricks with a

clean towel and then allow to air dry.

•Place masonry back in the oven when dry. NEVER put

damp masonry in a warm/hot pizza oven as it may

crack if heated too quickly.

Note: 

The Pizza Stone will 

darken and discolor 

with use. 

This is a 

normal 

part of the seasoning process. 

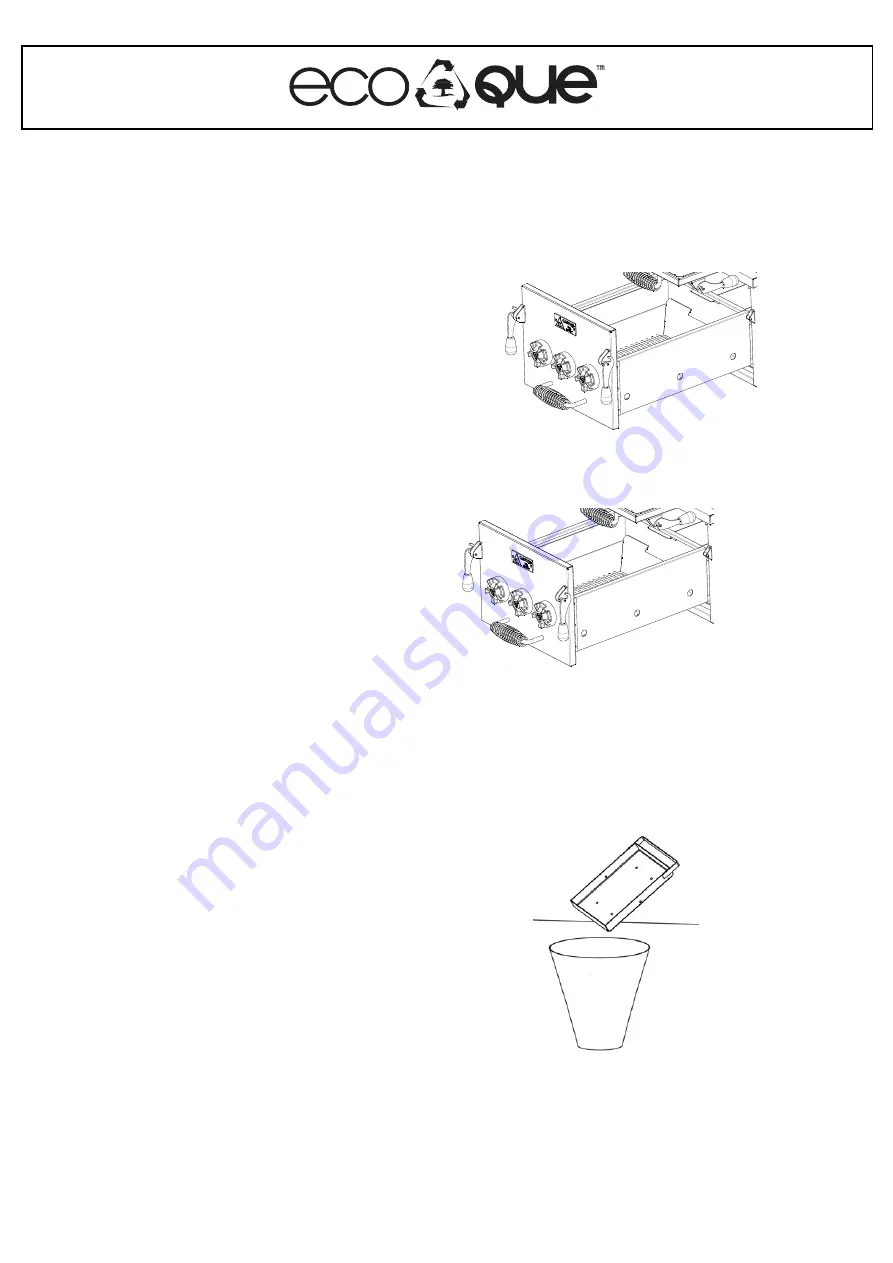
Cleaning the Combustion Chamber 

When it comes time to empty the ash tray, follow 

these simple steps ONCE THE FIRE IS OUT!!... 

Step 1: Pull out the Fire Box 

Step 2: 

Do not remove coals until

fire is completely extinguished 

Step 3: Empty Ash Tray 

Warning! Make sure ashes are completely 

doused with water after emptying the ash 

tray.  Remove the upper fuel grate. 

NOTE!!- You can also leave the firebox 

attached to the rails, and just remove and 

empty the ash tray. 

ECO-710

10

page|1

5

Содержание ECO-71010

Страница 1: ...ECO 71010 STPK ECO 71010 DLX Read All Safety and Operating Instructions thoroughly before use Wood Fired Pizza Oven Smoker w Cover Assembly Operation Manual BAKE SMOKE ROAST GRILL 71010 MAN01 88 6 in 225 cm 68 in 173 cm 33 9 in 86 cm 30 3 in 77 cm ...

Страница 2: ...d or gas fire starters Always refer to ecoque com for a list of fire starters recommended for this appliance Do not leave this appliance unattended around minors or pets Use extreme caution when appliance is hot Improper handling can result in burns and or fire Wait until appliance is cool before moving Do not use accessories in a manner other than specifically stated by an official instruction ma...

Страница 3: ...l brakes By product from the combustion of charcoal and other fuels are known by the State of California to cause cancer birth defects or other reproductiveharm Edges are sharp and can cause cuts or lacerations Handle appliance components with care and never swipe any part of your body across an edge corner or side of this appliance Assembly of this appliance requires two people Do not attempt ass...

Страница 4: ... be alarmed if the door thermometers read significantly above ambient temperature We recommend using a digital thermometer for much more accuracy Probes go through the provided door holes You can now also use bigger pieces of cooking wood Hints and Tips The Smoker Oven is great for smoking large cuts of meat With vent control the smoker oven can maintain temperatures as low as 200oF 93oC for low a...

Страница 5: ...don t line up first flip the handle over and try again on that side Hold off tightening both handles down until both are in place and fit properly on your oven It s also possible that both handles will fit on either side but make sure that you have a match on both sides before tightening down the screws Also note that if the wire grid is in the way to attach the screws on the top of the handlebar ...

Страница 6: ...e place where your oven will go it s time to unpack it Remove the carton and empty the contents of the oven chambers to lighten up the unit to move it into place Remove all the accessories from the bottom shelf Your unit was Pre Assembled and we ve installed a ramp on one side to allow you to roll it off the pallet but please empty everything out of the oven first and install the handles REMOVING ...

Страница 7: ...for clearance under eves and through doors to prevent damage But leave it on when the oven has the cover on it NOTE THIS STEP HAS ALREADY BEEN COMPLETED ON YOUR UNIT PLEASE MOVE TO THE NEXT STEP ON PAGE 8 Transport this unit by pulling on the two handles located on the sides of this unit The unit will pivot on the wheels and can easily be wheeled across a smooth hard surface to the desired locatio...

Страница 8: ...Cover pan over the drip pan Removable griddle is Used when the oven is pulled out for loading and unloading or on the optional firebox Tuscan Wood grill surface 1x Wire Lifter tool for the griddle Important Note Do not leave empty Water pans in the oven during use as this will damage the pan If you are only using the brick oven below Always Remove It No Name Size QTY A Flat Head Screw 1 2 Long M6 ...

Страница 9: ...el free to use a charcoal starter chimney right in the firebox when it is pulled out to start a Base fire dump it in the firebox then add wood and close the firebox Only use lump charcoal Never use Briquettes Step 4 Control the Temperature Once you ve added fuel slide the fire box back into the appliance and close the door The knobs on the front of the door allow you to directly control the temper...

Страница 10: ...ne Instead make sure to put foods like lasagna meat and anything else that might drip in one of the non stick pans or on a cookie sheet Follow instructions on page 11 to light the fire and maintain your desired cooking temperature The pizza stone takes about 90 minutes to heat up and will stay hot for hours For best results we recommend a laser thermometer to measure the exact temperature of the p...

Страница 11: ...se note that the chamber temperature may drop slightly when either oven door is opened This is normal do not immediately add more wood Instead close the oven door and wait a few minutes to see if temperature rises back to the desired temperature After that add one or two pieces of wood at a time Check every few minutes to see if the oven has reached the desiredtemperature Hold the oven at your des...

Страница 12: ...ve provided a plastic pipe jack to hold the stone in place while you install the brackets screws Center the plastic adjustable tube under the stone to push the stone up to the oven top Loosely start all the screws first Screw the brackets in place to hold the stone 5 2 6 ECO 71010 page12 NOTE THIS STEP HAS ALREADY BEEN COMPLETED ON YOUR UNIT SO MOVE TO THE NEXT STEP Also note that the vent pipe no...

Страница 13: ...ere in on top of the bottom cooking stone so the plastic cap on the jack doesn t leave a mark on the stone s cooking surface 3 On one side loosely install the bracket with 3 screws that hold the bracket in place That way you will be able to slip the stone up above the first bracket with all the screws already started A phillips head 2 screwdriver works well for this One with a magnetic screw holdi...

Страница 14: ...en more intense smoke flavor Mild Flavor Medium Flavor Heavy Flavor Peach White Oak Mesquite Apple Cherry Red Oak Pecan Hickory Blackjack Oak Experiment with different woods to find your personal favorite Always use well seasoned wood Green or fresh wood can turn food black and impart a bitter taste Always keep the smoker oven door closed to prevent loss of heat and smoke Add wood as necessary to ...

Страница 15: ...one to completely cool before removing it for cleaning Carefully clean the pizza stone with a wire pizza stone brush and damp rag Use a damp rag to wipe the three bricks if necessary Do not use soap or detergent as this will damage the masonry Scrape off food particles with a plastic scraper or spatula A soft wire pizza stone brush can also be used to lightly release of particles from the stone su...

Страница 16: ...l or improper installation of this appliance Scratches dents corrosion or discoloration caused by heat abrasive chemical cleanersor chipping of painted coated parts Corrosion or damage caused by exposure to the elements e g insects weather hail Grease and fat fires Cleaning and wear and tear Rusting of metal frame or components Commercial use of the product Unauthorized repairs or modifications du...

Страница 17: ...ss prior to cooking However certain fuels like cooking wood and Natural Lump Charcoal will be used in this oven These are the same fuels commonly used to cook with ALL the charcoal and wood burning grills on the market today These fuels carry the following warning label WARNING This product contains a chemical known to the State of California to cause cancer birth defects and or reproduction harm ...

Страница 18: ...ation Please visit us at ecoque com and on our You Tube Channel at http www youtube com user EcoQue CONTACT US AT sales directglobalsales com or customerservice ecoque com PH 253 487 5924 Copyright 2019 Direct Global Sales Inc DBA EcoQue ...

Отзывы: