manualshive.com logo in svg
background image

EATON

Powerware

®

ConnectUPS

t

Web/SNMP Adapter (E Model) Quick Start Instructions 164950186 Rev A

4

4.

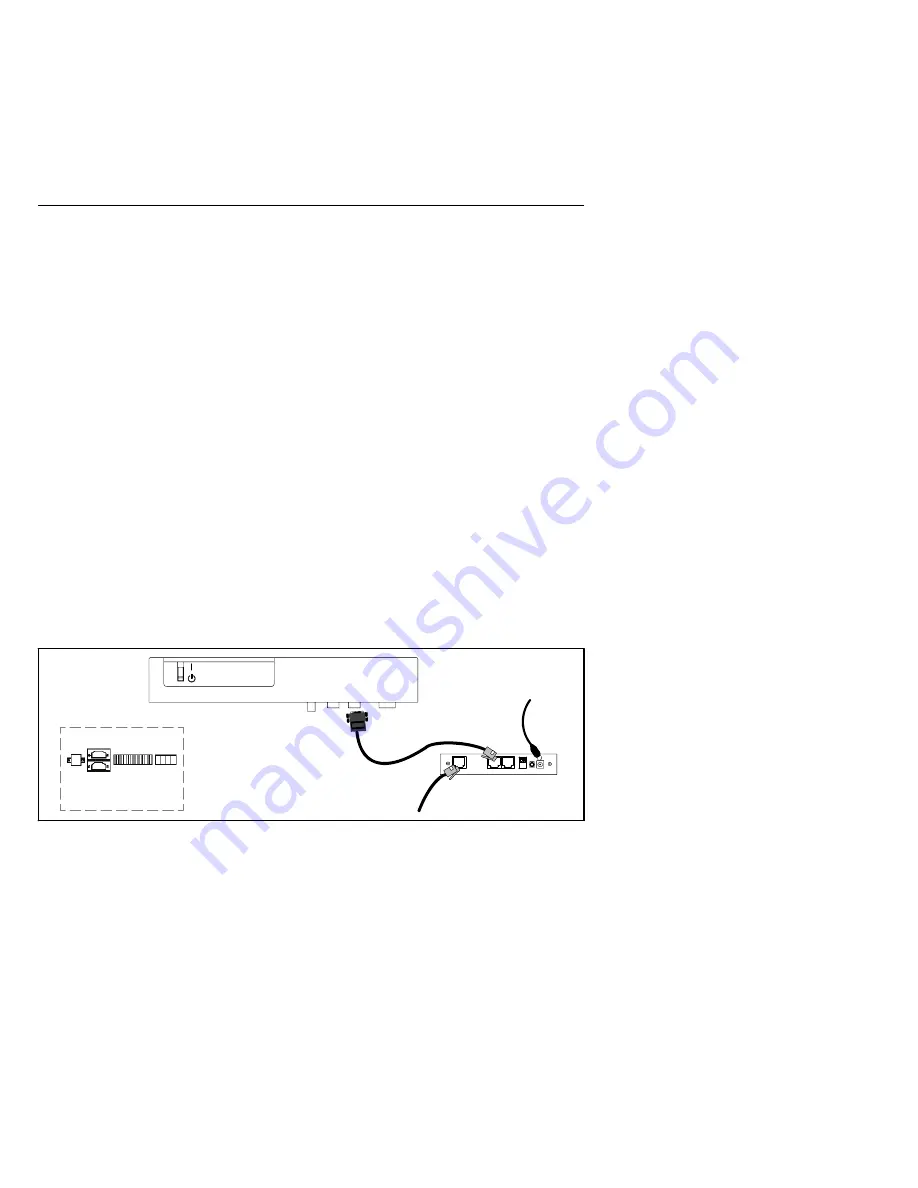
If the X100 port is not available,

use the supplied serial cable

(labeled “PC”) to connect the UPS port on the ConnectUPS-E
to the male, 9-pin, RS-232 port (labeled X101) on the UPS
(see Figure 4).

Insert the external power supply cord into the power inlet on
the ConnectUPS-E (labeled “12 VDC”).

Plug one end of the detachable power cord into the external
power supply.

Plug the other end of the power cord into a UPS-protected
receptacle.

5.

Replace the UPS front cover.

6.

Connect an active Ethernet cable (supplied) to the network
connector on the ConnectUPS-E.

7.

To configure the adapter locally using the supplied serial
cable, continue to “Connect the Adapter” on page 7.

To configure the adapter remotely through a network using a
Web browser or Telnet (or similar) utility, refer to the

ConnectUPS Web/SNMP Card User’s Guide

PDF on the

Software Suite CD.

(7.5–15 kVA)

(20–80 kVA)

X100

X101

X100 X101

To LAN port

Cable labeled “PC” to
UPS communication port
and ConnectUPS-E UPS port

External power supply to
ConnectUPS-E power inlet
and UPS-protected receptacle

Powerware 9305 UPS

Figure 4.

Alternate Installation with a Powerware 9305 UPS

Содержание Powerware 9305 UPS

Страница 1: ...onnectUPSt Web SNMP Adapter S Male DB 9 to RJ 45 Serial Cable with Detachable DC Power Cable S Female DB 9 to RJ 45 Serial Cable labeled PC S External Power Supply with Detachable Power Cord S Softwar...

Страница 2: ...nistrator must set up the DHCP server to provide a static address each time the adapter makes a DHCP request Provide the network administrator with the adapter s MAC address on the bottom of the adapt...

Страница 3: ...ronment set DIP switch 2 to the 1 on position 2 Open or remove the UPS front cover and locate the female 9 pin RS 232 port labeled X100 See Figure 2 3 If the X100 port is available use the supplied un...

Страница 4: ...ected receptacle 5 Replace the UPS front cover 6 Connect an active Ethernet cable supplied to the network connector on the ConnectUPS E 7 To configure the adapter locally using the supplied serial cab...

Страница 5: ...DIP switch 2 to the 1 on position 2 Remove the UPS front cover and locate the female 9 pin RS 232 port see Figure 6 3 If the female port is available use the supplied unlabeled serial cable to connect...

Страница 6: ...8 Replace the UPS front cover 9 Connect an active Ethernet cable supplied to the network connector on the ConnectUPS E 10 To configure the adapter locally using the supplied serial cable continue to...

Страница 7: ...UPS port To connect the adapter to the computer and start the configuration 1 Plug the RJ 45 end of the supplied serial cable labeled PC into the PC port on the adapter Verify that you have used the p...

Страница 8: ...owing conditions S Verify the serial line is set to 9600 baud No parity 8 data bits 1 stop bit and no flow control S If the serial line settings are correct check the cabling to verify all connections...

Страница 9: ...o set the Gateway Address and Network Mask 6 Change any other options as needed for your particular configuration by typing the corresponding number shown in the menu Each Configuration Menu setting i...

Страница 10: ...guides for instructions Use the following procedure to install NetWatch software after you have installed and configured the adapter 1 Insert the Software Suite CD into the computer s CD ROM drive Th...

Страница 11: ...ect Next 12 Verify the configuration settings are correct and select Finish see Figure 22 13 A pop up message indicates that communication with the adapter is established see Figure 23 Select Clear to...

Страница 12: ...BERS UNITED STATES 1 800 356 5737 or 919 870 3149 CANADA 1 800 461 9166 ext 260 www powerware com ALL OTHER COUNTRIES Call your local sales representative 2006 Eaton Corporation All Rights Reserved 16...

Отзывы: