


6
This section describes the removal, inspection, and
installation of the control valve.
1 Clean the control valve and the area around where it
attaches to the motor.
Important: Cleanliness is extremely important; be sure
that no contaminates get into the motor.
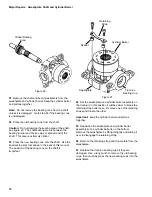
2 Remove the six hex head bolts that hold the control
valve to the motor.
3 Lift the control valve away from the motor and
disengage the feedback linkage, see figure 2.
4 Remove the control valve gasket.
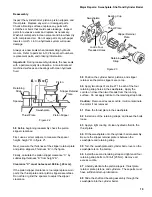
5 Inspect the control valve: Start by thoroughly flushing
the control valve with clean solvent. Then blow it dry
with compressed air. Be sure to blow through all of the
control valve’s internal passages.
Inspect the control valve linkage. Move the control lever
back and forth; it should move freely without binding.
There should be no free play in the feedback link or
control lever.
Check the control valve orifice; if it is plugged after
flushing replace it.
Figure 2
Feedback Linkage
Control Valve
Gasket
Minor Repair: Control Valve Inspection
Содержание 1 Series
Страница 31: ...31 Notes...


