background image

EyeMax User’s Guide

53

Part # 401216-C

Chapter 4: Series 5 Software Settings

S

PEAK

 B

UTTON


IN


THE

 M

ESSAGE

 W

INDOW

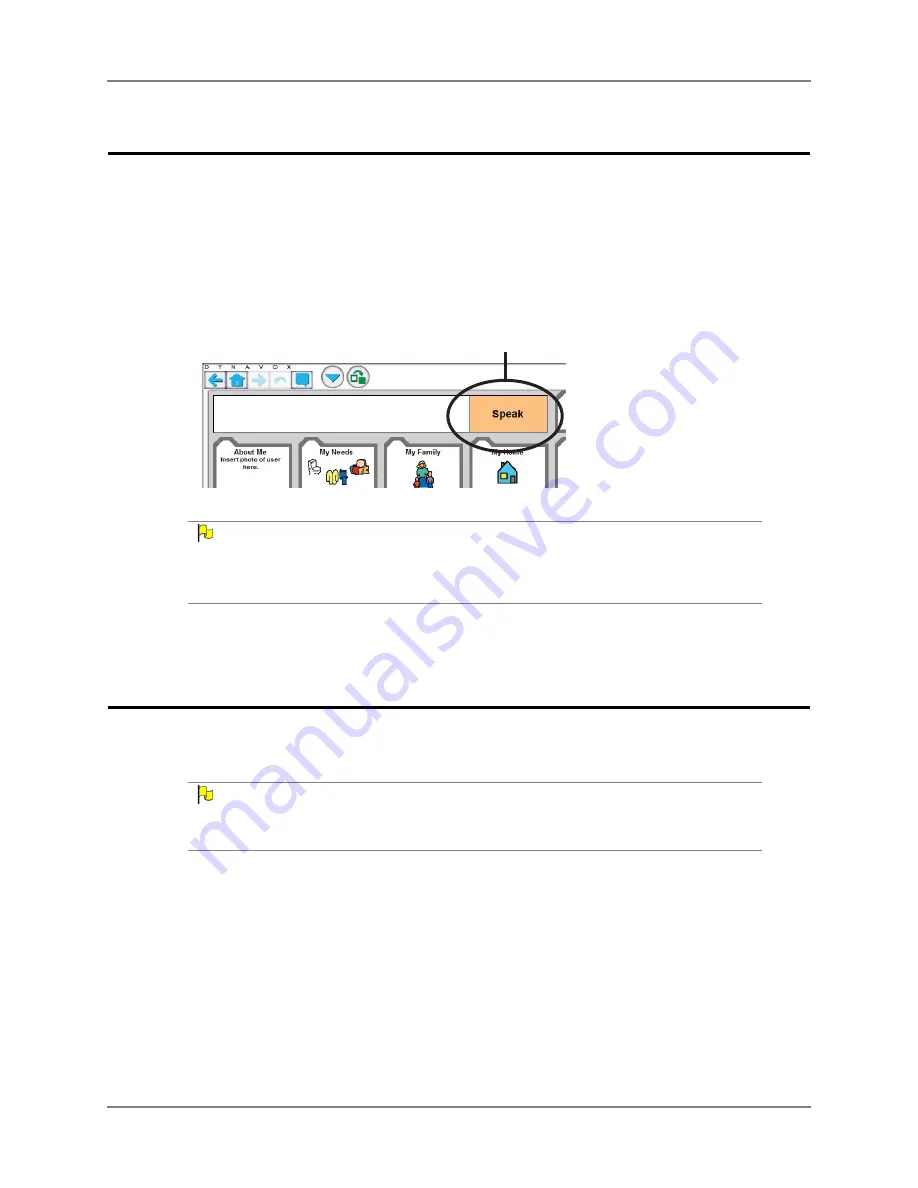
In most cases, selecting any portion of the Message Window on a page will automatically 
speak its contents. However, the Series 5 software enables you to designate a particular 
section of the Message Window to serve as the selection area for speaking the Message 
Window contents. When this section (“Speak button”) is active, the rest of the Message 
Window will not respond to selections.

M

ESSAGE

 W

INDOW


WITH

 S

PEAK


BUTTON

 (

EXAMPLE

)

N

OTE

The Speak button was designed primarily for those who use the Mouse Pause or Eye Tracking 

selection methods. It allows these users to read and review the contents of the Message Window 

without inadvertently signalling your Maestro/Vmax to speak. However, it can be useful in other 

selection methods as well.

Define the Speak Button Settings

To enable (and define the settings for) the Speak button in the Message Window:

N

OTE

If the Series 5 software is in full screen mode, you must display the title bar. On an open device, 

select the triangular button in the upper right corner of the touch screen. On a dedicated device, 

select the power button, and then select 

Toggle Title Bar

1.

Select 

Main Menu > Setup > Setup Menu

. The 

Setup

 menu will open.

2.

Select 

Interface Features

. The 

Interface Features 

menu will open.

3.

Select the 

Show a Speak Button

 check box.

4.

Select 

Speak Button Settings

. The 

Speak Button Settings

 menu will open.

Speak Button

Содержание EyeMax

Страница 1: ......

Страница 2: ...ough every precaution has been taken in the preparation of this publication the publisher assumes no responsibility for errors or omissions For information write to In North America DynaVox Systems LLC 2100 Wharton Street Suite 400 Pittsburgh Pennsylvania 15203 USA The European Authorized Representative is DynaVox and Mayer Johnson Pure Offices Plato Close Lower Cape Tachbrook Park Leamington Spa ...

Страница 3: ...Mounting the EyeMax System 18 Proper Mounting Position 18 Eye Track Status Window 20 Mounting Options 21 Chapter 4 Series 5 Software Settings 23 Adjusting the Eye Tracking Selection Method Settings 23 Modify Zoom Settings 29 Modify Highlight Rules Settings 32 Modify Eye Tracking Assistance Settings 34 Modify Advanced Eye Tracking Settings 37 Modify Eye Tracking Calibration Settings 39 Modify Addit...

Страница 4: ...te Eye Tracking via Eye Tracking Dashboard 56 Calibrate Eye Tracking via System Menus 58 Chapter 6 Navigator User 59 Navigator Introduction 59 Select a Keyboard Layout 61 Navigator Main Page 63 Opening the Navigator User 65 Chapter 7 Troubleshooting 67 Calibration Issues 67 General Issues 69 ...

Страница 5: ... device screen Once the EyeMax is properly connected and calibrated conversation environmental control and even email and the Internet are only a blink or gaze away Be sure to read through the step by step instructions in this document to learn the proper installation methods and ways to customize the software to best suit the needs and capabilities of the device user DYNAVOX EYEMAX SYSTEM OPTIONS...

Страница 6: ...for performing the basic operations of your EyeMax Throughout the text you will find the following kinds of comments NOTE This document offers notes on making the most of your communication system These notes are designed to highlight features that can be used to make the device a better fit for an individual user or point out other important considerations CAUTION You should always be sure to rea...

Страница 7: ...from using any kind of eye tracking device neck strain and eye strain This is true for using computer monitors as well Recommendations for alleviating such monitor eye strain may be found by browsing to this Web site www mayoclinic com health eyestrain WL00060 If at any time you notice discomfort pain or fatigue in either your neck or your eyes stop using the EyeMax and rest until you feel well ag...

Страница 8: ...e ICNIRP exposure limits in the workplace Other organizations recommend product safety emission limits ANSI 2005 2000 2007 CIE 2002 CENELEC 2002 IEC 2007 CDRH 1995 Currently there are two sets of product safety standards that apply to the use of lamps including solid state lamps LEDs worldwide These are The CIE Lamp Safety Standard CIE Standard S009 E 2002 Photobiological Safety of Lamps and Lamp ...

Страница 9: ...ccessories that ship with the EyeMax Single sheet describing the contents of the box EyeMax and accessories Allen Wrench for removing the support leg from the Vmax and installing the handle for the EyeMax Vmax kit only EyeMax Handle a metal handle to make it easier to carry the DynaVox EyeMax System and help when removing the system from a mount EyeMax the EyeMax itself If you are using the EyeMax...

Страница 10: ... mounted in the center of the EyeMax It works with the IR transmitters to track the movement of the user s eyes Eye Lock LEDs These green LEDs will light up when the EyeMax has a lock on the position of the user s eye Infrared Transmitters An IR transmitter is located on each side of the EyeMax These transmitters help the camera track the movement of the user s eyes Infrared Transmitters Camera Ey...

Страница 11: ...rt This port connects to one of the USB ports on your Maestro Vmax Charger Port This port connects to the charger that was shipped with your EyeMax Power Indicator This green LED will light up when the EyeMax is powered on Charging Indicator This amber LED will light up when you are charging the batteries of the EyeMax and Maestro Vmax When both batteries are fully charged the LED will go out NOTE...

Страница 12: ...ynaVox devices wet Never submerge them in water for example in dishwater If your devices accidentally get wet shut them down immediately and allow them to dry thoroughly If after 24 hours you find that the devices seem to function normally there is probably no damage If the devices fail to function or behave abnormally contact DynaVox Technical Support US and Canada Monday through Friday 8 00 a m ...

Страница 13: ...AX TO MAESTRO REFERENCE If you want to connect your EyeMax to a Vmax device see Connecting EyeMax to Vmax on page 13 Installing the Maestro Battery When your Maestro is shipped the battery is not installed Before you can turn on your Maestro or connect the EyeMax and its bracket you must install the battery NOTE If your Maestro battery is already installed skip to Connecting the Bracket EyeMax Mou...

Страница 14: ...ng up the small horizontal lines on the battery with those on either side of the battery well 4 Slide the battery up towards the front of the Maestro Make sure that the battery is in complete contact with the Maestro along the entire front wall of the battery well 5 While holding the battery securely in this position slide the 2 battery buttons to the inside locked position Battery Buttons ...

Страница 15: ...nter of the device just above the battery circled in the picture below BRACKET ON BACK OF MAESTRO 2 Connect the EyeMax to the bracket below the Maestro Use a Phillips head screwdriver to tighten the 4 screws in the back of the EyeMax circled in the picture below EYEMAX CONNECTED TO BRACKET 3 Connect the mounting plate to the bracket just below the handle Use a Phillips head screwdriver to tighten ...

Страница 16: ...elow 2 Connect the cable coming from the Power Out port on the EyeMax to the charger port on your Maestro as indicated in the picture below POWER USB CONNECTIONS BETWEEN EYEMAX MAESTRO Now that the EyeMax and the Maestro have been connected you can charge the batteries in both devices You should charge the batteries for at least 4 hours before turning the Maestro on see Charging the Batteries on p...

Страница 17: ...it could need to be replaced You can order a replacement battery by contacting DynaVox Customer Service Sales Support To install or replace the battery in your Vmax 1 If you are replacing a battery turn the device off and if necessary disconnect the charger 2 Lay your device face down on top of a soft cloth on a flat surface You should be looking at the support leg and the battery door on the back...

Страница 18: ...he EyeMax battery door on your Vmax and tighten the screws by turning them clockwise to the right You should only have to turn them a quarter turn or half turn NOTE After you replace the battery door make a note of both your Vmax s serial number and the EyeMax s serial number They are printed on the label on the battery door Pull the Vmax Quick Start guide out of the Vmax shipping box and write th...

Страница 19: ...picture below 2 Connect the cable coming from the Power Out port on the EyeMax to the charger port on the Vmax as indicated in the picture below POWER USB CONNECTIONS BETWEEN EYEMAX VMAX Now that the EyeMax and the Vmax have been connected you can charge the batteries in both devices You should charge the batteries for at least 4 hours before turning the Vmax on see Charging the Batteries on page ...

Страница 20: ...recharge the batteries as soon as possible The icon will remain visible until the batteries are recharged LOW BATTERY ICON IN THE TITLE BAR NOTE If the EyeMax battery begins to run out of power the charging indicator LED on the left side of the EyeMax will blink see Left Side on page 7 You should recharge the batteries as soon as possible If the batteries completely run out of power your DynaVox d...

Страница 21: ... charging indicators will light up These indicators are located just above the touch screen on your Maestro Vmax and on the left side of the EyeMax 5 When the batteries are fully charged the charging indicators will go out You may unplug the charger jack from the EyeMax and unplug the adapter from the electrical outlet NOTE You can use the devices while they are charging You cannot overcharge the ...

Страница 22: ... user s face 20 24 inches is the optimal distance Angle parallel to the user s face Tilt tilted to match the user s head position NOTE The number of different head positions the user has throughout the day should be an important consideration when considering mounting components and options To set the proper height for the Maestro Vmax imagine a line perpendicular to the user s face extending out ...

Страница 23: ...deline You should adjust the height and the tilt of the device to best suit the user s needs ALTERNATE ANGLE FOR USERS WITH GLASSES For users leaning to the side it is helpful to tilt the EyeMax System sideways as well Rotating the EyeMax System to match the user s head angle will greatly increase the allowed head movement PROPER TILT DIAGRAM NOTE The mount that you choose should be easily adjusta...

Страница 24: ...he Series 5 software to create an Eye Track Status window on any custom page NOTE You may toggle the image in this menu to display either the live camera image or only the eye glints green crosshairs that signify the pupil of each eye To toggle the image select the triangular button in the lower right corner of the viewing field When the image is displaying the live camera feed the button symbol w...

Страница 25: ...c device mounting plate required can be obtained through those same channels as well If you purchase a mount from a company that does not specifically serve the AAC market you may need to obtain a matching mounting plate from DynaVox There are a large number of desk and wall mounts such as an Ergotron mount in the general market that are primarily intended to mount display screens If you are consi...

Страница 26: ...Chapter 3 Installation Setup 22 DynaVox ...

Страница 27: ...s unique selection method allows the user to make immediate selections instead of waiting for a scan to highlight the individual items or without touch NOTE The software default settings may differ from those that were determined as ideal during the user s trial session with the EyeMax It may be helpful to contact the person who led the evaluation session to obtain those software settings These so...

Страница 28: ...o refine the settings for your chosen method of selection If you chose Blink proceed to step 7 If you chose Dwell proceed to step 8 If you chose Blink Dwell proceed to step 9 Blink The software will register a selection when the user gazes at an object and then blinks within a specific length of time Dwell If the user s gaze is stopped on an object for a specified length of time the highlighted ob...

Страница 29: ...ion when you maintain the blink for a specified length of time select the Secondary Action drop down menu and choose the desired action b The Requires Both Eyes to Select check box is enabled by default You may clear the check box if you want to blink only one eye to trigger a selection NOTE If you chose to calibrate only one eye in the Eye Tracking Settings menu the Requires Both Eyes to Select c...

Страница 30: ...nu and proceed to step 11 8 If you chose the Dwell option or the Blink Dwell option in the Select With drop down menu select the Dwell Settings button the Dwell Settings menu will open and complete the rest of this step DWELL SETTINGS MENU a Use the Dwell Time slider to adjust the length of time your eyes must pause on an object to make a selection Select the slider thumb and drag it to the right ...

Страница 31: ...om check box if you want the device to zoom in on an area of the touch screen whenever a selection is made Otherwise make sure the Zoom check box is not selected a If you enable the Zoom check box the Zoom Settings button will be enabled Select the Zoom Settings button to customize the style and behaviors of the zoom function Continue with Modify Zoom Settings on page 29 Then return here 12 Select...

Страница 32: ...y Eye Tracking Assistance Settings on page 34 Then return here 16 To enable or adjust the advanced eye tracking settings refer to Modify Advanced Eye Tracking Settings on page 37 Then return here 17 To customize the speed of the calibration process as well as the images used select the Calibration Settings button Continue with Modify Eye Tracking Calibration Settings on page 39 Then return here 18...

Страница 33: ... Every Selection Every selection activates the zoom Zoom Hotspot Select the Zoom Hotspot and then your next selection activates the zoom NOTE Select the Hotspot Settings button to adjust and position the Zoom Hotspot See Using Hotspots on page 44 for more information Secondary Blink Eye Tracking The secondary blink activates the zoom System Menus Only Smart Zoom The zoom is only activated when you...

Страница 34: ...om 4 If you want to animate the zoom feature showing the screen objects enlarge select the Animate Zoom check box 5 If you want scrolling or panning in the Zoom Toolbar to continue until you make another selection select the Continuous Scroll Pan check box If you leave this check box unchecked scrolling or panning will only move the zoomed area a small amount and then stop When the Zoom Area is se...

Страница 35: ... the tools 8 Select the Position drop down menu to choose the position of the Zoom Toolbar It can appear in any of the four corners of the touch screen or around the entire perimeter Refer to the examples below ZOOM TOOLBAR POSITION EXAMPLES BOTTOM LEFT WITH PAN ARROWS LEFT TOP RIGHT WITH SCROLLING ARROWS RIGHT 9 Select the Toolbar Color box to choose the color of the Zoom Toolbar 10 Select the To...

Страница 36: ...nvert or Outline Outline Color Select Outline Color to open the Color Selector menu and select or create the desired color for the outline When you have chosen the desired color select the OK button to close the Color Selector menu Outline Width Select Thicker to increase the width of the outline Select Thinner to decrease the width of the outline Preview Button Select Preview Button to see an exa...

Страница 37: ... starts to drain The Drain Time slider indicates how long it will take screen objects to completely lose their fill NOTE The Drain options give users the option of not losing their current efforts in selecting an object if their gaze briefly leaves the object This may allow certain users to successfully select objects of a smaller size than they would otherwise be able to access Drain Select the D...

Страница 38: ...se features to best suit your specific needs 1 Select Main Menu Setup Setup Menu The Setup menu will open 2 Use the Selection Method drop down menu to choose the Eye Tracking selection method 3 Select Selection Method Settings The Eye Tracking Settings menu will open 4 Select Assistance Settings The Assistance Settings menu will open ASSISTANCE SETTINGS MENU 5 Select the Visual Bumpers check box i...

Страница 39: ...folders on your device and choose the sound that you want to use When finished select OK The sound you selected will be shown on the Assistance Settings menu 8 Select the Volume slider to set the volume for the alarm sound Use the Enter Value window to enter the volume setting 0 100 with 100 being loudest Select OK when finished Then proceed to step 10 9 Select the Email Address drop down menu to ...

Страница 40: ...lows the user to read the screen without making unwanted selections When Gaze Pause is enabled all the user has to do is look beneath the EyeMax camera between the LEDs for a brief time The Pause Hotspot will appear containing a the Gaze Pause red eye icon refer to the picture below and the software will not track eyes to make a selection PAUSE HOTSPOT SHOWING GAZE PAUSE ICON In order to resume ey...

Страница 41: ...ngular button in the upper right corner of the touch screen On a dedicated Maestro Vmax select the power button and then select Toggle Title Bar To enable and adjust the advanced settings of the Eye Tracking selection method 1 Select Main Menu Setup Setup Menu The Setup menu will open 2 Use the Selection Method drop down menu to choose the Eye Tracking selection method 3 Select Selection Method Se...

Страница 42: ...ed Settings menu 9 To change the Dashboard settings select Hotspot Settings refer to Define the Hotspot Settings on page 50 10 Select OK to close the Advanced Settings menu 11 Select OK to save the settings and close the Eye Tracking Settings menu 12 Select OK to close the Setup menu Open Dashboard The software will open your Dashboard popup refer to Using the Dashboard Hotspot on page 46 Alarm Th...

Страница 43: ...t often use The options are Navigator Yellow appropriate for any page set dominated by light colored buttons Black or Grey appropriate for page sets with a darker color scheme 6 If you want to use an external switch or keyboard acting as a switch to control when the software takes the calibration reading of the user s eyes select the Calibrate with Switch check box When this check box is selected ...

Страница 44: ...a Symbol menu will open SELECT A SYMBOL MENU b Choose a symbol that you want to use in the eye tracking calibration process Refer to Edit the Button s Symbol for step by step instructions and search options NOTE You also have the option to choose to use a photo from one of your custom photo albums Select the Photo Album Browser button to search through the custom photos on your device Select the p...

Страница 45: ...1 Part 401216 C Chapter 4 Series 5 Software Settings b Select No Symbol The Select a Symbol menu will close and the button will be cleared in the Calibration Settings menu 11 Select OK to close the Calibration Settings menu ...

Страница 46: ...n and then select Toggle Title Bar 1 Select Main Menu Setup Setup Menu The Setup menu will open 2 Use the Selection Method drop down menu to choose the Eye Tracking selection method 3 Select Selection Method Settings The Eye Tracking Settings menu will open 4 Select the Select With drop down menu and select either the Dwell or Blink Dwell option 5 Select Dwell Settings The Dwell Settings menu will...

Страница 47: ...e object it is hovering over on the Windows desktop highlighting the object in the process 10 Select Activate Series 5 on Mouse Over to automatically bring the Series 5 window or onscreen keyboard to the front of the Windows desktop priority whenever you mouse over it Leaving the check box empty requires you to make a selection in the Series 5 window or selecting it in the Windows task bar to give...

Страница 48: ...vailable when the current selection method is set to Mouse Pause or Eye Tracking and a pause dwell setting is active In Eye Tracking Gaze Pause is available when blink is active Zoom Hotspot The Zoom hotspot works in conjunction with the zoom feature see Modify Zoom Settings on page 29 When you select the Zoom Hotspot the next spot you select on the touch screen will become the center of the zoom ...

Страница 49: ...yeMax User s Guide 45 Part 401216 C Chapter 4 Series 5 Software Settings THREE HOTSPOTS EXAMPLE Zoom Hotspot left position Pause Selection Hotspot bottom right position Dashboard Hotspot center position ...

Страница 50: ...ASHBOARD HOTSPOT ON AN INTERAACT VISUAL SCENE EXAMPLE Selecting the Dashboard Hotspot will immediately open the popup or onscreen keyboard that you have designated as the Dashboard The Dashboard will open on top of the current page or popup If you are using an onscreen keyboard selecting the Dashboard Hotspot will open the Dashboard in place of the current onscreen keyboard NOTE If Eye Tracking is...

Страница 51: ...ings The Navigator Dashboard popup has been assigned as the default Dashboard popup because it is optimized for eye tracking it provides immediate access to eye tracking status tools eye tracking calibration and an alarm DASHBOARD POPUP EXAMPLE EYETRACKING DASHBOARD MAIN ...

Страница 52: ...ing or Mouse Pause and a pause dwell setting is active In Eye Tracking Gaze Pause is available when blink is active The Pause Selection Hotspot can be positioned any of several places around the perimeter of the touch screen see Using Hotspots on page 44 This hotspot contains an icon that shows the current selection method see the following picture EYE TRACKING PAUSE SELECTION HOTSPOT EXAMPLE To a...

Страница 53: ...ly right between the two LEDs Using the Zoom Hotspot The Zoom Hotspot works in conjunction with the zoom feature When you select the Zoom Hotspot the next spot you select on the touch screen will become the center of the zoom area The Zoom Hotspot can be positioned on either the left or right sides the bottom left or bottom right corners or the bottom middle of the touch screen see Using Hotspots ...

Страница 54: ...Features The Interface Features menu will open 3 Select the Advanced tab The options on the Advanced tab pane will be displayed 4 Select Hotspot Settings The Hotspot Settings menu will open NOTE You can also open the Hotspot Settings menu by selecting Hotspot Settings in the Zoom Settings menu HOTSPOT SETTINGS MENU 5 To define the settings for the Dashboard Hotspot a Select the Show Dashboard Hots...

Страница 55: ...he right viewport Or visually search through the pages sets in the left viewport the contents of the selected folder will be shown in the right viewport Select the desired onscreen keyboard in the right viewport Select OK The Please select an Onscreen Keyboard menu will close and the name of the onscreen keyboard you selected will be shown in the Dashboard Onscreen Keyboard button in the Hotspot S...

Страница 56: ...ayed c Select the Size drop down menu in the One Shot Zoom Hotspot group box and choose the size of the Zoom Hotspot d Select Zoom Settings to open the Zoom Settings menu and adjust the parameters of the zoom function See Modify Zoom Settings on page 29 8 If you want the hotspots to appear full size on the Windows desktop instead of appearing in a minimized state check the Show Full Size Hotspots ...

Страница 57: ...ction methods It allows these users to read and review the contents of the Message Window without inadvertently signalling your Maestro Vmax to speak However it can be useful in other selection methods as well Define the Speak Button Settings To enable and define the settings for the Speak button in the Message Window NOTE If the Series 5 software is in full screen mode you must display the title ...

Страница 58: ...ook in use 6 Use the Message Window Text Area slider to define how much of the Message Window will be devoted to displaying text and how much will be devoted to the Speak button Select the slider thumb and drag it to the left to make the Speak button wider or drag it to the right to make it narrower The display square above the slider will update to reflect the current setting NOTE If any selectio...

Страница 59: ...ependently perform the calibration because it is more direct and it allows the user to select larger buttons throughout the entire process GENERAL CALIBRATION NOTES When you are calibrating the EyeMax System consider these general points It is important to stay relaxed during the calibration process If your body is tense or if your gaze is more intent than normal this could negatively impact the c...

Страница 60: ...e the EyeMax using the Dashboard 1 Make sure that the EyeMax is properly mounted and positioned Refer to Proper Mounting Position on page 18 for more information 2 Select the Dashboard Hotspot blue triangle in the bottom corner of the touch screen The Dashboard popup will open EYETRACKING DASHBOARD MAIN POPUP NOTE You may toggle the image in the center of the Dashboard popup to display either the ...

Страница 61: ...ep If you select No you will return to the Dashboard page a A page with several buttons will open and an image will appear in one of the buttons Use eye tracking to select the image b The image will appear on another button Continue using eye tracking to select the image wherever it appears c When finished with one round of testing you may choose to quit or continue testing If you continue the but...

Страница 62: ...ght corner of the touch screen On a dedicated Maestro Vmax select the power button and then select Toggle Title Bar 2 Select Main Menu Setup Setup Menu The Setup menu will open 3 Make sure that the Selection Method drop down is set to Eye Tracking If it is not select the drop down menu and choose Eye Tracking 4 Select Selection Method Settings The Eye Tracking Settings menu will open 5 Select Impr...

Страница 63: ...ger and easier to select with the EyeMax and the default Dashboard popup provides easy access to the EyeMax calibration menus NOTE The EyeMax and the Eye Tracking selection method can be used effectively with Series 5 users other than Navigator Conversely the Navigator user may be used effectively with selection methods other than Eye Tracking NAVIGATOR INTRODUCTION When the Navigator user is firs...

Страница 64: ...you finish with one page of testing you may choose to continue testing on a page with smaller buttons to determine the size and number of buttons you can successfully access or you may stop testing Choosing No will take you to the back to your previous page NOTE If this was your first time through the eye tracking calibration routine selecting No to finish calibration will automatically take you t...

Страница 65: ...keyboard layout Alphabetical or QWERTY 2 The second screen asks you to choose between Left Sided and Right Sided 3 The third screen asks you to choose the Message Window position Top or Bottom NOTE If you want to change your selection at any point select the Back button to return to the previous screen The Series 5 software will automatically set the following elements of the Navigator user so tha...

Страница 66: ...ocess is immediately begun after you finish the eye tracking calibration process see Navigator Introduction on page 59 for the first time From the Dashboard see Dashboard Popup example EyeTracking Dashboard Main on page 47 select the Settings button Then select Advanced Settings and then select Keyboard Layout Selection ...

Страница 67: ... It also provides access to predictor buttons Main Keyboard This page provides a more detailed full screen keyboard for typing novel messages It provides access to predictor buttons and also to Quickfires and core words for each letter Largest Keyboard This page provides very large targets for the letters This page can be used when the user is fatigued and having difficulty selecting smaller targe...

Страница 68: ...ve Eye Tracking Test Eye Tracking and eye tracking Settings which provide the means to adjust calibration assistance and other parameters without having to open the system menus NOTE This button is only available when Eye Tracking is the current selection method If any other selection method is active this button is blank Text Messaging This button will launch a special keyboard that follows your ...

Страница 69: ...x if it is not already 1 Select Main Menu Setup Setup Menu The Setup menu will open 2 Select the User Manager button The User Manager menu will open 3 Select Navigator in the left viewport 4 Select the Change to Selected User button 5 Select the Yes button to confirm that you want to change users 6 Select the Exit DynaVox button to confirm that you want to restart your device software The Series 5...

Страница 70: ...Chapter 6 Navigator User 66 DynaVox ...

Страница 71: ...e user Adjust the lighting and block sunlight coming into the room from directly behind the EyeMax System Check the Eye Track Status menu or the Eye Track Status tool in the Eye Tracking Dashboard to ensure that the device is positioned properly and that the eyes are in view of the EyeMax camera There should be a large green mark on each pupil and two smaller green marks below each pupil If there ...

Страница 72: ... glasses are as far away from the user s pupil as possible Any reflective coatings on the lenses can interfere with proper calibration See if the user can switch to different glasses without any coatings Ask if the user can wear blended bifocals instead of hard line bifocals Consider increasing the button and font sizes or asking the user to stop wearing the glasses The user is unable to keep his ...

Страница 73: ... buttons on the edges of the screen page Move the device screen a few inches farther away from the user If there are buttons on the edges of the screen that will be used frequently consider swapping them with buttons closer to the middle of the screen that are used less frequently The user has either horizontal OR vertical eye movement only not both Program the user s pages to accommodate the avai...

Страница 74: ...ing the eye tracking system for a time Encourage the user to take occasional breaks at least once every hour Encourage the user to make a conscious effort to blink more often Use artificial tears to moisten the user s eyes Typically this fatigue will decrease in a few days ...

Отзывы: