background image

49-043 F 2011-06 Warranty 07-00424 

Dri-Eaz Products, Inc. 

O P E R A T I N G   T H E   D R A G O N


Setting up the Dragon 

Choosing a location 

WARNING! Use the Dragon outdoors only. Place the 
unit on a level, stable surface. Be sure to chock the 
trailer wheels securely to prevent the unit from 
rolling. Choose a location away from high-traffic 
areas, children and pets, and ensure there are no 
obstructions to the air intake.  


CAUTION: 

Keep air intake vents clean and clear of any 

obstruction. Avoid setting up unit in a location where the 
intake could be blocked or restricted. Blocking the air 
intake will cause the unit to


produce sooty exhaust, 

potentially damaging the unit and the structure being 
heated. 
NOTICE: Install and operate the Dragon in accordance 
with all local and regional regulations. In Canada, refer 
to CSA B139 and CSA B140-1962. 

Fill the fuel tank 

The Dragon is shipped with the fuel 
tank empty. Before operating, fill 
the tank with no. 1 or no. 2 diesel or 
fuel oil. In cold conditions, a diesel-
kerosene mixture as described on 
p. 2 may be used. The tank has a 
55 gallon (208 liter) maximum 
capacity. Do not overfill.  
 

CAUTION:

 Do not use gasoline or 

crankcase drainings. 
 

CAUTION:

 Do not fill the tank while 

the unit is operating. 

Attach the exhaust stack  

The Dragon is equipped with a 2 ft. 
(61 cm) exhaust stack fitted with a 
rain cap. Before operating the 
Dragon, affix the stack to the flue 
opening by slipping the stack over 
the flue ring (Figure 1, B). If the 
stack does not fit snugly, drive 
small sheet metal screws into the 
three pre-drilled holes in the base of 
the stack to hold the stack in place. 
To prevent damage to the unit, 
remove the stack when transporting 
the Dragon.  


CAUTION: 

Do not operate the Dragon without the 

exhaust stack in place.


Attaching ducting to the Dragon 

The Dragon is supplied with three


25 ft. lengths of 8 in. 

diameter (7.6 m × 20 cm) high-temperature ducting. This 
ducting is used to direct the heat produced by the 
Dragon into the structure.  
 

Installing the ducting 

1.  Locate the ends of the 8 in. ducting with the sewn-in 

cuff and buckle. Attach ducting on each of the three 
hot air outlets (Fig. 1, A) and secure them with the 
buckles. 

2.  Place the other end of the ducting into a suitable inlet 

in the structure.  

3.  If recirculation is desired, 12 in. ducting may be 

attached to the inlet ducting ring (Fig. 1, L). Note: the 
accessory inlet ducting ring is available for purchase 
from your Dri-Eaz dealer (part no. 13-01615). Secure 
the ring to the intake grill with 1 in. sheet metal 
screws. 

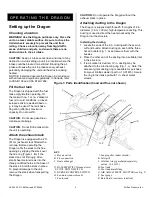
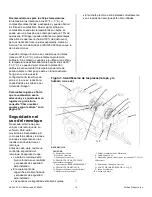
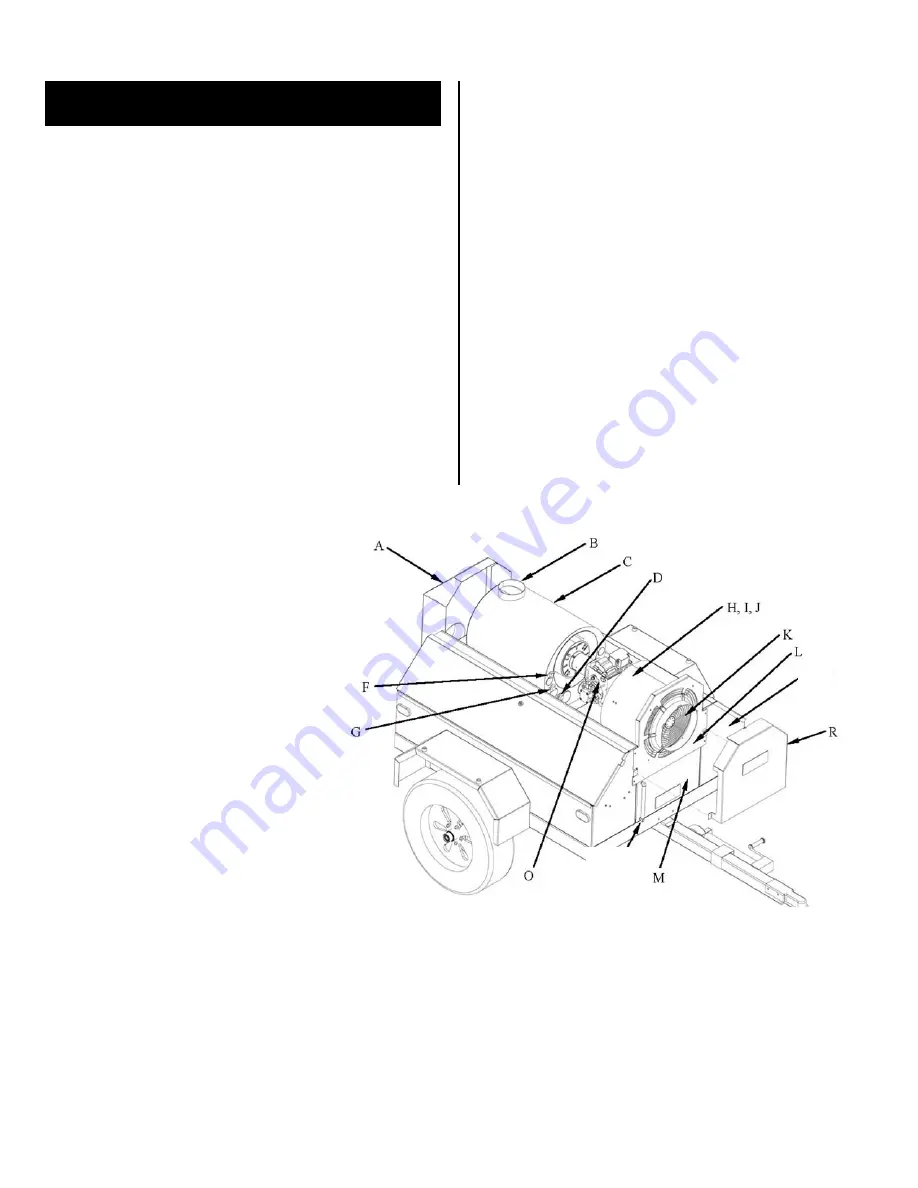
Figure 1: Parts Identification (hood and flue not shown)


KEY 


 A. Hot air outlets 

  J. Fan propeller (under shroud) 

 B. Flue connection 

 K. Inlet grill 

 C. Heat exchanger 

 L. Inlet duct ring (purchased separately:  
    part no. 13-01615) 

 D. HI-TEMP SWITCH manual reset 

M. Fuel tank 

 F. COOL DOWN SWITCH 

 N. Fuel tank drain fitting 

 G. BURNER CONTROL SWITCH 

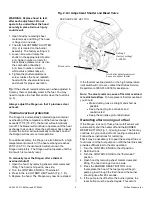
 O. AIR ADJUSTMENT SHUTTER (see Fig. 2) 

 H. Fan motor (under shroud) 

 P. Fuel gauge  

  I. Fan shroud 

 R. Rain Shield (customer installed) 


N, P 


Содержание Dragon X2

Страница 1: ...o before each use Failure to adjust for altitude changes could cause injury permanent damage to the unit and secondary damage when ducting into a structure It may also void the Dri Eaz warranty Refer...

Страница 2: ...on Fuel type The Dragon X2 Mobile Furnace can operate for approxi mately 72 hours on a single tank depending on conditions The Dragon is designed to operate on no 1 or no 2 diesel or fuel oil In cold...

Страница 3: ...tack to the flue opening by slipping the stack over the flue ring Figure 1 B If the stack does not fit snugly drive small sheet metal screws into the three pre drilled holes in the base of the stack t...

Страница 4: ...e could damage the heat exchanger and will not be covered under warranty Special Instructions Bleeding the fuel line In certain circumstances air may accumulate in the fuel line and prevent proper ope...

Страница 5: ...eset To manually reset the Dragon after a thermal overload shutoff 1 Open the hood by removing sheet metal screws and lifting The hood is hinged on one side 2 Turn the CONTROL KNOB to Thermostat 4 Pre...

Страница 6: ...Replace the fuel filter once a year The filter is a spin on type and is located inside the right side cabinet behind the control panel Replacement fuel filters may be purchased from Johnston Supply p...

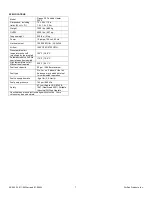
Страница 7: ...hut off monitored by thermostat 102 F 38 8 C Automatic reset cut off No user intervention required 175 F 79 4 C High temperature cut off Manual reset required 205 F 96 1 C Fuel tank capacity 55 gal 20...

Страница 8: ...e pare a menos de 8 pies 2 m de la salida del calentador Aseg rese de que haya suficiente circulaci n de aire alrededor de la unidad para que la combusti n sea adecuada Mantenga todos los elementos in...

Страница 9: ...e temporalmente calor puro y seco Cuando se utiliza para reparar da os causados por el agua y secar construcciones nuevas el Dragon puede aumentar la eficacia de secado El calor que aporta el Dragon a...

Страница 10: ...s ruedas cuando estacione el remolque Antes de cada viaje realice un control de seguridad del remolque Aseg rese de que La bola de remolque est bien colocada en el recibidor y el pasador de seguridad...

Страница 11: ...te el tubo al transportar el Dragon ADVERTENCIA No utilice el Dragon si el tubo de escape no est colocado Coloque los conductos en el Dragon El Dragon incluye tres conductos de 25 pies de largo por 8...

Страница 12: ...0 5 cm x 2 m recipiente para combustible trapos o pa os para limpiar cualquier derrame llaves de tuercas y destornillador 1 Gire la PERILLA DE CONTROL hasta la posici n Off 2 Abra la tapa Aseg rese d...

Страница 13: ...ragon volver a funcionar con normalidad Para mayor seguridad el Dragon tambi n incluye un limitador de alta temperatura Si el intercambiador t rmico alcanza los 205 F 96 1 C el limitador apagar el Dra...

Страница 14: ...drenaje para que caiga all el combustible b Quite el tap n de drenaje con una llave de tuerca c Deje que el tanque se vac e por completo d Vuelva a colocar el tap n de drenaje e Deseche el combustible...

Страница 15: ...delo Calentador Port til Dragon X2 Portable Heater F429 Dimensiones con el remolque incluido ancho x altura x profundidad 74 54 116 in 1 9 1 4 3 m Peso 1500 lb 680 kg Peso total del veh culo 2000 lb 9...

Страница 16: ...as se pencher ni s asseoir sur le g n rateur Ne pas s approcher moins de 8 pi 2 m de la sortie d air du g n rateur La circulation d air autour de l appareil doit favoriser une bonne combustion Garder...

Страница 17: ...ocaux de stockage et les entrep ts les serres et les tunnels en polyur thanne pour l agriculture toute situation exigeant un chauffage temporaire sec et propre Le Dragon favorise un s chage plus effic...

Страница 18: ...r un endroit non fr quent par les enfants ou les animaux V rifier que l entr e d air est bien d gag e MISE EN GARDE Les prises d air doivent tre propres sans engorgement viter de placer l appareil l o...

Страница 19: ...es r glages du Dragon et les conditions dans la structure au moins une fois par jour de fonctionnement R gulation de la temp rature Le Dragon est muni d un thermostat distant permettant de r guler la...

Страница 20: ...arburant L chappement du Dragon doit toujours tre transparent Une fum e noire ou blanche indique un mauvais m lange air carburant a Lorsque l chappement est transparent aucun r glage n est n cessaire...

Страница 21: ...u refroidissement complet du g n rateur Suivre les instructions ci apr s de red marrage Conseil Les tapes suivantes doivent parfois tre r p t es trois quatre fois afin de permettre la pompe de carbura...

Страница 22: ...service technique de Dri Eaz au 800 932 3030 l adresse du service apr s vente le plus proche 5 Nettoyage du bo tier Nettoyer le bo tier du Dragon avec un d graissant de type Unsmoke Degrease All Acces...

Страница 23: ...1 06 Warranty 07 00424 23 Dri Eaz Products Inc Dragon X2 Schematic Esquema Schematic See Schematic Key p 24 Vea en la p gina 24 la explicaci n de los s mbolos utilizados en el esquema Voir l gende du...

Страница 24: ...3 SJT CONJUNTO DE CABLES DEL TERMOSTATO 14 3 SJT FAISCEAU DE C BLES 24VAC 24VAC 24 V c a BLOWER VENTILADOR SOUFFLANTE BULB BOMBILLA AMPOULE BURNER QUEMADOR BR LEUR BURNER CONTROL SWITCH ADJUST TO 175...

Отзывы: