background image


2.2.


Menu interfaces 

sScale™ is divided into various menu interfaces. The following is 

an overview on all available 

menu items. You will find a detailed description in the chapters indicated. 

2.2.1.


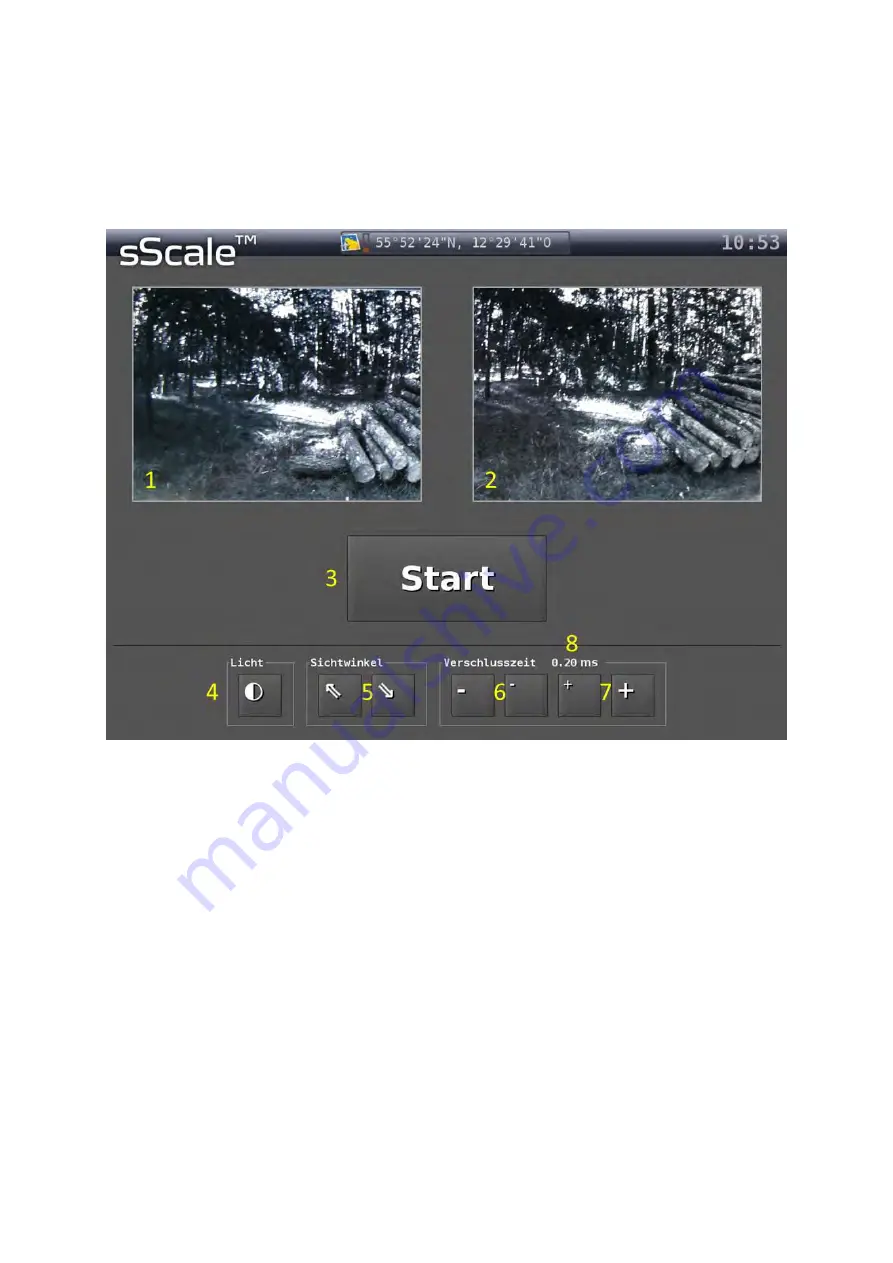
“Start screen” user interface


1


Picture of camera 1. 

2


Picture of camera 2. 

3


Button to start photographing. While photographing the “Stop” button is displayed. 

The frame around the camera images will flash and a progress bar below the cam-

era images shows the capacity of the working-memory. 

4


Button, to switch the LED floodlights on and off. 

5


Button, to move the viewing angle of the camera up or down. 

6


Button, to adjust the exposure time for brighter conditions. 

7


Button, to adjust the exposure time for darker conditions. 

8


Indication of the selected exposure time (will be displayed after the first touch of 

the buttons 6 or 7 - not directly after starting the system). 


You can find more information in the Chapters A.3 and A.5. 


Содержание sScale

Страница 1: ...Manual for sScale With conformity rated software Versions 3 4 190X and versions 3 5 203X As of 28 2 2018 ...

Страница 2: ......

Страница 3: ... 12 2 2 10 Manual measurement user interface 13 2 2 11 Measurement of the rear side user interface 14 3 Measurement 15 3 1 General procedure 15 3 2 Measurement step by step 15 3 2 1 Image capture 15 Preparations 15 Image capture 16 3 2 2 Check and crop the captured picture sequence 17 Checking 17 Cropping 17 3 2 3 Editing of the polygonal course and entering the Woodpile ID 18 Editing the polygona...

Страница 4: ...ar side of a woodpile 34 5 2 3 Depth 34 5 2 4 Density 34 5 2 5 Entering rejects 35 5 2 6 Entering underlays 36 5 2 7 Entering tree species 36 5 2 8 Entering the assortment 36 5 2 9 Entering a note 36 5 2 10 Entering the seller 36 5 2 11 Entering the buyer 36 5 3 Functions of the user interface Edit polygonal course 37 5 3 1 Checking the log diameter 37 5 3 2 Editing a log diameter 38 5 3 3 Adding ...

Страница 5: ...c detection of a woodpile face area 43 2 2 Additional requirements for the identification of a container volume 43 3 Environmental influences 43 C Test Routine 45 1 Brief description of the system test 45 2 Necessity of a system test 46 Contact Dralle A S Venlighedsvej 4 2970 Hørsholm Denmark info dralle dk www dralle dk ...

Страница 6: ......

Страница 7: ... picture sequence a polygonal course is derived which describes the woodpile face with the outer contour The photo optic area measurement of the woodpile face is conformity rated In a further calculation step the total volume of the woodpile can be calculated from the conformity rated area which is then no longer conformity rated 2 System components and menu interfaces 2 1 System components sScale...

Страница 8: ... Hard drive Data storage Hitachi HGST Z5K500 320 HDD Cactus KD64GFI 910S SSD Monitor Operation G121XN01 V0 G121XN01 V0 LED floodlight Lighting Instrumented DRAL LED Instrumented DRAL LED Control motor camera movement Firgelli Technologies L12 Firgelli Technologies L16 Heating Heating Temperature controlled heating module Screen venti lation Anti fog Fans Status display Status display of vari ous f...

Страница 9: ...3 Figure 3 Schematic structure of the sScale ...

Страница 10: ...ame around the camera images will flash and a progress bar below the cam era images shows the capacity of the working memory 4 Button to switch the LED floodlights on and off 5 Button to move the viewing angle of the camera up or down 6 Button to adjust the exposure time for brighter conditions 7 Button to adjust the exposure time for darker conditions 8 Indication of the selected exposure time wi...

Страница 11: ... the installed Software example 6 Button to view registrations 7 Button to view archive 8 Button to change user 9 Button to check the transmission status of measurements 10 Button to switch the LED floodlight on and off 11 Button to use the system in demonstration mode if installed 12 Button to shut down the system 13 Button to return to the start screen or the presentation of results You can find...

Страница 12: ...e mentioned list 3 Directional radar for orientation The entry selected in the list above is highlighted in the directional radar 4 Administrative data for the selected entry in the above mentioned list 5 Button to reject the measurement job selected in the above list 6 Button to return to the start screen or the presentation of results You can find more detailed information in Chapter A 5 ...

Страница 13: ... list view of the received measurement jobs 3 Administrative data for selected measurement job also highlighted in the map 4 QR code with deposited coordinates of the selected measurement job viewable in Google Maps 5 Button to return to the start screen or the presentation of results You can find more detailed information in Chapter A 5 ...

Страница 14: ...nt Further details can be accessed by clicking 3 Buttons to scroll through the above mentioned list 4 Button to search for a specific measurement a keyboard appears 5 Button to call up other days 6 Button to return to the start screen or the presentation of results You can find more information in the Chapters A 4 and A 5 ...

Страница 15: ...le of the most important woodpile information 3 Addition woodpile information 4 Unique internal Woodpile ID 5 QR with stored woodpile index for use in StackSnap see separate documentation 6 Button to return to the archive interface You can find more detailed information in Chapter A 4 ...

Страница 16: ...ce of the entire woodpile for quick navigation The red line represents the current position within the woodpile 4 Button to accept pictures and to start the picture analysis 5 Button to discard pictures After confirmation you return to the user interface Start screen You can find more detailed information in Chapter A 3 ...

Страница 17: ...e face area and unique internal Woodpile ID Clicking on the pictures calls up the user interface Edit polygonal course 9 Button to enter the woodpile depth 10 Button to enter the woodpile thickness 11 Button to enter the rejected amount 12 Button to enter the underlay amount 13 Button to select the tree species 14 Button to select the assortment 15 Button to enter an additional note 16 Button the ...

Страница 18: ...gon vertices 4 Button to enter additional polygon vertices 5 Button to remove excess polygon vertices 6 Green line indicates the total length of the woodpile defined by the first polygon vertex on the left side and the last polygon vertex on the right side 7 Picture sequence of the entire woodpile for quick navigation The red line shows the current position within the woodpile 8 Button to return t...

Страница 19: ... 4 Overview of the necessary variables for calculating the woodpile face area 5 Button to enter the length of the woodpile 6 Button to enter the mean diameter of the woodpile 7 Button to enter the number of logs in the woodpile 8 Button to save the entered data and return to the Result user interface You can find more information in the Chapters A 4 and A 5 ...

Страница 20: ...measured heights 3 Button to move from one height to another 4 Overview of the necessary variables for calculating the woodpile rear side 5 Button to enter the length of the woodpile 6 Button to save the entered data and return to the Result user interface You can find more detailed information in Chapter A 5 ...

Страница 21: ...fter the transfer changes to the measurement cannot be made to the sScale system in the forest nor the sScale server NOTE Use a digitiser pen with a thin plastic tip for all work on the monitor Using for example metal tip pens results in damage to the monitor and significant costs to the customer if a monitor needs to be replaced 3 2 Measurement step by step 3 2 1 Image capture Preparations Start ...

Страница 22: ... off during measurement You can find more detailed information concerning the LED floodlights in Chapter A 5 1 5 Image capture After adjusting the viewing angle and exposure drive to the start of the woodpile so that the woodpile does not exceed 30 of the camera picture Begin taking pictures by pressing button 2 2 1 3 Start after you have started to move the vehicle Drive past the woodpile at a co...

Страница 23: ...it is possible to examine the individual pictures and to check for any errors for example cropped woodpile areas if the woodpile is not parallel to the path To do this you can scroll through the individual pictures in the Picture sequence user inter face Cropping Cropping the picture sequence reduces the number of pictures to be analysed and speeds up the analysis process This step is not absolute...

Страница 24: ...r the edit mode of the polygonal course press the woodpile picture The polygonal course is shown as a blue line Blue squares mark the polygon vertices The polygonal course is defined by straight connections between the individual polygon vertices You can move it by tapping and holding a polygon vertices You can add more polygon vertices by pressing the button 2 2 8 4 Plus This button remains activ...

Страница 25: ...e TIP If necessary use the zoom function to better identify details of the woodpile face This is achieved by pressing the button 2 2 8 2 Magnifying glass How precisely does the polygonal course need to be adjusted Generally the polygonal course output by the system must be optimised To guide you for the precision you need the following illustrations show schematic polygonal courses and polygonal c...

Страница 26: ...20 Figure 9 Automatic generated polygonal course insufficient optimisation ...

Страница 27: ...21 Figure 10 Edited polygonal course excessive optimisation ...

Страница 28: ...22 Figure 11 Edited polygonal course adequate optimisation ...

Страница 29: ...see illustration in Figure 10 Entering the Woodpile ID Only after a Woodpile ID has been entered by the user can a measurement be stored and sent to the sScale server This Woodpile ID is independent of the internal unique Woodpile ID Entering the Woodpile ID is done via button 2 2 7 5 Woodpile ID After pressing the button a QWERTY keyboard appears By pressing the ALT button further special charact...

Страница 30: ...changed after saving NOTE After saving the measurement the software is restarted This takes place fully automatically and requires no intervention by the user Note that there may be a short delay in receiving the GPS signal 3 2 5 Discarding a measurement If a picture analysis is not to be transmitted and deleted you can cancel the measurement by pressing button 2 2 7 19 Discard All data is deleted...

Страница 31: ...and XYZ123 2 XYZ123 1 and XYZ123 2 In addition a note can be stored in the note field see Chapter A 5 2 9 so that the two amounts can be combined later 3 3 2 Procedure Use the cross hair plates described in Chapter C 1 to mark the dividing line between the upper and lower woodpile part Look for a suitable edge log on the relevant woodpile so that the regular polygonal course crosses the cross hair...

Страница 32: ...es along the dividing line in addition to the two edge crosses Woodpiles can also be divided and measured under unfavourable piling conditions such as slight bends or bumps in the woodpile face For woodpiles over 20 metres in length it is recommended to place a marker cross every 15 metres The procedure of dividing the woodpile corresponds to the method already de scribed Just that existing polygo...

Страница 33: ...on on it Stak ID is au tomatically called Combine In top left corner just to the right of the sScale logo this green icon appears Finish edit part 1 and push submit Take pictures of part 2 of the stack Start the analysis Under the give ID menu give select the stack s id Finish the editing and push submit A box will pop up with two options Left Right Top Bottom Choose the option that fits the stack...

Страница 34: ...as per template g nnn xxxx mmmmmmmmmmmmm In addition with photo optic measurement results there is the note Information highlighted green is conformity rated according to the Measurement and Verification Act see Operating Instructions Figure 20 Result representation of a conformity rated measurement in the user interface Result Non conformity rated results are always shown white These are the wood...

Страница 35: ...e main tree species of the woodpile the range of woodpile the seller of the woodpile the purchaser of the woodpile a note if entered 4 2 Manual measurement Using sScale a manually measured woodpile can be entered and saved You can find more detailed information in Chapter A 5 2 1 CAUTION Results of manual measurements are non conformity rated For this reason the results of a manual measurement are...

Страница 36: ...easurement is present if the woodpile could not be measured in a photo optic manner for example repeated failure of the analysis because the woodpile is too small Thus no overall picture of the woodpile can be generated Therefore as a woodpile picture in the archive view only a single picture of the picture sequence is stored and displayed to basically document the woodpile as a photo All other re...

Страница 37: ...in relation to their location to the vehicle The navigation scale will automatically change with the distance to the selected measurement job All measurement jobs are displayed that are in the respective radius Job details On the right side of the screen you will find details concerning the measurement job selected in the list on the left side In addition to the position of the woodpile the seller...

Страница 38: ...nts that have not yet been sent this data will not be lost Sending the results to the sScale server may take some time depending on your network connection 5 1 5 Light By pressing the button 2 2 2 10 Light you can switch the built in LED floodlight on and off again This is especially helpful at night when you want to detect sprayed woodpile numbers If you use the light during a measurement the flo...

Страница 39: ...hat cannot be reached with the vehicle The manual measurement function is based on the section height method and essentially provides extended computational support for this method In this way a manually measured woodpile can be transferred into the IT structure of the user Measure the section heights of the front side of the woodpile according to your specifications and enter them into the mask u...

Страница 40: ...Depth to enter the depth of the woodpile assortment length A keyboard appears The depth is used to calculate the container volume by multiplying it by the woodpile area 5 2 4 Density The system derives the possible density of the woodpile from various parameters The density of the woodpile is the ratio of wood volume to container volume However because the system is unable to detect for example th...

Страница 41: ...herefore rather soft parameters For the additions and deductions of blocks 4 6 and 7 the quantities issued by sScale can be used 5 2 5 Entering rejects If there are individual logs in the woodpile that are to be marked as reject you can enter their numbers via button 2 2 7 11 Reject The system then automatically calculates the number of logs with the mean diameter of the woodpile and the assortmen...

Страница 42: ...rtment of the woodpile A list appears from which you can select the appropriate assortment The assortment list is cus tomer specific and is configured and maintained centrally via the sScale server 5 2 9 Entering a note With the button 2 2 7 15 Note you can enter a note to the measurement A QWERTY key board appears press the ALT key at the bottom right of the keyboard to call up more special chara...

Страница 43: ... if necessary 5 3 1 Checking the log diameter By pressing the button 2 2 8 1 Circle you can switch to the view of the face diameter As shown in Figure 23 the diameters are displayed as yellow circles on the faces of the individual logs The middle of the circle is the basis of the assessment As with editing of the polygonal course you can use the navigation bar to traverse along the woodpile Figure...

Страница 44: ...ameter for editing If you move the pen up and out of the circle on the monitor the circle increases in size move the pen down the circle reduces in size After editing click anywhere outside the circle to see all diameters again By clicking and holding a diameter you can also move it to any position NOTE Make the pen movements slowly to allow delicate adjustment NOTE If you move the pen diagonally ...

Страница 45: ...se activate the button 2 2 4 9 Minus and touch the inside diameter to be deleted NOTE Both the Plus button and the Minus button remain active until they are deactivated by clicking them again NOTE Diameters automatically recognised by sScale have a very high precision However since the monitor has a resolution of about 2 cm px the manually changed diameters always have a level of error This can le...

Страница 46: ...record the woodpile after passing through and failing the analysis see Chapter 5 2 1 6 2 System crash If the system crashes due to an internal error monitor freezes and stops responding you can restart or shutdown the system using the on off switch on the back of the monitor A restart occurs by briefly pressing the button the shutdown is carried out by holding the button for a few seconds until th...

Страница 47: ...41 CAUTION If this happens contact the manufacturer immediately Figure 27 Representation of a defective or manipulated data record ...

Страница 48: ...rement area is limited by the maximum picture taking time of individual pictures within 60 seconds versions 3 4 1900 and 3 4 1902 or 120 seconds version 3 4 2031 1 3 Resolution The woodpile face area is calculated and stored with a resolution of 0 1 cm The result is displayed with a resolution of 0 01 m 1 4 Environmental conditions Climatic environmental conditions Temperature range 25 C to 40 C H...

Страница 49: ...ight without curves and bends maximum curvature of the woodpile face of 0 1 m running meter 2 2 Additional requirements for the identification of a container volume 11 The length of the piled logs corresponds to the order length of the species 12 Front and rear sides of the woodpile have a uniform surface form so that there are no differences in area 13 The stack must lie horizontally on horizonta...

Страница 50: ...sun moves a few degrees further or is briefly covered by a cloud To 4 Here only a removal of the obstacles is possible In addition internal rules of action must be found as to whether for example if there is snow it is acceptable for the customer to refrain from correct piece counting and diameter distribution The calcu lated area of the polygonal course coincides with the enclosed area even if th...

Страница 51: ...th sufficient accuracy The testing is divided into two parts 1 Based on reference areas see Figure 28 on woodpiles it is checked under conditions that are representative of the entire area of application of the system whether the measurements lie within the legal calibration error limits For this purpose irregular rectangles are marked according to the requirements on the woodpile face areas and t...

Страница 52: ...ed test described in Chapter C 1 another simpler solution is available for this purpose Both can be performed by the user on site in the forest The correct combination of the individual pictures in the context of the picture analysis can be checked by comparing a reference length in the simplest case of the maximum woodpile length with the result of the device measurement The difference should not...

Отзывы: