


Saflok RT/RT Plus Installation Guide
PK3720_T 04-19 25
APPENDIX A.2 Additional steps for
Autodeadbolt ASM
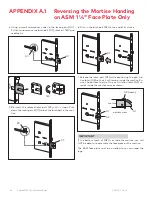
Do the following INSTEAD OF page 10, step 6:
5. If not already installed at the factory, put the thumbturn
in the vertical position and install all four (4) parts (E) as
shown, on the inside trim assembly.
E4
E17
E3
E5
Install clip E17
diagonally on hub
Turn the thumbturn all the way to the right for a RH instal-
lation (arrow on E3 points UP), or all the way to the left for a
LH installation (arrow on E3 points DOWN). The thumbturn
should stop in the vertical position, and the stopper cam (E3)
will be in the position illustrated below.
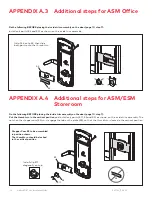
Place the 3 spacers (S) on the door. Place the inside trim as-
sembly on the door so that the upper and lower spindles (F)
and (G) engage the thumbturn and the inside lever. Fasten
to the outside housing using the three 1/8" hex head mounting
screws (I).
If applicable apply the privacy thumbturn sticker as shown. If
in doubt as to the direction of the arrow, press the auxiliary
latch (D6) to extend the deadbolt, and verify in which direc-
tion to rotate the thumbturn to reach the horizontal (priva-
cy) position.
S
T
I
I
I
S
RH/LHR LH/RHR
D6


