


24
Saflok RT/RT Plus Installation Guide PK3720_T 04-19
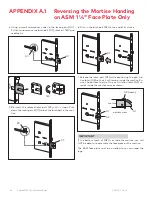
4. Using a small screwdriver, slide up the locking pin (D11).
Pull out and remove the latch bolt (D7), rotate it 180°, and
reattach it.
D11
D7
180°
5. Re-insert the rotated latch bolt (D7) until it stops. Push
down the locking pin (D11) to lock the latch bolt in the mor-
tise.
D7
D11
6. Push in the latch bolt (D7) to the end of its stroke.
D7
7. Release the latch bolt (D7) while positioning the anti-fric-
tion latch (D9) so that it will remain inside the mortise. En-
sure the bottom tooth of the anti-friction latch (D9) re-
mains inside the mortise case as shown.
D7
D9 (tooth)
mortise
bottom view
D7
D9
CAUTION
WARNING
IMPORTANT
If the bottom tooth of (D9) is outside the mortise, you will
NOT be able to re-assemble the face plate on the mortise.
The ESM face plate must be installed so you can read the
logo.
APPENDIX A.1 Reversing the Mortise Handing
on ASM 1 1/4" Face Plate Only


