


2
Saflok RT/RT Plus Installation Guide PK3720_T 04-19
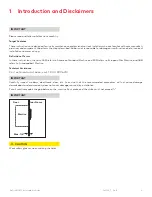
1. Introduction and Disclaimers
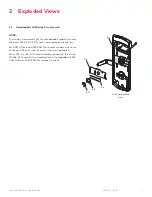
2. Checklist and Exploded Views
2.1. Parts and Tools List
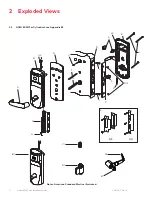
2.2. ASM/ESM
2.3. Autodeadbolt ASM Inside Trim
Assembly
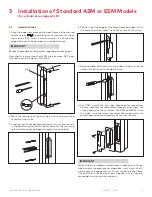
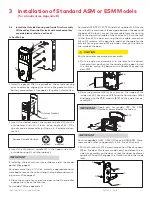
3. Installation of Standard ASM or ESM
Models
3.1. Check the Mortise Handing
3.2. Install the Strike
3.3. Install the Mortise
3.4. Install the Outside Housing & Inside
Trim Assembly without key override
3.5. Reversing the Outside Lever
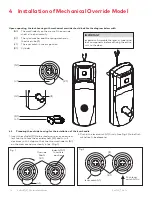
4. Installing the Mechanical Override Model
Appendices
A. Mortise Models
A.1. Reversing the Mortise Handing
A.1.1. Reversible ASM
A.1.2. Reversible ESM
A.2. Additional Steps for Autodeadbolt ASM
A.3. Additional Steps for ASM Office
A.4. Additional Steps for ASM/ESM
Storeroom
B. Cylindrical Models
B.1. Installing Cylindrical Models
B.1. Install the Strike
B.2. Install the Latch
B.3. Install the Cylindrical Unit
B.4. Inside Trim Assembly
B.5. Install Outside Housing &
Trim Assembly
C. Escape Return Model (79N)
C.1. ASM/ESM & ADB Inside trim assembly
for 79N
C.2. Installation of extension spring on
inside trim assembly
Installation Guide Lexicon
Note: This installation Guide is for Saflok RT
and RT Plus lock. Images of the lock may
vary depending on installed options.
03
04
04
06
07
08
08
09
10
11
12
13
21
21
24
26
27
27
28
28
28
28
29
30
31
33
33
33
34
Table of Contents
Saflok RT/RT Plus
ASM, ESM, ASM Auto Deadbolt Mortises &
Cylindrical Models 23/8" and 23/4" Backset
Stand Alone (79S), Ambiance RX Ready (79R), Ambiance RX
(79Z,Y,Q), and Escape Return (79N) Models
©2019 Saflok. All trademarks and registered trademarks are the property of their respective owners.


