Chapter 1
Getting Started
vi
Chapter 1
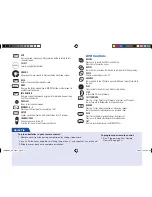
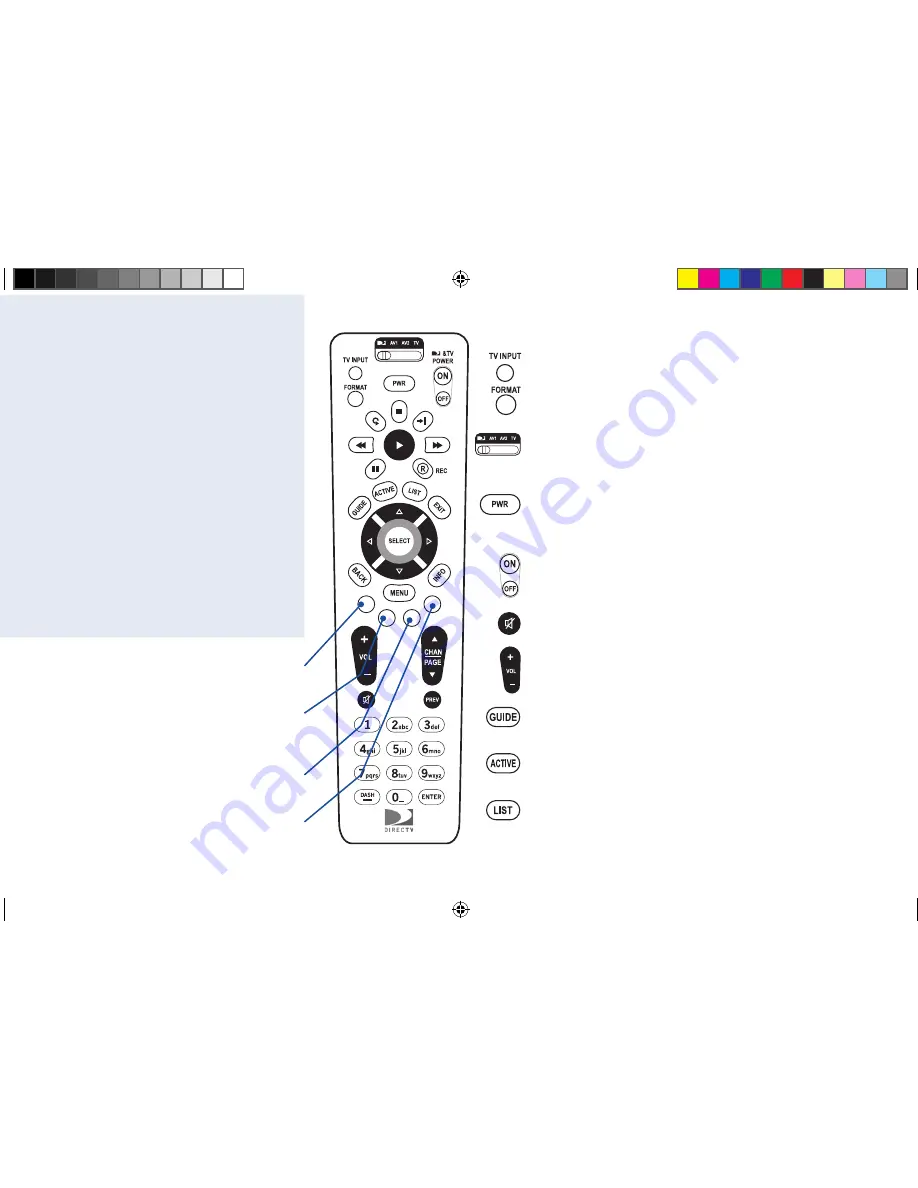
DVR Controls
RECORD
Press once to record live TV or in the Guide.
Press twice to record a series.
REPLAY
Jumps back six seconds. Hold down to jump back to the beginning.
PAUSE
Pauses current video or live TV.
ADVANCE
Jumps ahead to live TV after a pause. Hold down to jump forward to
the end.
PLAY
Plays current video. Press and hold for slow motion.
STOP
In recorded TV, stops playback.
FAST FORWARD
Press up to four times to fast-forward at increasing FF speeds.
Jumps forward to Bookmarks in a recorded show.
REWIND
Press up to four times to rewind at increasing speeds.
Jumps backwards to Bookmarks in a recorded show.
DASH
Press twice to delete recorded shows from your list.
Press once to delete a Bookmark in recorded shows.
LIST
Displays recorded programs on DIRECTV Plus.
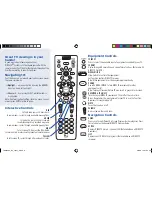
Great TV viewing is in your
hands!
A good way to begin learning about your
DIRECTV® System is to familiarize yourself with the
remote control. You’ll find further details throughout the
User Guide relating to specific functions.
Navigating 101
You’ll find you can get around nearly all onscreen menus
the same simple way.
4
Highlight…
a menu or button by using the ARROW
keys (up, down, left and right).
4
Choose it…
by pressing SELECT while the item is
highlighted.
Note: Don’t worry about getting stuck in a menu. You can
always press EXIT to return to video.
Equipment Controls
TV INPUT
Press to select the available input of equipment connected to your TV
FORMAT
Cycles through HD resolution and screen format options. (Not used with
DIRECTV Plus DVR)
MODE SWITCH
Slide Switch to control other equipment.
Left position controls DIRECTV receiver.
Note: Other equipment must be programmed individually.
POWER
Use with MODE SWITCH to turn DIRECTV receiver and/or other
equipment on/off.
Note: Turning off receiver before TV may result in gray or black screen.
RECEIVER & TV ON/OFF
Turns both your DIRECTV receiver and TV on/off at the same time.
Notes: Remote must be programmed for your TV to use this function.
Receiver still records when off.
MUTE
Turns the Sound on or off.
VOLUME
Rises or lowers the sound level
Navigation Controls
GUIDE
Press once to see different On-Screen Program Guide categories. Press
twice to display the General DIRECTV Program Guide.
ACTIVE
Displays DIRECTV mosaic - channel 100 (Not available on all DIRECTV
Receivers).
LIST
Displays your TO DO list of programs (Not available on all DIRECTV
receivers).
EXIT
Exits any menu screens and Programming Guide to return to last
channel viewed.
SELECT
Selects any highlighted item.
ARROWS
Allows you to move around in Program Guide and menu screens.
BACK
Returns to previously displayed screen.
MENU
Displays the Quick menu when in DIRECTV mode or other menu for
another selected device.
INFORMATION
Displays current channel and program information when watching
live TV or in the Guide.
PREVIOUS
Tunes to last channel viewed.
NUMBERS: 0 - 9
Press keys to directly enter channel (e.g. 730)
ENTER
Speeds up channel tuning. Sets up Autotune for L12 receiver.
CHANNEL/PAGE
Changes channels in live TV.
Scrolls a full page in the Programming Guide.
Interactive Controls
RED
In the Guide, jumps 12 hours back.
In some menus, cycles through available menu options.
GREEN
In the Guide, jumps 12 hours forward.
Inserts Bookmarks on recorded programs.
In some menus, cycles through available menu options.
BLUE
In full-screen TV, displays the Mini Guide.
In recorded lists, marks show to prevent automatic removal.
YELLOW
In full-screen TV, cycles through alternate audio tracks.
To place batteries in your remote control:
1. Remove cover from the battery compartment by sliding it downward.
2. Insert 2 AA batteries (supplied), matching the positive (+) and negative (–) at each end.
3. Slide the cover back on to complete installation.
Quick Tip
To program your remote control:
1. See “Programming Your Remote
Control” on page 20.
16855980_L12_Jan27_2.indb 6
2/6/08 12:47:46 PM
Содержание L12
Страница 1: ...DIRECTV RECEIVER USER GUIDE Model L12 16855980_L12_Jan27_2 indb 1 2 6 08 12 47 16 PM ...
Страница 8: ...16855980_L12_Jan27_2 indb 8 2 6 08 12 47 53 PM ...
Страница 9: ...ix 16855980_L12_Jan27_2 indb 9 2 6 08 12 47 54 PM ...
Страница 12: ...xii 16855980_L12_Jan27_2 indb 12 2 6 08 12 48 02 PM ...
Страница 76: ...Notes 64 16855980_L12_Jan27_2 indb 64 2 6 08 12 50 30 PM ...
Страница 77: ...Notes 65 65 16855980_L12_Jan27_2 indb 65 2 6 08 12 50 31 PM ...
Страница 78: ...Notes 66 66 16855980_L12_Jan27_2 indb 66 2 6 08 12 50 33 PM ...
Страница 79: ...Notes 67 16855980_L12_Jan27_2 indb 67 2 6 08 12 50 35 PM ...
Страница 80: ...Notes 68 68 16855980_L12_Jan27_2 indb 68 2 6 08 12 50 37 PM ...
Страница 81: ...Notes 69 16855980_L12_Jan27_2 indb 69 2 6 08 12 50 39 PM ...
Страница 84: ...TOCOM 16855980 Printed in USA 16855980_L12_Jan27_2 indb 72 2 6 08 12 50 53 PM ...

