DigiTech GeNetX BNX3 Скачать руководство пользователя страница 43

Recorder

The BNX3 is equipped with an 8-track digital recorder. The recorder interface features standard recording
transport buttons,Track buttons, Drums button, Level/Pan button, Setup button, and Remain (time remaining)
button. Song and Time displays help you keep track of what song or loop you are working with and how
much recording time has elapsed or remains. The recorder functions are also mapped to the BNX3’s
footswitches allowing hands-free functionality to the recorder.

Recorder Panel

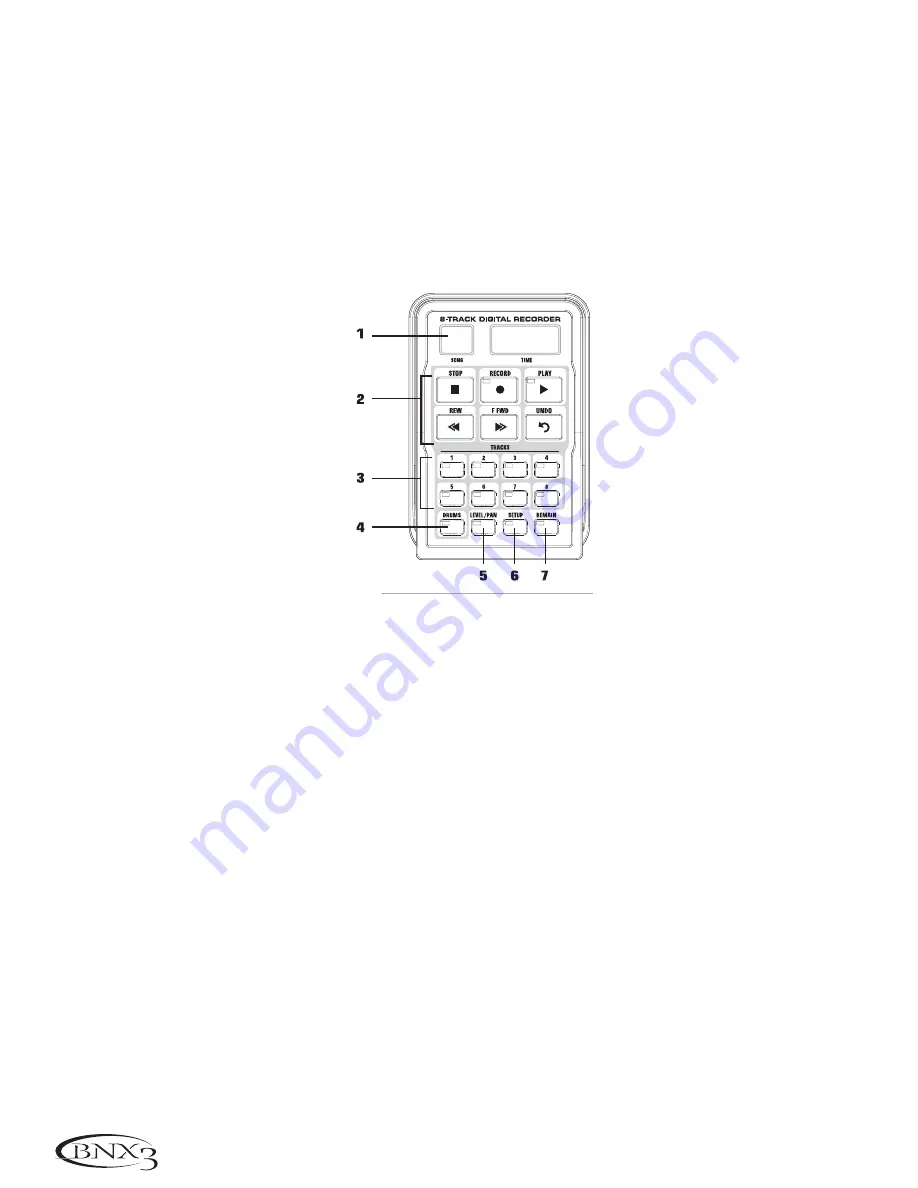
The recorder panel is divided into 7 basic sections:

1.

DISPLAY

– There are 2 different displays on the BNX3’s recorder panel

SONG

– A Song is a group of recorded tracks that are combined to create songs. This display shows the

selected Song or Loop for recording and playback.

TIME

– This display shows elapsed time of recorded material of the current Song when the recorder is

playing back tracks. When the 

REMAIN

button is on, it also displays the amount of recording

time left in memory when the recorder is stopped.

2.

TRANSPORT BUTTONS

– The 6 transport buttons just below the displays are used for beginning the

record, playback, and search functions of recorded material. They include
Stop, Record, Play, Rewind, Fast Forward, and Undo.

3.

TRACKS

– A Track is an individual memory location in a song that you record audio to. The BNX3 has

eight individual tracks that can be recorded to.

4.

DRUMS

– Records drum audio tracks or syncs the Drums playback to tracks using the BNX3’s built-in

drum machine.

5.

LEVEL/PAN

– Accesses the playback level and pan controls for each track.

6.

SETUP

– Accesses setup options for each song including Input Select, Stereo Enable, Click Track,Tempo,

Pre-Roll, Song Repeat and more.

7.

REMAIN

– When Remain is turned on, the 

TIME

display shows the remaining recording time available in

track minutes when the recorder is stopped. When the recorder is playing back tracks, it
shows the amount of time remaining in the current song.

38

Recorder

Содержание GeNetX BNX3

Страница 1: ...GENETX BASS WORKSTATION TM USER S GUIDE...

Страница 2: ...Compatibility Operation is subject to the following conditions This device may not cause harmful interference This device must accept any interference received including interference that may cause u...

Страница 3: ...is returned to DigiTech WITH RETURN AUTHORIZATION where all parts and labor will be covered up to a period of one year A Return Authorization number may be obtained from DigiTech by telephone The comp...

Страница 4: ...horus Mod Effects 24 Chorus 24 Flanger 25 Phaser 25 Tremolo 25 Panner 26 Vibrato 26 Rotary Speaker 26 AutoYa 26 YaYa 27 Detune 27 Pitch Shift 27 Delay 28 Reverb 28 Tutorial 30 Select a Preset 30 Creat...

Страница 5: ...rding a Loop 58 Recording Layered Overdubs to your Loop 58 Using Quantize for Seamless Loops 58 Using the GNXFC for Recorder Functions 59 Recording a Track 59 Using Undo While the Recorder is Stopped...

Страница 6: ...er your time would be well spent by reading through this User s Guide with your BNX3 in front of you Included Items Please check to make sure the following items have been included PSS3 Power Supply W...

Страница 7: ...supply to an AC outlet 4 Turn the BNX3 POWER switch on 5 Turn your amplifier s on and adjust the volume s to a normal playing level Gradually turn up the BNX3 s OUTPUT level Select an Analog Output Mo...

Страница 8: ...the active effects for the selected preset or the selected row of effects while editing 3 Effect Select Buttons The Effect Select buttons are used together with the Matrix LEDs to choose the effects y...

Страница 9: ...e labeled as follows MODE This button changes the functionality of footswitches 1 5 When the Mode button is lit yellow footswitches 1 5 toggle effects on and off and change amp channels When the Mode...

Страница 10: ...l controls effect parameters in real time Most BNX3 parameters can be assigned to the Expression Pedal Applying extra pressure to the toe of the Expression Pedal switches control between the assigned...

Страница 11: ...eadphone Output Connect stereo headphones to this jack Do not connect a mono plug to this jack because you may damage the output driver 6 Left Output Low Output Bass Mono Output Connect to the input o...

Страница 12: ...e available recording time The BNX3 supports 16 32 64 and 128 Megabyte SmartMedia cards 16 Strain Relief This secures the power cord to help prevent it from disconnecting during a performance Getting...

Страница 13: ...o the inputs of a house PA system or a recording console 1 Connect the bass to the BNX3 s input 2 Connect the BNX3 s outputs to the channel inputs of the mixing console 3 Turn on the BNX3 4 If the BNX...

Страница 14: ...l audio compatible mixer or computer sound card You must have S PDIF inputs on the receiving device in order to use this output Be sure to use a 75 ohm or RCA video cable to connect from the Digital O...

Страница 15: ...ctory preset is active The BNX3 s Modes When you first apply power to the BNX3 it powers up in one of three modes Bank Stompbox or Recorder Modes are selected in two different ways 1 Press the MODE bu...

Страница 16: ...nds back through a song FOOTSWITCH 2 deletes the last track recorded FOOTSWITCH 3 stops the recorder playback FOOTSWITCH 4 begins recording FOOTSWITCH 5 plays back the recorded tracks The Expression P...

Страница 17: ...HES 3 and 4 simultaneously again Jam A Long The Jam A Long feature lets you connect a Tape CD or MP3 player to the BNX3 The tape CD or MP3 player s signal is output through the BNX3 s left right and h...

Страница 18: ...following 1 Press the AMP SAVE Level button The display reads DruM LVL drum level 2 Rotate the DATA WHEEL to select the playback volume of the drum loop Level ranges are from 1 to 99 3 Press the DRUMS...

Страница 19: ...sociated with DigiTech direct 1 Turns the cabinet modeling off fold1x18 2 Based on an Acoustic 360 hart1x15 3 Based on a Hartke 1x15 Jazz1x15 4 Based on a Peavey 1516 1x15 bass1x15 5 Based on an Ampeg...

Страница 20: ...Red Amp Channels The Gain ranges from 0 0 to 99 99 The Bass Mid and Treble EQ range from 12 12 dB to 12 12 dB The Level ranges from 0 0 to 99 99 The procedure for adjusting the Amp Parameters is as f...

Страница 21: ...NX3 has any unused HyperModel locations available the display reads EMPTY U1 The U1 flashes indicating that this is the first available location for HyperModel to be stored If all 9 HyperModel locatio...

Страница 22: ...ting you have changed a parameter and need to store the changes Once you have modified the Amp Models Cabinet types and Effect Parameters store it to a User Preset location The following steps outline...

Страница 23: ...gain to finish To copy one preset to another preset location begin by selecting the preset you want to copy then follow the steps listed above Press EXIT at any time during the procedure to aborts the...

Страница 24: ...Compressor Settings Comp On Off The STATUS button turns the Compressor Fretless module on and off Type The Parameter 1 knob selects whether the compressor or or fretless effect is active Set this so t...

Страница 25: ...includes eight types of pitch altering effects Whammy IPS Detune Octavider Synth Filter Envelope and Pitch Shift The Status button turns the Whammy Synth Wham syn module on and off The Parameter 1 kno...

Страница 26: ...Range is 0 99 Detuning Detuning is similar to a standard pitch shifter with the exception that it shifts the copied signal by less than a semitone resulting in an effect as if two basses were slightl...

Страница 27: ...ge is 1 99 Parameter 3 Start The Parameter 4 knob controls the synth start cutoff frequency Start Range is 1 99 Parameter 4 Stop The Parameter 5 knob controls the stop cutoff frequency stop Range is 1...

Страница 28: ...ist mid freq mid lvl low high level Gain Controls the amount of distortion or gain in the Stompbox model Range is 0 99 Param1 A tone control for the Stompbox model Range is 0 99 Param2 A second Tone c...

Страница 29: ...ut signals to 99 re triggers with weak input signals The Parameter 5 knob does not function when the Noise Gate is selected Chorus Mod Effects The Modulation Effects group is a multi function module a...

Страница 30: ...requencies are canceled resulting in a warm sort of twisting sound Parameter 1 The Parameter 2 knob adjusts the rate Speed of the modulating phase Ranges from 1 to 99 Parameter 2 The Parameter 3 knob...

Страница 31: ...resting combination of sound panning from side to side as well as a slight pitch change due to the speed of the sound coming towards and then going away from the listener Parameter 1 The Parameter 2 k...

Страница 32: ...t and dry signal Ranges from 0 all dry to 99 all wet Detune A Detuner makes a copy of your incoming signal takes the copied signal slightly out of tune from the original and mixes the two signals toge...

Страница 33: ...d rpt hold infinite repeat Ducker Threshold The Parameter 4 knob adjusts the level threshld the input signal must reach before the Delay signal is attenuated Ranges from 0 to 99 and off oF Ducker Atte...

Страница 34: ...sound which is absorbed damping in the simulated environment Ranges from 0 to 99 Reverb Balance The Reverb Balance adjusts the left right balance of the Reverb signal Ranges from L 99 to R 99 Reverb...

Страница 35: ...l to select Preset 40 Create a HyperModel 1 Select Preset 40 The BNX3 is ready to select the Amp Models indicated by the Status button s yellow LED Select the Green Channel Amp and Cabinet The LEDs ne...

Страница 36: ...5 Rotate the Parameter 4 knob to adjust the Vintage Treble 6 Rotate the Parameter 5 knob to adjust the Vintage Level Adjust the Red Channel Parameters Like the Vintage bass amp in the Green Channel th...

Страница 37: ...ste you can Warp their characteristics together to create a new HyperModel To warp the green and red amps do the following 1 Press the STATUS button until its LED turns yellow 2 Rotate the Parameter 3...

Страница 38: ...our new HyperModel To do this you need to select the Fuzz model for the Green Channel and VNTGASH for the Red Channel of your preset as follows 1 The LED next to the STATUS button should be yellow If...

Страница 39: ...h the Fuzz Model Green Channel and the VNTGASH HyperModel Red Channel can also be adjusted individually here as well as the way described on page 31 Here you have added control over the Mid and High f...

Страница 40: ...eed to be adjusted depending upon your bass 5 Rotate the Parameter 3 knob to set the Attack Time to 0 fast attack Select and Adjust the Chorus Next you wanted to thicken up the sound by adding a subtl...

Страница 41: ...isplay reads on On 3 Rotate the Parameter 1 knob to select Hall Hall for the Reverb Type 4 Rotate the Parameter 2 knob to set the Reverb Predelay to 2 5 Rotate the Parameter 3 knob to set the Reverb D...

Страница 42: ...lashing character is an X Continue using the Drums button to select the character location and the Data Wheel to change the characters 5 Once the Display reads exampLE press STORE again The numbers in...

Страница 43: ...aying back tracks When the REMAIN button is on it also displays the amount of recording time left in memory when the recorder is stopped 2 TRANSPORT BUTTONS The 6 transport buttons just below the disp...

Страница 44: ...input can also be used for recording stereo signals into the BNX3 s recorder By properly setting the Mic Level and using a 1 4 to XLR impedance DI box you can run one side of the stereo signal into th...

Страница 45: ...s back through different amp models effects or entirely new presets This is exactly how professional recording engineers mix down bass tracks To select the input configuration for recording follow the...

Страница 46: ...recorder is recording When Click Track is enabled a metronome is set to the selected songs tempo while recording To setup the Click Track follow these steps 1 Begin with the recorder stopped 2 Press...

Страница 47: ...ded tracks will not be synchronized with tracks recorded after the change The Recorder Tempo also controls the Drum Machine tempo when recording or playing a virtual Drum track Drum Level The Drum Lev...

Страница 48: ...this feature is turned on To enable Song Repeat follow these steps 1 Begin with the recorder stopped 2 Press the SETUP button until the BNX3 s main display reads song rptOf 3 Use the DATA WHEEL to tur...

Страница 49: ...on of this manual To setup the Quantize function follow these steps 1 Begin with the recorder stopped 2 Press the SETUP button until the BNX3 s main display reads Quantize 3 Use the DATA wheel to turn...

Страница 50: ...utton The BNX3 s main display reads BUSY as the card is being checked The TIME display on the recorder panel will begin counting backwards from 100 indicating the procedure s progress The BNX3 s butto...

Страница 51: ...The BNX3 s main display reads erasing during this time The BNX3 s buttons and footswitches are disabled during this procedure 4 When the recording memory is completely erased the display shows reading...

Страница 52: ...y disabled during the card formatting process Depending on the memory card size this process may take several minutes 4 When formatting is complete the display reads reading indicating the BNX3 is rea...

Страница 53: ...aration routine in the BNX3 s recorder setup menu you can now use a computer s memory card reader to access these files These files can be copied between the memory card and your computer using standa...

Страница 54: ...e in memory is dependent on the total amount of record time For example with an optional 128 Meg Smart Media card the BNX3 has a total of 96 EP Quality track minutes available This would be the equiva...

Страница 55: ...Undo works Using Undo While the Recorder is Stopped If you stopped the recorder and decided you were unhappy with the last take you can Undo erase the track information To undo the last track you rec...

Страница 56: ...ing back the track song from the very beginning If you want to start playback at the beginning of a track or song but are someplace other than the end of the song follow these steps 1 Begin with the R...

Страница 57: ...e track for recording automatically lights red indicating it is armed to record and the recorder begins recording on this track from the beginning of the song The TIME display begins counting off the...

Страница 58: ...tracks as you would on old analog 4 and 8 track tape recorders only without the signal degradation You can merge playback tracks with recorded tracks and retain the recorded material on the tracks yo...

Страница 59: ...PATTERN button 4 Use the DATA WHEEL to select the pattern tempo and level you want to record 5 Press the DRUMS button again to stop the drums 4 Press the DRUMS track button on the recorder panel until...

Страница 60: ...ton 2 Press either the MODE or DRUMS button until the display reads DIGI OUT The default configuration from the factory is bass REC This configuration sends both bass processor and recorder output to...

Страница 61: ...ording is completed press the STOP footswitch This stops the recording process and the track is saved The TIME display shows the elapsed time used and the TRACK 1 button is lit green indicating it is...

Страница 62: ...e very beginning and wasting recording time with silence you can punch in the phrase you want to record at a certain point on the track To punch in record follow these steps 1 Arm the track you want t...

Страница 63: ...your first loop is easy After recording your first track and pressing the PLAY footswitch TRACK 2 is already armed for recording To add overdubs to the current loop follow these steps 1 Press the RECO...

Страница 64: ...songs and creating loops Recording a Track To begin recording a track using the GNXFC footswitches follow these steps 1 Press the B RECORD footswitch The TRACK 1 button will automatically light red wh...

Страница 65: ...ultiple Tracks After a track has been recorded you may want to record other tracks overdub that will play along with it You will want to play the previously recorded track s as a monitoring source whi...

Страница 66: ...PLAY footswitch after recording the first pass recording will stop and the loop s length will be set The TRACK 1 button will now be armed for record flashing red You will begin hearing playback of tra...

Страница 67: ...Pedal selection and the assigned parameter 3 Rotate the Parameter 1 knob until the parameter appears in the display See the Expression Parameter Assignment List on page 64 for a complete list of assi...

Страница 68: ...WITCH 5 becomes a Control Footswitch This provides even more real time expressive control during performance when used in conjunction with the Expression pedal Up to three 3 parameters can be controll...

Страница 69: ...rols the Fretless Simulator Amount attack Fretless Attack Controls the Fretless Simulator Attack Senstvty Fretless Sensitivity Controls the Fretless Simulator Sensitivity wahonoff Wah On Off Turns the...

Страница 70: ...elay Level Controls the Mix Level of the selected Delay Type DLY BAL Delay Balance Controls the left right balance of the selected Delay Type rvbonoff Reverb On Off Turns the Reverb effect on and off...

Страница 71: ...Amp Configuration The BNX3 offers a Bi Amp High Low output configuration This lets you configure the analog Left and Right outputs as High and Low frequency outputs These signals are sent to separate...

Страница 72: ...ock the Expression Pedal all the way forward to the toe down position and press the blinking number 2 Footswitch The display changes to read TOE UP toe up 5 Rock the Expression Pedal all the way back...

Страница 73: ...eturn to the BNX3 presets NOTE The Bulk Dump sends information on the MIDI channel defined in the MIDI Channel menu MIDI Preset Dump The Sysex Preset Dump uploads individual BNX3 presets to a sysex li...

Страница 74: ...ight until M 1 U is displayed 3 Use the DATA WHEEL to select the incoming MIDI program number you want to remap Notice the flashing number to the right of the M increases and decreases as you turn the...

Страница 75: ...ut the digital output while still monitoring the effects processing through the analog and headphone outputs You can then bring the signal back into the BNX3 s analog input and hear the same dry bass...

Страница 76: ...BNX3 s Memory Card slot before performing this procedure If external memory cards are to be reformatted insert them into the Memory Card slot before performing this procedure NOTE Performing this pro...

Страница 77: ...Double click the INSTALLER icon and follow the installation instructions NOTE Previous versions of GENEDIT will not work with the BNX3 You must install the new version of GENEDIT from the CD that cam...

Страница 78: ...PACEMAN Bank 6 dirtbass 26 GRINDY 27 DIRT BAG 28 PIE FAZE 29 LEADBASS 30 SHREDNIT Bank 7 amps two 31 CUSTOM 32 CLENTUBE 33 TUBEDIRT 34 FAT PRE 35 BOOGIMAN Bank 8 hybrid 36 POPPEN 37 LEVSTICK 38 BASICA...

Страница 79: ...le Level CC 35 Red Amp Type CC 36 Red Amp Gain CC 37 Red Amp Level CC 38 Red Cab Type CC 39 Red Cab Tuning CC 40 Red Bass Freq CC 42 Red Bass Level CC 43 Red Mid Freq CC 45 Red Mid Level CC 46 Red Tre...

Страница 80: ...h Total Harmonic Distortion Less than 0 05 1kHz Microphone Input Recorder Input set to B MICDRY Frequency Response 20 Hz 20 kHz 0 dB 1 dB S N ratio Analog Outputs 99 dB A weighted ref max signal 22kHz...

Страница 81: ...mart Media Card Why can t I select Re Amp track as record input Re Amp is not available unless previous tracks have been recorded Verify Stereo Record is set to OF Cannot Merge tracks Tracks that are...

Страница 82: ...y Parkway Sandy Utah 84070 USA PH 801 566 8800 FAX 801 566 7005 DigiTech GeNetX Audio DNA and BNX3 are trade marks of the Harman Music Group Inc Copyright the Harman Music Group Manufactured and Print...

Отзывы: