Use of the device
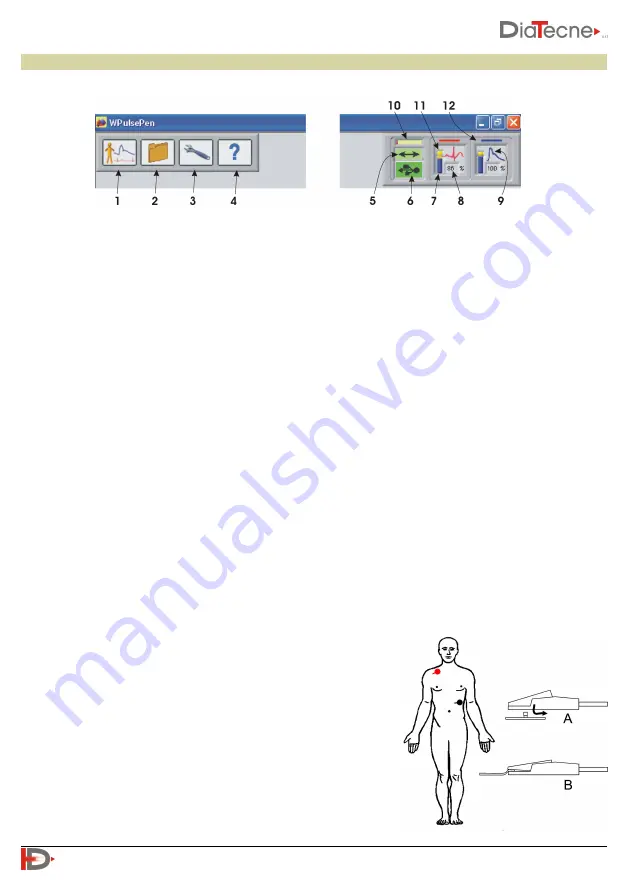
Software Interface
1. New examination.
2. Access to the Patient Archive.
3. Setup and device programming.
4. “On line” instructions (Help / Quick Guide / Tutorial / Manual).
5. Data exchange between computer and wRs1 (green under normal conditions).
6. USB drive wRs1 connection (green if recognized correctly).
7. Graphic indication of the residual battery capacity of wEc1 and wTn1.
8. Remaining battery capacity of wEc1 and wTn1: replace the battery if less than 10%.
9. Icon representing the ECG (QRS) or Tonometric (pressure wave) signal depending on the type of active
sensor.
10. Data coming from wRs1 waiting to be processed: a short bar signals a better situation to a long bar (it
depends on the speed of the computer, other running programs,…).
11. The positive terminal of the battery symbol turns yellow in standby, i.e. when the “Freeze” is active or
in situations other than that of “real time” acquisition and display of signals.
12. Sensor1 corresponds to the red trace (ECG or Tonometer) while Sensor2 corresponds to the blue trace
(Tonometer only).
Preparation for the exam
A. Start the WPulsePen software.
B. Insert the wRS1 receiver into a USB port and wait for the device to be recognized (fig. 1 - icons 5 and 6
green).
C. Extract the cap of the wEc1 and wTn1 units, insert the batteries in the appropriate compartment,
strictly respecting the orientation indicated (see Warnings)
and put the cap back in its seat.
D. Let the patient lie down on the couch.
If you intend to carry out the examination with two tonometers
at the same time, go directly to the next point "H".
E. Using "fresh" gel-embedded disposable Ag / AgCl ECG
electrodes, for crocodile clips, place them in the following
way:
• Red: right subclavian region
• Black: left subcostal region
10
User Manual
PulsePen
- V. 5.0_b
fig. 2
fig. 1


