background image

- 9 -

65 Aleksandar Stamboliyski Str., 8000 Bourgas, Bulgaria

Tel: +359 56 820027, Fax: +359 56 836700

E-mail: [email protected] ,Web: www.devabroadcast.com

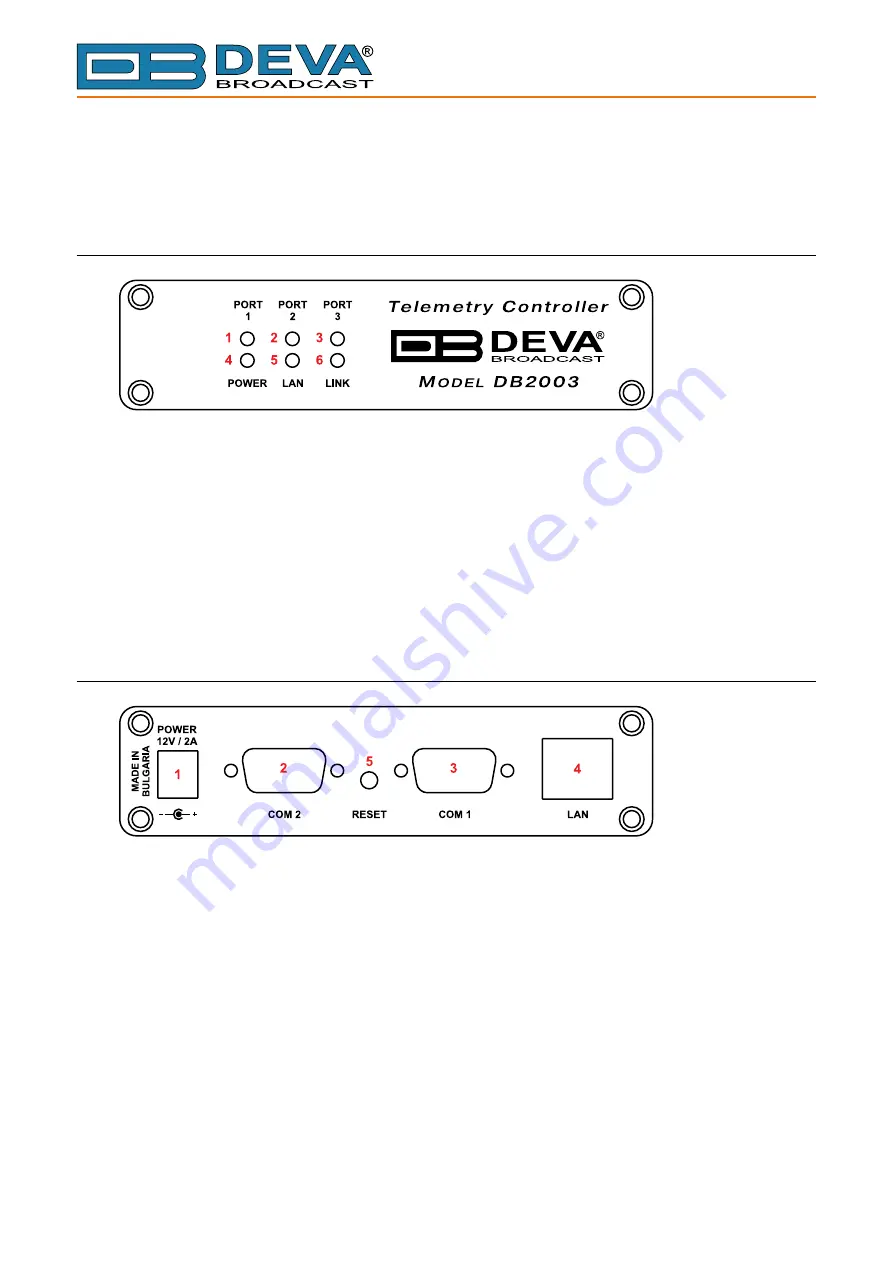
Panel Indicators and Appointments

FRONT PANEL

1.  Telemetry PORT 1 LED Activity Indicator;

2.  Telemetry PORT 2 LED Activity Indicator;

3.  Telemetry PORT 3 LED Activity Indicator;

4.  Power LED Indicator;

5.  LAN Presence LED Indicator;

6.  LINK LED Indicator - This LED can be in one of the following states:


Off – No User Connected;


On – User is connected;

REAR PANEL

1.  Power Supply (12V, 2A);

2.  COM 2 Connector - DB15 High Density male;

3.  COM 1 Connector - DB9 male;

4.  LAN Port / Internet Input – standard RJ-45 port;

5.  Factory Defaults reset button

Содержание DB2003

Страница 1: ...MAINTENANCE AND OPERATION INSTRUCTION MANUAL Publish Date 19 Sep 2019 DB2003 Remote Control for RVR FM Radio Transmitters ...

Страница 2: ...ts 12 Alarms 13 Device Settings 14 Hardware Factory Default 14 General Settings and Device Status 15 Network Settings and Status 16 SNMP Agent 16 E mail 17 HTTP server and FTP server 17 SNTP client 18 GSM Modem 18 General Purpose Outputs 19 Ping Watchdog 20 Device Management 20 Reboot Device 20 Restore All Except IP 20 Storage Format 21 Firmware Update 21 Notify Power Up 21 Logs 22 Telemetry Port ...

Страница 3: ...ation with PTX LCD on COM2 via RS232 55 Installation with PTX LCD on COM2 via I C 56 Installation with PTX LCDDSP on COM1 via RS232 57 Installation with PTX LCDDSP on COM2 via RS232 57 Installation with PJ 502 702 LCD 2HE via I C 58 Installation with PJ 3500 LCD 3HE via I C 59 Installation with PJ 5000 U K 4HE via I C 60 Installation with TEX LCD 2HE via I C 61 Installation with TEX LIGHT 3HE via ...

Страница 4: ...THIS PAGE IS INTENTIONALLY LEFT BLANK ...

Страница 5: ...oved us a reliable business partner and a valuable asset as our dealers worldwide would confirm In constant pursuit of precision and long term satisfaction DEVA enhances the reputation of our partners and clients alike Furthermore we have already a proven merit as a credible partner provider Our portfolio offers complete line of high quality and competitive products for FM and Digital Radio Radio ...

Страница 6: ...ion Examples Menu Sub Menu Menu Command A menu item s and menu command that you need to click in sequence Click Settings General Button Interface Interactive buttons Press OK to save the changes NOTE Important notes and recommendations NOTE The notification will appear only once Reference Name on Page XXX References and links refer to New Connection see Monitoring on page 56 Example Used when exam...

Страница 7: ...tive supervision What is more status report via SMS is available as well with the optional GSM Modem DB2003 also provides a number of great additional features such as the Factory Parameters Restore option SNTP for automatic synchronization of the built in clock as well as date and time settings in various formats It allows for easy firmware upgrades to ensure that your remote control device is al...

Страница 8: ...C Immunity 6 V m COMMUNICATION INTERFACES Ethernet 10 100 Base T RJ45 connector RS232 2 interfaces RS485 1 interface I2 C 1 bus Protocols HTTP SNMP SMTP FTP DHCP MEASUREMENT STORAGE Storage 8GB Build in Memory Card Data format Text CSV OTHER GPO 3 outputs Open Collector type GSM modem Support generic external GSM modem to send SMS as alarm notification POWER Voltage External 12V 1A Power consumpti...

Страница 9: ...dicator 2 Telemetry PORT 2 LED Activity Indicator 3 Telemetry PORT 3 LED Activity Indicator 4 Power LED Indicator 5 LAN Presence LED Indicator 6 LINK LED Indicator This LED can be in one of the following states Off No User Connected On User is connected REAR PANEL 1 Power Supply 12V 2A 2 COM 2 Connector DB15 High Density male 3 COM 1 Connector DB9 male 4 LAN Port Internet Input standard RJ 45 port...

Страница 10: ...al interfaces INTERFACES DB2003 has two connectors to the monitored device COM1 and COM2 The COM1 connector supports RS232 interface only The COM2 connector is multi functional supporting I2 C RS232 RS485 half duplex interfaces as well as GPO1 GPO2 and GPO3 COM1 Connector 1 2 3 4 5 6 7 8 9 GND RX TX 1k 12V This is a DB9 connector Pin 1 not used Pin 2 RS232 Rx line DB2003 receiver Pin 3 RS232 Tx li...

Страница 11: ...und Pin 11 GPO3 open collector Pin 12 RS485 full duplex TX Pos Pin 13 RS232 RX line DB2003 Receiver Pin 14 RS232 TX line DB2003 Transmitter Pin 15 I2 C bus SDA line I2 C bus I2 C bus is independent it only uses pins on the COM2 connector Several monitored devices telemetry ports can be connected with different bus addresses assigned to them This is 5V bus Ethernet DB2003 comes with an RJ45 connect...

Страница 12: ...preferred interface is RS485 so RS232 can be available to service the transmitter In accordance with their installation the client must make the necessary cables Details on Cables and connectors can be found in APPENDIX A on page 49 DB2003 is able to send alarm notifications via SMS using a GSM modem which is purchased additionally The Modem is connected to communication port COM1 and upon activat...

Страница 13: ...er signals such as Reflected Power only the upper threshold can be monitored A notification is sent both when the signal goes beyond the threshold alarm activation and when normal values are restored idle An alarm notification is also sent when there is an event such as loss of connection with the monitored device No threshold or time delay is set for this alarm type For some events a notification...

Страница 14: ...ion can be interrupted by an SNMP user for a set operation User has limited rights It can monitor but can not edit It has no access to settings and cannot change the operation mode of the DB2003 or influence monitored devices Its session can be set to no time limits but can be interrupted by admin or by an SNMP user for a set operation HARDWARE FACTORY DEFAULT It is recommended that the device sho...

Страница 15: ...t value will allow automatic setting of DB2003 s time in accordance with its location Admin Name and Admin Password Admin access credentials Default values are admin and pass User Name and User Password access credentials with user rights Default values are user and pass The Device Status section provides information about the current status of the device firmware version serial number current dev...

Страница 16: ...sable network mask gateway primary and secondary DNS MAC address SNMP AGENT The SNMP Agent section allows you to Enable Disable agent change agent and manager ports and set manager address SNMP trap receiver The DB2003 uses SNMP version 2 the Read Write community is similar to a password for read write access Use the agent ID to distinguish between multiple agents in one trap receiver You can down...

Страница 17: ...rpose PLEASE NOTE that notifications may be filtered as spam and may not reach the receiver HTTP SERVER AND FTP SERVER When the HTTP server is disabled access via WEB browser is no longer possible However users can still have access via SNMP It is possible to change the default port when there are several devices with the same external IP address Here you can also set the duration of the admin ses...

Страница 18: ...ve an SMS as an alarm notification you must connect a GSM Modem to the DB2003 The modem has to have an active SIM card with the PIN code protection disabled Set the GSM Modem to COM1 to enable communication If there are no issues Status must become Active as illustrated above In the right hand section set the phone numbers of up to 5 message receivers Use the Test button to make sure all of them r...

Страница 19: ... contact PLEASE NOTE that without a power supply the GPO is normally open which can be interpreted as a false alarm With manual control or ping watchdog you can select a stable status change or a change for a certain amount of time Pulse Duration In order for a GPO to be used as an alarm event output the following three conditions must be fulfilled 1 The Alarm Output function must be selected 2 In...

Страница 20: ...vice causes the device DB2003 to re start It does not change the settings or delete the logs If Dayparting has been activated for any Telemetry Port a command will be sent to the monitored device to determine the forward power in accordance with the current time Restore All Except IP Restore All Except IP causes all settings to be restored to their default values It does not affect the IP address ...

Страница 21: ...s the used one Warning Level increases Memory is freed by removing old files use FTP client Format deletes ALL files System and Port LOGs Firmware Update Firmware Update installs an updated DB2003 firmware version Unless there are explicit instructions accompanying the firmware it does not cause or require change in any of the settings It does not delete the logs If Dayparting has been activated f...

Страница 22: ...select only the required information for a specific time type of log port or certain events Recording data in the System Log cannot be disabled The System Log does not record the values of the signals read from the monitored devices The files can also be accessed via FTP at sys To record data in the Port Logs this must be allowed with the relevant Telemetry Port setting see Telemetry Port Settings...

Страница 23: ...ed Port N Dayparting is Enabled Disabled Port N set Active Daypart None 1 2 8 Port N Edit Dangerous Parameters Timer expired Disable access WEB login logout SNMP login logout management Device setup Port N setup SysLog Cleared Storage Formated control impact of the monitored device Port N actions alarm notice that the value of a monitored signal passes a set threshold inf setup information Port Lo...

Страница 24: ...Port Settings The settings for each port are identical This Guide is to designate each port with the phrase Telemetry Port The Dayparting function is not available for all monitored device series and may therefore not be displayed on the settings screen The number and type of alarm events is different for each series and may differ from the ones described below ...

Страница 25: ...power in W when setting alarm and dayparts thresholds will be calculated against the nominal power of the set model For alarms power is compared in W while for Target Power command values are in percent That will lead to a difference between the transmitter s power and the power expected by the DB2003 The models from the Plug in KPS CA and Barracuda series differ by the number of RF Units When a m...

Страница 26: ...logger interval for recording data from the monitored device The port logs data is extracted from the DB2003 and visualized in an appropriate way via specialized software In order for the software to work the FTP server of the DB2003 must be enabled It is recommended that a short interval in seconds should be set at only one port for a limited time Especially in the case of a monitored Plug in the...

Страница 27: ...W is calculated against the nominal power for the selected monitored device model The Plug in and Barracuda series allow you to set Target Power up to 105 while PTX TEX and Blues up to 100 When Dayparts are enabled the setting of Forward Power is controlled by the DB2003 and the relevant parameters are not available for telecontrol Target Power for PTX TEX and Blues and Selected Power for Plug in ...

Страница 28: ...t Alarm Name Notification Series PTX TEX Blues Plug in PJ SCML HC Forward Power FWD Low High Idle ü ü ü ü ü ü ü Reflected Power RFL High Idle ü ü ü ü ü ü ü Unbalanced Power UNB High Idle ü ü Temperature t Low High Idle ü ü ü ü ü ü ü Total Modulation MOD Low High Idle ü ü ü PLL Lock Loss PLL Active Idle ü ü ü Audio Loss AUD Active Idle ü ü ü SWR Alarm SWR Active Idle ü ü ü General Alarm GEN Active ...

Страница 29: ...this type of alarm no threshold or delay is set For some events it is not necessary to send a notification for the return to normal values for example that is the case with power change To set up an email notification the following must be fulfilled the E mail button in the Notifications for the alarm must be enabled e mail notification must be enabled for the entire Telemetry Port a receiver must...

Страница 30: ...n Notifications for the alarm GPO notification must be enabled for the entire Telemetry Port the Alarm Output function must be set for the respective output in Settings Device GPO see General Purpose Outputs on page 19 The alarm thresholds are used to highlight signal values If the alarm is not enabled the threshold pass is still registered with the highlighting of the signal The alarm can be enab...

Страница 31: ...etry Port 3 NOTE Screenshots are taken from simulated devices rather than monitored ones in actual operation The signal values in the images may therefore not be consistent The values of the main signals get highlighted in red when the set alarm thresholds are passed This happens even when the alarm is not Enabled as illustrated by Unbalanced Power in the upper section of the image The value is in...

Страница 32: ...n can be displayed in one of two ways as a list or using tabs The image above shows the information as a list Depending on the selected browser window width the list can be organized in 4 3 or 2 columns The information is ordered first by row and then by column The number of signals is in accordance with the selected model of the monitored device The list does not repeat main signals already displ...

Страница 33: ...devabroadcast com The second way of displaying information shows it grouped in tabs This method is used with Plug in and Barracuda monitored devices The image above shows the Status tab Only one RF Unit is simulated with its status Fault due to high current at one of the end MOS transistors The system is set to work in low power mode ...

Страница 34: ...t com The tabs below show signals as a list grouped by Plug in Units With RF Units there are sub tabs The first one shows as a table the information from all RF Units while the next ones the information of each unit separately as a list This illustrates the reason for the Fault status of the RF Unit high current at MOS 1 also highlighted in red ...

Страница 35: ...cted to the port or system logs recorded by the DB2003 Plug in records in its Alarm Log in accordance with its configuration more on which will be discussed further on These logs are not affected by the DB2003 settings They are just displayed here The entire log can be deleted with a command by a DB2003 operator see Telecontrol on page 38 Next comes the Release tab displaying the Transmitter s uni...

Страница 36: ...er can edit through the transmitter s front panel and some of which can be edited even remotely via the DB2003 Sub tab Control Unit shows the minimum power at the transmitter s input under which a changeover of exciters will be carried out if the automatic Exciter changeover mode is selected The Action column shows the action the unit would undertake if the upper threshold of the respective signal...

Страница 37: ... set by the manufacturer during production of the transmitter Here they are displayed in order to inform users of the types of situations that would lead to Alarm log entries This table shows the signal values for all RF Units As with Combiner it displays the actions which would be undertaken by the respective RF Unit if the signal limit is passed For the signals which do not have a DB2003 alarm c...

Страница 38: ...operations to be carried out the required new values of the parameters must be set Commands will be carried out after the Save button is pressed In order for the respective action to be carried out immediately the button marked with a lightning sign must be pressed There is no need to press Save Plug in Telecontrol Parameters The image above shows the telecontrol parameters for a Plug in transmitt...

Страница 39: ...It is equivalent to pressing the same button on the transmitter s front panel The ClearAlarm Log button deletes the transmitter s log WARNING This action is irreversible once deleted the Alarm log data cannot be restored The Sync Time Date button synchronizes the transmitter s time used in the Alarm log with that of the DB2003 The DB2003 cannot be aware of the Plug in time so it is impossible to k...

Страница 40: ...e second image the value of the Edit Dangerous Parameters setting is Enabled and the dangerous Frequency parameter is available for telecontrol It is also marked by a warning sign In the image below the value of the Edit Dangerous Parameters settings is For a limited time and the dangerous Frequency parameter can be edited in the remaining time indicated in the gray bar in this case 45 seconds Onc...

Страница 41: ...e Save button to send a command to the transmitter There are no buttons here with immediate action marked by a lightning sign All commands are sent when the Save button is pressed The more parameters are edited the more time will be needed for sending the commands to the transmitter Once the process is completed the current values of the transmitter are displayed Due to the large number of hardwar...

Страница 42: ... Edition a free of charge version of an excellent software tool of sufficient functionality SNMP AGENT For SNMP to work SNMP Agent must be Enabled and the respective ports must be routed Go to Settings Device SNMP Agent to set as Manager IP the IP address of the computer which is running the trap receiver Set an appropriate value for Agent ID in order to be able to identify the sender in the case ...

Страница 43: ... sernum it s serial number The settings folder corresponds to Settings on the web page under device are settings related to the DB2003 itself while the telemetry Port folders contain settings related to the monitored devices connected on each port General Dayparts and Alarms Under the telemetry folder are OID for readings this is information read from the monitored device There are folders for eve...

Страница 44: ...eters for telecontrol of the transmitter are here There are three more tables here These are for RF Units tm1kpsRFUnitsTable tm2kpsRFUnitsTable and tm3kpsRFUnitsTable Select the appropriate one in accordance with the Telemetry Port where the transmitter is connected These tables are indexed by RF Unit The number of columns is determined by the number of RF Units of the selected model Their content...

Страница 45: ... pen By entering an appropriate value you can perform telecontrol of the transmitter or a DB2003 setting The same parameters are available to edit here as the ones available for telecontrol through the WEB interface By completing an SNMP set operation a session is created in the DB2003 If another session has been running at the same time by admin or user it is terminated The duration of the SNMP s...

Страница 46: ...wer to the set limits The highlighted Field 1 contains the name of the received trap Field 2 contains the Alias of the DB2003 the sender of the notification Field 3 contains the Alias of the port which caused the notification Field 4 contains the name of the signal being monitored by the alarm Field 5 contains the Agent ID as in the SNMP Agent settings It serves to identify the sender in addition ...

Страница 47: ...apply to damage caused by misuse abuse accident or neglect This Warranty is voided by unauthorized attempts at repair or modification or if the serial identification label has been removed or altered III TERMS OF WARRANTY DEVA Broadcast Ltd products are warranted to be free from defects in materials and workmanship A Any discrepancies noted within TWO YEARS of the date of delivery will be repaired...

Страница 48: ...E mail Phone Fax Which DEVA Broadcast Ltd product did you purchase Product Serial Purchase date Installation date Your signature Signing this warranty registration form you are stating that all the information provided to DEVA Broadcast Ltd are truth and correct DEVA Broadcast Ltd declines any responsibility for the provided information that could result in an immediate loss of warranty for the ab...

Страница 49: ...nector on each end Male and Female The connections are direct Pin 2 to Pin 2 Pin 3 to Pin 3 Pin 5 to Pin 5 and Screen to Casing DB2003 COM1 to RS232 on Monitored Device COM2 CONNECTOR The COM2 Connector services three interfaces and GPO At the most four cables will come out of the connector Cable 1 to RS232 connector on monitored device Cable 2 to RS485 connector on Plug in only Plug in series mod...

Страница 50: ...connection to the monitored device via I2 C This is just an example If your installation includes three devices connected via I2 C use three connectors The figure shows the connection for the two types of connectors used by RVR Elettronica as I2 C Combine the number and type of connectors needed for your installation Cable 4 The figure shows the signals for GPO The DB2003 supply voltage 12V is ava...

Страница 51: ...dress and for Bus Speed PTX_DDS and PTX_LCDDSP Devices from this series use only an RS232 connection and it can be made in two ways On the PTX_DDS PTX_LCDDSP side use the RS232 connector type DB9 On the DB2003 side you can use the COM1 connector and a straight cable as described in APPENDIXA COM1 Connector The second way is to use DB2003 connector COM2 and Cable 1 When 2 devices are connected via ...

Страница 52: ...r is positioned on the rear panel of the Control Unit type DB9 female designated RS485 On the front panel of the Control unit there is a connector designated RS232 The Plug in is accessible from this connector but this is not recommended Leave this connector available to service the transmitter These two connectors share the same UART When RS232 is used the other connector RS485 is disabled intern...

Страница 53: ...examples of installations The figures show the necessary cables as well as their corresponding connectors Only the connections to DB2003 are described To simplify the figures the remaining connections between the devices such as power audio and RF have been omitted The GSM Modem shown in the figures is optional If it is not present in the figure this means that COM1 is in use and a Modem can there...

Страница 54: ... 54 65 Aleksandar Stamboliyski Str 8000 Bourgas Bulgaria Tel 359 56 820027 Fax 359 56 836700 E mail office devabroadcast com Web www devabroadcast com ...

Страница 55: ... 55 65 Aleksandar Stamboliyski Str 8000 Bourgas Bulgaria Tel 359 56 820027 Fax 359 56 836700 E mail office devabroadcast com Web www devabroadcast com ...

Страница 56: ... 56 65 Aleksandar Stamboliyski Str 8000 Bourgas Bulgaria Tel 359 56 820027 Fax 359 56 836700 E mail office devabroadcast com Web www devabroadcast com ...

Страница 57: ... 57 65 Aleksandar Stamboliyski Str 8000 Bourgas Bulgaria Tel 359 56 820027 Fax 359 56 836700 E mail office devabroadcast com Web www devabroadcast com ...

Страница 58: ... 58 65 Aleksandar Stamboliyski Str 8000 Bourgas Bulgaria Tel 359 56 820027 Fax 359 56 836700 E mail office devabroadcast com Web www devabroadcast com ...

Страница 59: ... 59 65 Aleksandar Stamboliyski Str 8000 Bourgas Bulgaria Tel 359 56 820027 Fax 359 56 836700 E mail office devabroadcast com Web www devabroadcast com ...

Страница 60: ... 60 65 Aleksandar Stamboliyski Str 8000 Bourgas Bulgaria Tel 359 56 820027 Fax 359 56 836700 E mail office devabroadcast com Web www devabroadcast com ...

Страница 61: ... 61 65 Aleksandar Stamboliyski Str 8000 Bourgas Bulgaria Tel 359 56 820027 Fax 359 56 836700 E mail office devabroadcast com Web www devabroadcast com ...

Страница 62: ... 62 65 Aleksandar Stamboliyski Str 8000 Bourgas Bulgaria Tel 359 56 820027 Fax 359 56 836700 E mail office devabroadcast com Web www devabroadcast com ...

Страница 63: ... 63 65 Aleksandar Stamboliyski Str 8000 Bourgas Bulgaria Tel 359 56 820027 Fax 359 56 836700 E mail office devabroadcast com Web www devabroadcast com ...

Страница 64: ... 64 65 Aleksandar Stamboliyski Str 8000 Bourgas Bulgaria Tel 359 56 820027 Fax 359 56 836700 E mail office devabroadcast com Web www devabroadcast com ...

Страница 65: ... 65 65 Aleksandar Stamboliyski Str 8000 Bourgas Bulgaria Tel 359 56 820027 Fax 359 56 836700 E mail office devabroadcast com Web www devabroadcast com ...

Страница 66: ... 66 65 Aleksandar Stamboliyski Str 8000 Bourgas Bulgaria Tel 359 56 820027 Fax 359 56 836700 E mail office devabroadcast com Web www devabroadcast com ...

Страница 67: ... 67 65 Aleksandar Stamboliyski Str 8000 Bourgas Bulgaria Tel 359 56 820027 Fax 359 56 836700 E mail office devabroadcast com Web www devabroadcast com ...

Страница 68: ... 68 65 Aleksandar Stamboliyski Str 8000 Bourgas Bulgaria Tel 359 56 820027 Fax 359 56 836700 E mail office devabroadcast com Web www devabroadcast com ...

Страница 69: ... 69 65 Aleksandar Stamboliyski Str 8000 Bourgas Bulgaria Tel 359 56 820027 Fax 359 56 836700 E mail office devabroadcast com Web www devabroadcast com ...

Страница 70: ... 70 65 Aleksandar Stamboliyski Str 8000 Bourgas Bulgaria Tel 359 56 820027 Fax 359 56 836700 E mail office devabroadcast com Web www devabroadcast com ...

Страница 71: ... 71 65 Aleksandar Stamboliyski Str 8000 Bourgas Bulgaria Tel 359 56 820027 Fax 359 56 836700 E mail office devabroadcast com Web www devabroadcast com ...

Отзывы: