


1-22
Ra c k I n s t a l l a t i o n G u i d e
www
.dell.com | support.dell.com
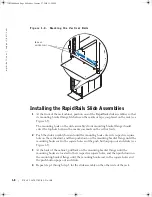
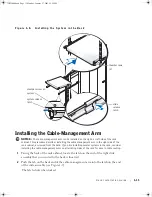
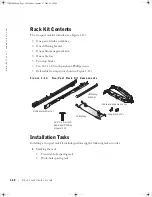
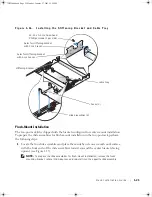
F i g u r e 1 - 1 5 .
I n s t a l l i n g t h e S l i d e A s s e m b l i e s f o r C e n t e r - M o u n t
C o n f i g u r a t i o n
4
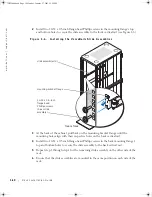
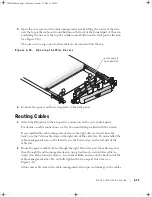
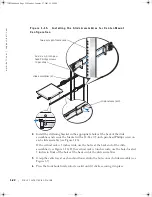
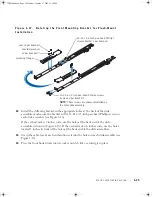
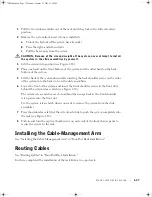
Install the stiffening bracket in the appropriate holes at the back of the slide
assemblies and secure the bracket with a 12-24 x 0.5-inch pan-head Phillips screw on
each slide assembly (see Figure 1-16).
If the vertical rack is 3 inches wide, use the holes at the back end of the slide
assemblies (see Figure 1-16). If the vertical rack is 6 inches wide, use the holes located
3 inches in front of the holes at the back end of the slide assemblies.
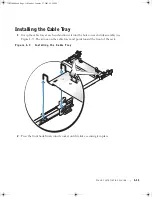
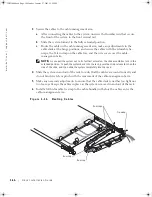
5
Grasp the cable tray at each end and lower it into the holes on each slide assembly (see
Figure 1-7).
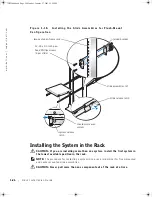
6
Press the front hook firmly into its socket until it clicks, securing it in place.
12-24 x 0.5 inch pan-
head Phillips screws
(4 per slide)
two-post open-frame rack
slide assemblies (2)
slide-release latch
JO525bk0.book Page 22 Monday, January 27, 2003 12:29 PM
Содержание PowerVault 725N
Страница 6: ...6 Contents JO525bk0 book Page 6 Monday January 27 2003 12 29 PM ...
Страница 42: ...6 Sommaire JO525fbk0 book Page 6 Monday January 27 2003 12 55 PM ...
Страница 82: ...6 Inhalt JO525bk0 book Page 6 Monday January 27 2003 1 11 PM ...
Страница 122: ...6 目次 JO525jbk0 book Page 6 Monday January 27 2003 3 13 PM ...
Страница 152: ...4 30 ラック取り付けガイド w w w d e l l c o m s u p p o r t d e l l c o m JO525jbk0 book Page 30 Monday January 27 2003 3 13 PM ...
Страница 160: ...6 Contenido JO525sbk0 book Page 6 Monday January 27 2003 4 29 PM ...