1-12
Ra c k I n s t a l l a t i o n G u i d e
www
.dell.com | support.dell.com
Installing the System in the Rack
CAUTION: If you are installing more than one system, install the first system in
the lowest available position in the rack.
CAUTION: Never pull more than one component out of the rack at a time.
1
Pull the two slide assemblies out of the rack until they lock in the fully extended
position.
CAUTION: Because of the size and weight of the system, never attempt to install
the system in the slide assemblies by yourself.
2
Remove the system front bezel (if one is installed):
a
Unlock the keylock (if the system has a keylock).
b
Press the right- and left-end tabs.
c
Pull the bezel away from the system.
3
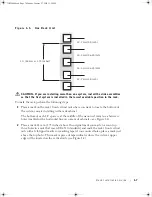
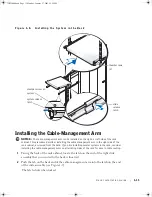
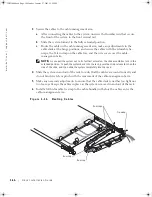
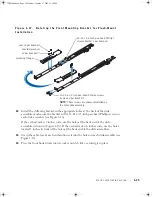
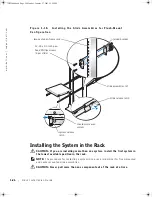
Lift the system into position in front of the extended slides (see Figure 1-8).
4
Place one hand on the front-bottom of the system and the other hand on the back-
bottom of the system.
5
Tilt the back of the system down while inserting the back shoulder screws on the sides
of the system into the back slots on the slide assemblies.
6
Lower the front of the system and install the front shoulder screws in the front slots
behind the system release latch (see Figure 1-8).
The system release latch moves forward and then snaps back as the shoulder screw
passes into the front slot.
Use this system release latch when you want to remove the system from the slide
assemblies.
7
Press the slide release latch at the side of each slide assembly to push the system
completely into the rack (see Figure 1-8).
8
Push in and turn the captive thumbscrews on each side of the front-chassis panel to
secure the system to the rack.
JO525bk0.book Page 12 Monday, January 27, 2003 12:29 PM
Содержание PowerVault 725N
Страница 6: ...6 Contents JO525bk0 book Page 6 Monday January 27 2003 12 29 PM ...
Страница 42: ...6 Sommaire JO525fbk0 book Page 6 Monday January 27 2003 12 55 PM ...
Страница 82: ...6 Inhalt JO525bk0 book Page 6 Monday January 27 2003 1 11 PM ...
Страница 122: ...6 目次 JO525jbk0 book Page 6 Monday January 27 2003 3 13 PM ...
Страница 152: ...4 30 ラック取り付けガイド w w w d e l l c o m s u p p o r t d e l l c o m JO525jbk0 book Page 30 Monday January 27 2003 3 13 PM ...
Страница 160: ...6 Contenido JO525sbk0 book Page 6 Monday January 27 2003 4 29 PM ...

