322 | SRA
6.0
Administrator’s
Guide
Step 1
Navigate to
Users > Local Groups
.
Step 2
Click the configure icon next to the group you want to configure.
Step 3
In the
Edit Local Group
page, select the
Policies
tab.
Step 4
On the
Policies
tab, click
Add Policy
. The
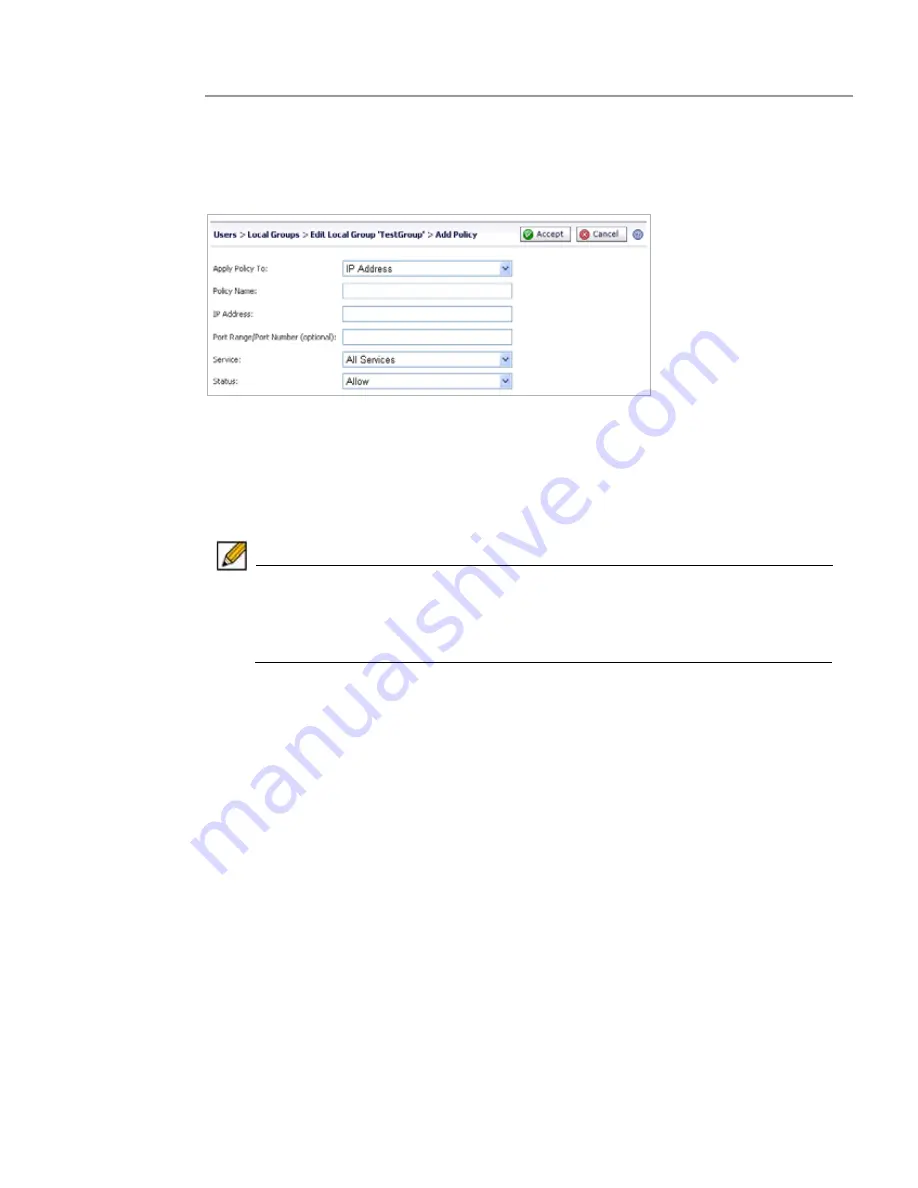
Add Policy
screen is displayed.
Step 5
Define a name for the policy in the
Policy Name
field.
Step 6
In the
Apply Policy To
drop-down list, select whether the policy will be applied to an individual
host, a range of addresses, all addresses, a network object, a server path, or a URL object. You
can also select an individual IPv6 host, a range of IPv6 addresses, or all IPv6 addresses. The
Add Policy
window changes depending on what type of object you select in the
Apply Policy
To
drop-down list.
Note
The SRA policies apply to the destination address(es) of the SRA connection, not
the source address. You cannot permit or block a specific IP address on the Internet
from authenticating to the SRA gateway through the policy engine. It is possible to
control source logins by IP address from the user's
Login Policies
page. For more
information, refer to
“Configuring Login Policies” section on page 312
.
•
IP Address
- If your policy applies to a specific host, enter the IP address of the local host
machine in the
IP Address
field. Optionally enter a port range (80-443) or a single port
number into the
Port Range/Port Number
field.
•
IP Address Range
- If your policy applies to a range of addresses, enter the beginning IP
address in the
IP Network Address
field and the subnet mask that defines the IP address
range in the
Subnet Mask
field. Optionally enter a port range (4100-4200) or a single port
number into the
Port Range/Port Number
field.
•
Network Object -
If your policy applies to a predefined network object, select the name of
the object from the
Network Object
drop-down list. A port or port range can be specified
when defining a Network Object. See
“Adding Network Objects” section on page 125
.
•
Server Path
- If your policy applies to a server path, select one of the following radio
buttons in the R
esource
field:
–
Share (Server path) - When you select this option, type the path into the Server Path
field.
–
Network (Domain list)
–
Servers (Computer list)
See
“Editing a Policy for a File Share” section on page 323
.
•
URL Object
- If your policy applies to a predefined URL object, type the URL into the
URL
field.
Содержание PowerEdge 4200 Series
Страница 1: ... 1 SRA 6 0 Administrator s Guide ...
Страница 10: ...10 SRA 6 0 Administrator s Guide ...
Страница 128: ...128 SRA 6 0 Administrator s Guide ...
Страница 176: ...176 SRA 6 0 Administrator s Guide ...
Страница 190: ...190 SRA 6 0 Administrator s Guide ...
Страница 212: ...212 SRA 6 0 Administrator s Guide ...
Страница 228: ...228 SRA 6 0 Administrator s Guide ...
Страница 342: ...342 SRA 6 0 Administrator s Guide ...
Страница 356: ...356 SRA 6 0 Administrator s Guide ...
Страница 358: ...358 SRA 6 0 Administrator s Guide ...
Страница 392: ...392 SRA 6 0 Administrator s Guide ...
Страница 416: ...416 SRA 6 0 Administrator s Guide ...
Страница 426: ...426 SRA 6 0 Administrator s Guide ...
Страница 436: ...436 SRA 6 0 Administrator s Guide ...
Страница 438: ...438 SRA 6 0 Administrator s Guide ...
Страница 439: ... 439 ...
Страница 440: ......


