Steps
1. Click or tap
.
2. Click or tap
and then click or tap
Shut down
.
NOTE:
Ensure that the computer and all attached devices are turned off. If your computer and attached devices did not
automatically turn off when you shut down your operating system, press and hold the power button for about 6 seconds
to turn them off.
Before working inside your computer
About this task
To avoid damaging your computer, perform the following steps before you begin working inside the computer.
Steps
1. Ensure that you follow the
.
2. Ensure that your work surface is flat and clean to prevent the computer cover from being scratched.
3. Turn off your computer.
4. Disconnect all network cables from the computer.
CAUTION:
To disconnect a network cable, first unplug the cable from your computer and then unplug the
cable from the network device.
5. Disconnect your computer and all attached devices from their electrical outlets.
6. Press and hold the power button while the computer is unplugged to ground the system board.
NOTE:
To avoid electrostatic discharge, ground yourself by using a wrist grounding strap or by periodically touching an
unpainted metal surface at the same time as touching a connector on the back of the computer.
After working inside your computer
About this task
After you complete any replacement procedure, ensure that you connect any external devices, cards, and cables before turning
on your computer.
Steps
1. Connect any telephone or network cables to your computer.
CAUTION:
To connect a network cable, first plug the cable into the network device and then plug it into the
computer.
2. Connect your computer and all attached devices to their electrical outlets.
3. Turn on your computer.
4. If required, verify that the computer works correctly by running
ePSA diagnostics
.
Working on your computer
7
Содержание Latitude 7400 2-in-1
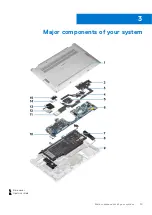
Страница 15: ...Major components of your system 1 Base cover 2 Heatsink shield 3 Major components of your system 15 ...
Страница 24: ...4 Pry along the left right and bottom edges of the base 24 Removing and installing components ...
Страница 27: ...2 Press along the edges of the base cover until it clicks into place Removing and installing components 27 ...
Страница 28: ...3 Tighten the 10 captive screws to secure the base cover to the computer 28 Removing and installing components ...
Страница 43: ...5 Place the metal shield on the WWAN card Removing and installing components 43 ...
Страница 51: ...8 Adhere the Mylar sheet on the system board Removing and installing components 51 ...
Страница 56: ...4 Remove the metal foil from the heatsink shield 56 Removing and installing components ...
Страница 57: ...5 Remove the heatsink shield from the system board Removing and installing components 57 ...
Страница 60: ...3 Place the heatsink shield on the heatsink 60 Removing and installing components ...
Страница 61: ...4 Adhere the metal foils on the heatsink shield Removing and installing components 61 ...
Страница 87: ...8 Lift the keyboard off the palmrest assembly Removing and installing components 87 ...


