Power management
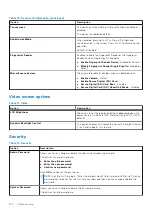
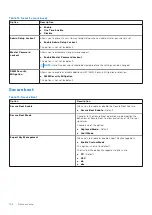
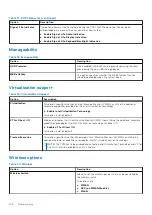
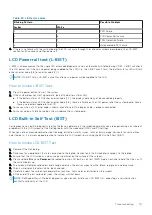
Table 16. Power Management
Option
Description
AC Behavior
Allows you to enable or disable the computer from turning on automatically when an AC adapter
is connected.
●
Wake on AC
This option is not set by default.
Enable Intel Speed Shift
technology
This option is used to enable/disable Intel Speed Shift Technology.
This option is not set by default.
Auto On Time
Allows you to set the time at which the computer must turn on automatically.
The options are:
●
Disabled
—Default
●
Every Day
●
Weekdays
●
Select Days
This option is not set by default.
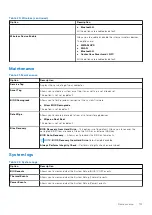
USB Wake Support
Allows you to enable USB devices to wake the system from standby.
●
Enable USB Wake Support
●
Wake on Dell USB-C Dock
This option is not set by default.
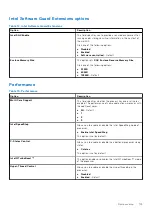
Wireless Radio Control
This option if enabled, will sense the connection of the system to a wired network and
subsequently disable the selected wireless radios (WLAN and/or WWAN). Upon disconnection
from the wired network the selected wireless radio will ne enabled.
●
Control WLAN radio
This option is not set by default.
Block Sleep
This option lets you to block entering to sleep in OS environment.
This option is not set by default.
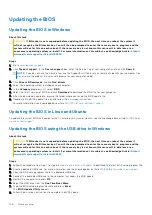
Peak Shift
Allows you enable of disable the Peak shift feature. This feature when enabled minimizes the AC
power usage at times of peak demand. Battery doesnot charge between the Peak Shift start and
end time
Peak Shift Start and End Time can be configured for all weekdays
This option set the battery threshold value (15 % to 100 %)
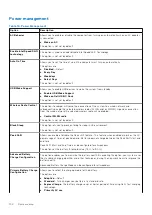
Advanced Battery
Charge Configuration
This option enables you to maximize the battery health. By enabling this option, your system uses
the standard charging algorithm and other techniques, during the non-work hours to improve the
battery health.
Advanced Battery Charge Mode can be configured for all weekdays
Primary Battery Charge
Configuration
Allows you to select the charging mode for the battery.
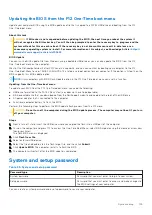
The options are:
●
Adaptive
—Default
●
Standard
- Fully charges your battery at a standard rate.
●
ExpressCharge
- The battery charges over a shorter period of time using Dell’s fast charging
technology.
●
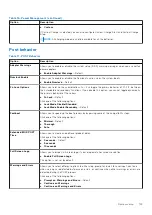
Primarily AC use
104
System setup
Содержание Latitude 7400 2-in-1
Страница 15: ...Major components of your system 1 Base cover 2 Heatsink shield 3 Major components of your system 15 ...
Страница 24: ...4 Pry along the left right and bottom edges of the base 24 Removing and installing components ...
Страница 27: ...2 Press along the edges of the base cover until it clicks into place Removing and installing components 27 ...
Страница 28: ...3 Tighten the 10 captive screws to secure the base cover to the computer 28 Removing and installing components ...
Страница 43: ...5 Place the metal shield on the WWAN card Removing and installing components 43 ...
Страница 51: ...8 Adhere the Mylar sheet on the system board Removing and installing components 51 ...
Страница 56: ...4 Remove the metal foil from the heatsink shield 56 Removing and installing components ...
Страница 57: ...5 Remove the heatsink shield from the system board Removing and installing components 57 ...
Страница 60: ...3 Place the heatsink shield on the heatsink 60 Removing and installing components ...
Страница 61: ...4 Adhere the metal foils on the heatsink shield Removing and installing components 61 ...
Страница 87: ...8 Lift the keyboard off the palmrest assembly Removing and installing components 87 ...

