background image

Back to Contents Page


 System Setup  

Dell Studio™ 540 Service Manual 


Overview 


Clearing Forgotten Passwords 


Clearing CMOS Settings 


Flashing the BIOS 


Overview  

Use system setup to:  

l


Change the system configuration information after you add, change, or remove any hardware in your computer 


l


Set or change a user-selectable option such as the user password 


l


Read the current amount of memory or set the type of hard drive installed 


Entering System Setup 


1.

Turn on (or restart) your computer.  


2.

When the blue DELL™ logo is displayed, watch for the F2 prompt to appear and then press <F2> immediately. 


System Setup Screens  

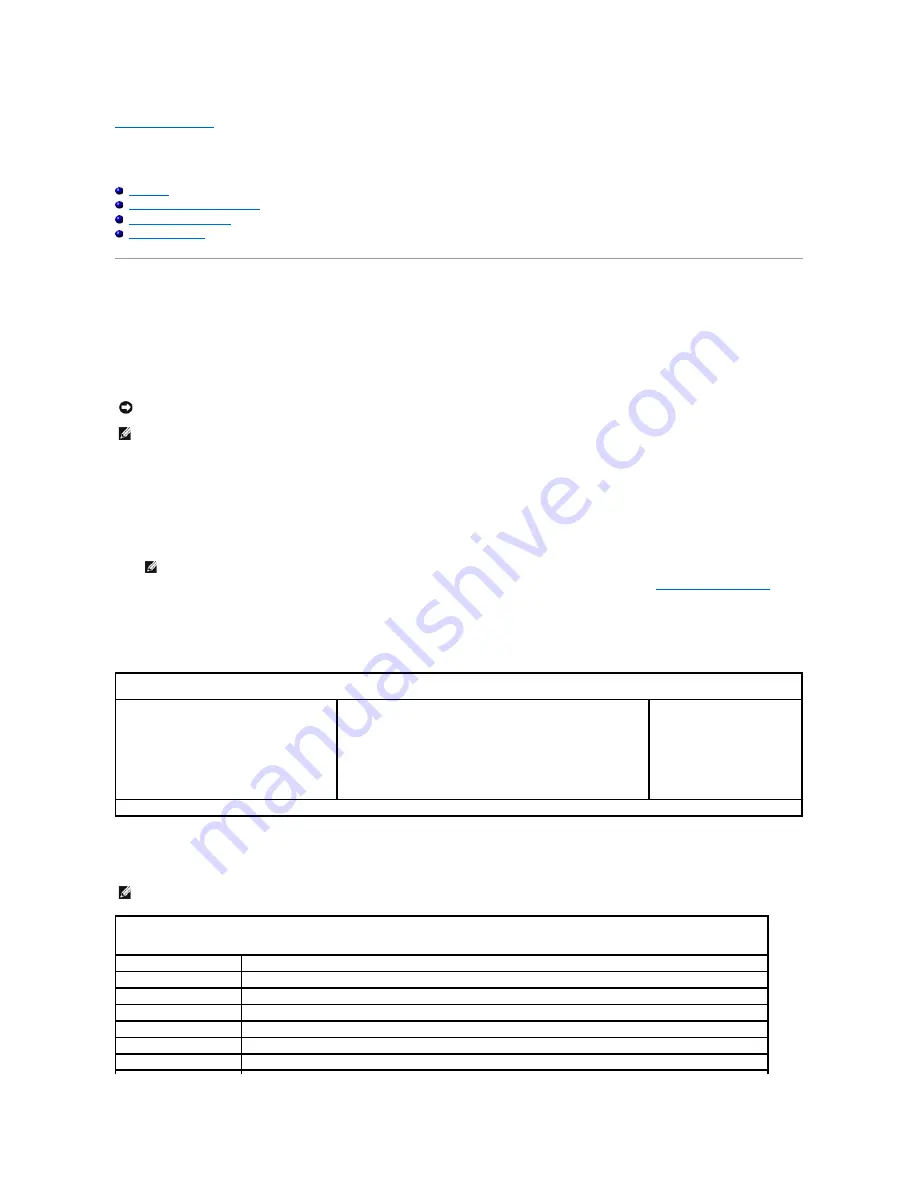
The system setup screen displays current or changeable configuration information for your computer. Information on the screen is divided into three areas: the 
options list, active options field, and key functions. 


System Setup Options  


NOTICE: 

Unless you are an expert computer user, do not change the settings for this program. Certain changes can make your computer work 

incorrectly.


NOTE: 

Before you use system setup, it is recommended that you write down the system setup screen information for future reference.


NOTE: 

The F2 prompt indicates that the keyboard has initialized. This prompt can appear very quickly, so you must watch for it to display, and 

then press <F2>. If you press <F2> before you are prompted, this keystroke will be lost. If you wait too long and the operating system logo 
appears, continue to wait until you see the Microsoft

® 

Windows

® 

desktop. Then, shut down your computer (see 

Turning Off Your Computer

) and 

try again.

Menu


 Appears on top of the System Setup window. This field provides a menu to access to the System Setup options. Press <

¬

 >and<

®

 >keys to 

navigate. As a 

Menu

 option is highlighted, the 

Options List

, lists the options that define the hardware installed on you computer. 

Options List


 Appears on the left side of the 

System Setup window. The field lists features 
that define the configuration of your computer, 
including installed hardware, power 
conservation, and security features.  
Scroll up and down the list with the up- and 
down-arrow keys. As an option is highlighted, 
the 

Options Field

 displays the option's current 

and available settings. 

Options Field


 Appears on the right side of 

Options List

 and 

contains information about each option listed in the 

Options List

. In 

this field you can view information about your computer and make 
changes to your current settings. Press <Enter> to make changes to 
your current settings. Press <ESC> to return to the 

Options List


NOTE: 

Not all settings listed in the Options Field are changeable. 

Help


 Appears on the right side 

of the System Setup window and 
contains help information about 
the option selected in 

Options 

List

Key Functions


 Appears below the 

Options Field

 and lists keys and their functions within the active system setup field. 


NOTE: 

Depending on your computer and installed devices, the items listed in this section may appear, or may not appear exactly as listed.


Main


System Date 

Displays current date settings, in the mm:dd:yy format. 

System Time 

Displays current time settings, in the in the hh:mm:ss format. 

SATA0 

Displays the SATA drive integrated on SATA0. 

SATA1 

Displays the SATA drive integrated on SATA1. 

SATA2 

SATA Port not present. 

SATA3 

SATA Port not present. 

SATA4 

Displays the SATA drive integrated on SATA4. 

Содержание 540 - USB Photo Printer 540

Страница 1: ...ing the marks and names or their products Dell Inc disclaims any proprietary interest in trademarks and trade names other than its own Model DCMA July 2008 Rev A00 Technical Overview Before You Begin Replacing the Computer Cover Replacing the Front Panel Replacing Memory Module s Replacing a PCI PCI Express Card Replacing Drives Replacing Fans Replacing the Front I O Panel Replacing the Processor ...

Страница 2: ... that the work surface is flat and clean to prevent the computer cover from being scratched 2 Turn off your computer see Turning Off Your Computer 3 Disconnect all telephone or network cables from the computer 4 Disconnect your computer and all attached devices from their electrical outlets 5 Press and hold the power button while the system is unplugged to ground the system board NOTICE To avoid l...

Страница 3: ...g inside your computer ground yourself by touching an unpainted metal surface such as the metal at the back of the computer While you work periodically touch an unpainted metal surface to dissipate static electricity which could harm internal components ...

Страница 4: ...ase it out of its connector 7 If you are replacing an existing card go to step 6 of Installing a PCI PCI Express Card 8 Install a filler bracket in the empty card slot opening 9 Replace the card retention bracket See Replacing the Card Retention Bracket 10 Replace the computer cover reconnect the computer and devices to electrical outlets and then turn them on 11 To complete the removal procedure ...

Страница 5: ... for information about the card s cable connections 11 Replace the computer cover reconnect the computer and devices to electrical outlets and then turn them on 12 To complete the installation see Configuring Your Computer After Removing or Installing a PCI PCI Express Card Replacing the Card Retention Bracket NOTE If you are installing a PCI Express card into the x16 connector ensure that the sec...

Страница 6: ...led Removed Sound Card 1 Enter system setup see System Setup 2 Go to Integrated Peripherals and select Onboard Audio Controller and then change the setting to Disabled 3 Connect the external audio devices to the sound card s connectors 1 Enter system setup see System Setup 2 Go to Integrated Peripherals and select Onboard Audio Controller change the setting to Enabled 3 Connect the external audio ...

Страница 7: ...see System Setup and restore the settings you recorded in step 1 Back to Contents Page CAUTION Before working inside your computer read the safety information that shipped with your computer For additional safety best practices information see the Regulatory Compliance Homepage at www dell com regulatory_compliance CAUTION A new battery can explode if it is incorrectly installed Replace the batter...

Страница 8: ...verse order Back to Contents Page CAUTION Before working inside your computer read the safety information that shipped with your computer For additional safety best practices information see the Regulatory Compliance Homepage at www dell com regulatory_compliance CAUTION To guard against likelihood of electric shock laceration by moving fan blades or other unexpected injuries always unplug your co...

Страница 9: ...ON Before working inside your computer read the safety information that shipped with your computer For additional safety best practices information see the Regulatory Compliance Homepage at www dell com regulatory_compliance NOTICE Do not perform the following steps unless you are familiar with hardware removal and replacement Performing these steps incorrectly could damage your system board For t...

Страница 10: ...nect your computer and devices to electrical outlets and then turn them on Back to Contents Page 1 processor cover 2 tab 3 processor 4 socket 5 center cover latch 6 release lever 7 front alignment notch 8 processor pin 1 indicator 9 back alignment notch NOTICE You must position the processor correctly in the socket to avoid permanent damage to the processor and the computer when you turn on the co...

Страница 11: ......

Страница 12: ...n that shipped with your computer For additional safety best practices information see the Regulatory Compliance Homepage at www dell com regulatory_compliance NOTE The system does not support IDE devices NOTE The 3 5 inch FlexDock is not interchangeable with the hard drive carrier NOTICE If you are replacing a hard drive that contains data you want to keep back up your files before you begin this...

Страница 13: ...onnect the power cable and the data cable from the back of the CD DVD drive 5 Remove the two screws securing the CD DVD drive to the chassis 6 Push and slide the CD DVD drive out through the front of the computer 7 If you are not replacing the drive a Replace the drive panel insert see Replacing the Drive Panel Insert b Go to step 12 8 If you are replacing the CD DVD drive or installing a new one ...

Страница 14: ...exDock replace the drive panel insert see Replacing the Drive Panel Insert 8 If you are installing a new FlexDock a Remove the drive panel insert if applicable see Replacing the Drive Panel Insert b Remove the FlexDock from its packaging 9 Gently slide the FlexDock into place in the FlexDock slot 10 Align the screw holes in the FlexDock with the screw holes in the FlexDock 11 Replace the two screw...

Страница 15: ... Panel 2 Gently press on the insert lever outward to release the lock 3 Pull the FlexDock drive insert away from the front panel 4 To replace the FlexDock drive insert align the FlexDock drive insert in place 5 Push the insert lever towards the front panel till it snaps in place Replacing the Drive Panel Insert Align the drive panel insert along the edges of the empty slot of the FlexDock or CD DV...

Страница 16: ... install a new Media Card Reader align and slide the Media Card Reader clamp into the Media Card Reader clamp slot 9 Replace and tighten the screw that secures the Media Card Reader to the chassis 10 Reconnect the cables to the system board NOTICE To comply with FCC regulations it is recommended that you replace the drive panel insert whenever the FlexDock is removed from the computer 1 back of th...

Страница 17: ...g a PCI PCI Express Card 12 Replace the front panel see Replacing the Front Panel 13 Replace the computer cover see Replacing the Computer Cover 14 Connect your computer and devices to an electrical outlet and turn them on Back to Contents Page ...

Страница 18: ... Remove the computer cover see Replacing the Computer Cover CAUTION Before working inside your computer read the safety information that shipped with your computer For additional safety best practices information see the Regulatory Compliance Homepage at www dell com regulatory_compliance CAUTION To guard against likelihood of electric shock laceration by moving fan blades or other unexpected inju...

Страница 19: ...nect the processor fan and heat sink assembly cable to the CPU_FAN connector on the system board see System Board Components 11 Replace the computer cover see Replacing the Computer Cover 12 Connect your computer and devices to an electrical outlet and turn them on Back to Contents Page NOTICE To ensure maximum cooling for the processor do not touch the heat transfer areas on the processor heat si...

Страница 20: ...sert 5 To replace the front panel align and insert the front panel clamps in the clamp insert 6 Rotate the front panel towards the computer until it snaps into place on the front of the computer 7 Replace the computer cover see Replacing the Computer Cover Back to Contents Page CAUTION Before working inside your computer read the safety information that shipped with your computer For additional sa...

Страница 21: ...to the chassis 10 Reconnect the cables to the system board 11 Replace any expansion cards see Replacing a PCI PCI Express Card 12 Replace the front panel see Replacing the Front Panel 13 Replace the computer cover see Replacing the Computer Cover 14 Connect your computer and devices to an electrical outlet and turn them on Back to Contents Page CAUTION Before working inside your computer read the ...

Страница 22: ...fety best practices information see the Regulatory Compliance Homepage at www dell com regulatory_compliance 1 securing clip 2 memory module connector NOTICE Do not install ECC memory modules NOTICE If you remove your original memory modules from the computer during a memory upgrade keep them separate from any new modules that you may have even if you purchased the new modules from Dell If possibl...

Страница 23: ...age appears stating that memory size has changed press F1 to continue 12 Log on to your computer 13 Right click the My Computer icon on your Microsoft Windows desktop and click Properties 14 Click the General tab 15 To verify that the memory is installed correctly check the amount of memory RAM listed Back to Contents Page 1 cutouts 2 2 memory module 3 notch 4 memory module connector NOTICE To avo...

Страница 24: ...ulatory Compliance Homepage at www dell com regulatory_compliance CAUTION To guard against likelihood of electric shock laceration by moving fan blades or other unexpected injuries always unplug your computer from the electrical outlet before removing the cover NOTICE Do not perform the following steps unless you are familiar with hardware removal and replacement Performing these steps incorrectly...

Страница 25: ...Back to Contents Page ...

Страница 26: ...e rubber foot to secure the rubber foot to the chassis Back to Contents Page CAUTION Before working inside your computer read the safety information that shipped with your computer For additional safety best practices information see the Regulatory Compliance Homepage at www dell com regulatory_compliance CAUTION To guard against likelihood of electric shock laceration by moving fan blades or othe...

Страница 27: ...Replace the processor see Replacing the Processor CAUTION Before working inside your computer read the safety information that shipped with your computer For additional safety best practices information see the Regulatory Compliance Homepage at www dell com regulatory_compliance NOTICE Do not perform the following steps unless you are familiar with hardware removal and replacement Performing these...

Страница 28: ...I Express Card 17 Replace the computer cover see Replacing the Computer Cover 18 Connect your computer and devices to an electrical outlet and turn them on 19 Flash the system BIOS as needed Back to Contents Page NOTICE Ensure that the heat sink assembly is correctly seated and secure NOTE For information on flashing the system BIOS see Flashing the BIOS ...

Страница 29: ...pears on top of the System Setup window This field provides a menu to access to the System Setup options Press and keys to navigate As a Menu option is highlighted the Options List lists the options that define the hardware installed on you computer Options List Appears on the left side of the System Setup window The field lists features that define the configuration of your computer including ins...

Страница 30: ...dicates the amount of CPU L2 cache Advanced Chipset Features Indicates amount of video memory 32 MB by default Integrated Peripherals Allows you to enable or disable the integrated devices and ports on your system CPU Configuration Allows you to enable or disable the CPU features that enhance the performance of the system USB Configuration Allows you to enable or disable the USB controller Power P...

Страница 31: ...gin 2 Remove the computer cover see Replacing the Computer Cover 3 Locate the 3 pin password connector CLEAR_PW on the system board see System Board Components 4 Remove the 2 pin jumper plug from pins 2 and 3 and fix it on pins 1 and 2 5 Wait for approximately five seconds to clear the password 6 Remove the 2 pin jumper plug from pins 1 and 2 and replace it on pins 2 and 3 to enable the password f...

Страница 32: ... on the computer 2 Locate the BIOS update file for your computer at the Dell Support website at support dell com 3 Click Download Now to download the file 4 If the Export Compliance Disclaimer window appears click Yes I Accept this Agreement The File Download window appears 5 Click Save this program to disk and then click OK The Save In window appears 6 Click the down arrow to view the Save In men...

Страница 33: ...The file icon appears on your desktop and is titled the same as the download BIOS update file 8 Double click the file icon on the desktop and follow the instructions on the screen Back to Contents Page ...

Страница 34: ...UTION Before working inside your computer read the safety information that shipped with your computer For additional safety best practices information see the Regulatory Compliance Homepage at www dell com regulatory_compliance 1 optional hard drive 2 hard drive 3 FlexDock 4 optional CD or DVD drive 5 power supply 6 CD or DVD drive 1 processor socket CPU 2 processor fan connector ...

Страница 35: ...r F_PANEL 16 front USB connector F_USB5 17 Media Card Reader USB connector F_USB4 18 front USB connector F_USB3 19 front I O USB connector F_USB2 20 FlexDock USB connector F_USB1 21 front 1394 connector F_1394 22 battery socket 23 front audio connector F_AUDIO 24 PCI connector PCI 1 25 PCI Express x1 connector PCIE_X1_2 26 PCI Express x1 connector PCIE_X1_1 27 PCI Express x16 connector PCIE X16 28...

Страница 36: ...of Microsoft Corporation in the United States and or other countries Other trademarks and trade names may be used in this document to refer to either the entities claiming the marks and names or their products Dell Inc disclaims any proprietary interest in trademarks and trade names other than its own July 2008 Rev A00 Back to Contents Page NOTE A NOTE indicates important information that helps yo...

Отзывы: