background image

Install rail brackets on the Data Domain racks (for square or round
hole racks)

About this task

NOTE:

Do not hold the bracket assembly in a vertical position as the parts may separate.

If you are using a rack with threaded holes, skip this section and go to 

Install rail brackets using the adapter hardware

(for threaded hole racks)

 on page 17 section.

The Data Domain system is 4 rack units (RU) tall so make sure the location in the rack fits the product. Attach the
bracket assembly to the lowest RU of the 4-RU opening.

To comply with Data Domain rack mounting guidelines, the system controller should be installed in the pre-defined space
in the rack for system controllers. Refer to the 

Installation and Setup Guide

 for your system.

For HA systems:

Mount node 0 such that the bottom of the chassis aligns with the 13U mark in the rack.

Mount node 1 such that the bottom of the chassis aligns with the 18U mark in the rack.

Steps

1. At each rack post, determine the vertical position in the rack where the brackets are to be installed. The top-most mounting

hole for a particular rack unit (RU) mounting position is typically identified by a mark or hole. The bracket will be installed in
the bottom hole of the 4 RU opening.

CAUTION:

 If the bracket is mounted in holes that are not vertically aligned from front to back, the bracket

may be damaged and mounting will not be secure.

2. As needed, select the bracket marked right or left. The rear of the bracket contains an adjustable piece.
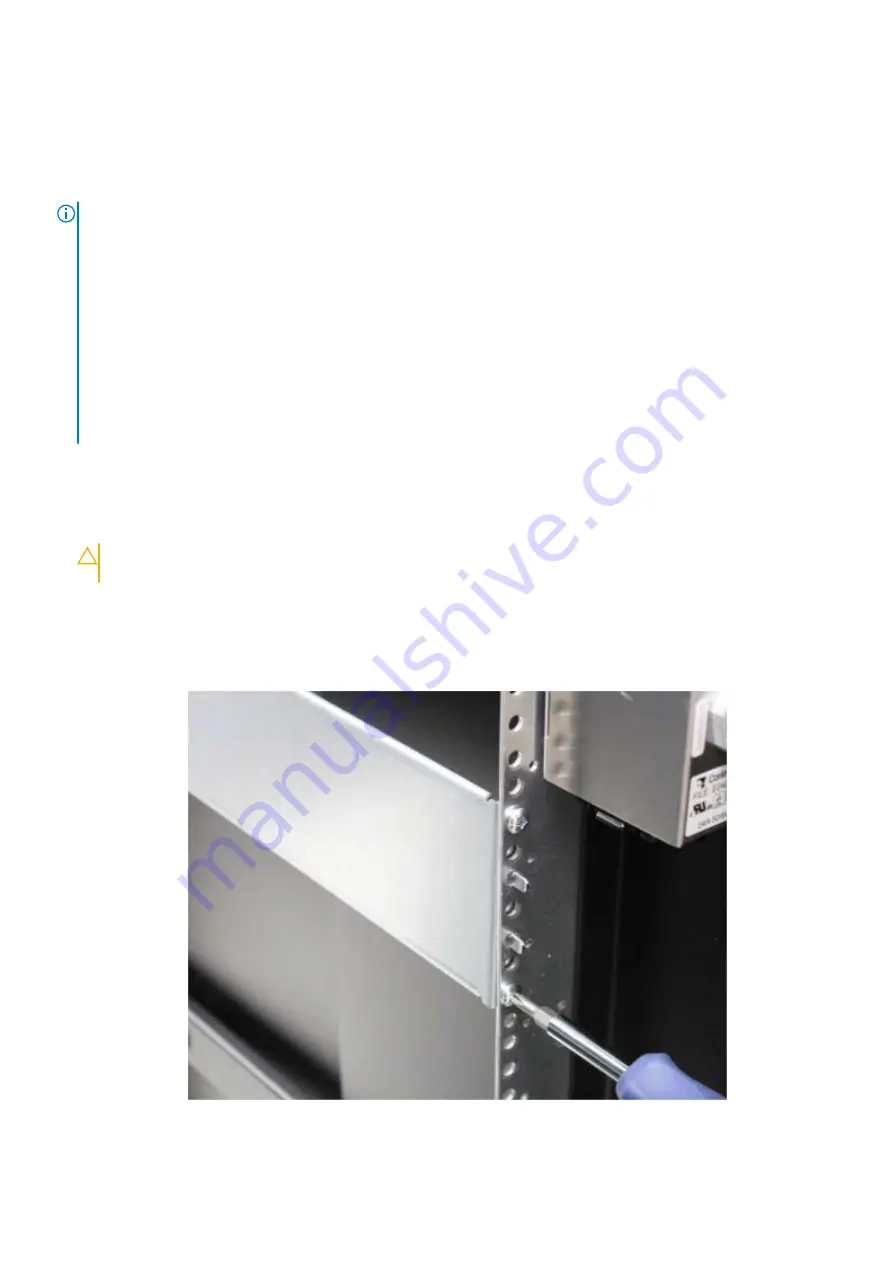
3. From the rear of the system, hold the bracket against the inside of the rack posts. Align the rear guide pin and slide the

bracket towards the front. The guide pins can help to temporarily hold the rack mount bracket in place. Attach the bracket
to the rear of the rack using the furnished screws. There are five screw holes. The picture shows two screws attached to
the rear rack post.

Figure 8. Insert screw in the back

Install the System in the Rack

15

Содержание Data Domain DD9800

Страница 1: ...Dell EMC Data Domain DD9800 System Installation Guide September 2020 Rev 02 ...

Страница 2: ...tial damage to hardware or loss of data and tells you how to avoid the problem WARNING A WARNING indicates a potential for property damage personal injury or death 2020 2020 Dell Inc or its subsidiaries All rights reserved Dell EMC and other trademarks are trademarks of Dell Inc or its subsidiaries Other trademarks may be trademarks of their respective owners ...

Страница 3: ... management assembly 22 Installing the expansion shelves into the racks 23 Chapter 3 Install the Disk Shelves in the Rack 24 Remove filler panels 24 Install an ES30 or FS15 shelf into the rack 24 Racking and cabling 24 Rail kit 25 Installing the rails in the cabinet 25 Adjusting for various rack types 26 Installing the rails using the adapter hardware 26 Installing the shelf on the rails 28 Instal...

Страница 4: ...h DD Cloud Tier HA 72 DD9800 with ERSO 74 Connecting the HA interconnect 76 Connect data cables on both nodes 77 Power on the systems 77 Install the bezel 79 Chapter 5 Configure System for Use 80 Enable administrative communication 80 Accepting the End User License Agreement 81 Run the configuration wizard 82 Configuring the network 82 Configuring additional system parameters 83 Configure HA for n...

Страница 5: ...alignment pins 25 21 Installing the rails 25 22 Attaching the rail to the rack 28 23 Sliding the enclosure onto the rails 28 24 Rail tabs securing the rear of the enclosure 29 25 Securing the front of the enclosure 29 26 Rail installation 31 27 Installing the right rail to the rear channel 32 28 Installing the right rail to the front channel 32 29 Sliding the shelf chassis into the rails 34 30 Unl...

Страница 6: ...gnment pins 49 58 Nutbar installation Left nutbar shown 50 59 Node 0 SAS I O module to ES30 host port connector 53 60 Node 1 SAS I O module to ES30 expansion port connector 54 61 Cables for ES30 to ES30 connections 55 62 DD9800 with ES30 shelves 57 63 DD9800 with ES30 shelves HA one rack 59 64 DD9800 with ES30 shelves HA two racks 61 65 DD9800 with ES30 shelves DD Cloud Tier or HA and DD Cloud Tie...

Страница 7: ...ES30 HA standby node cabling instructions two racks 60 16 DD9800 with ES30 DD Cloud Tier or HA and DD Cloud Tier primary node cabling instructions 61 17 DD9800 with ES30 DD Cloud Tier or HA and DD Cloud Tier standby node cabling instructions 62 18 DD9800 with ES30 ERSO 63 19 Cables for node 0 and node 1 to DS60 shelf loop 66 20 DD9800 with DS60 67 21 DD9800 with DS60 HA primary node cabling instru...

Страница 8: ...Follow the instructions in Configure System for Use on page 80 to configure factory racked systems The following documents available from the Online Support website provide additional information about factory racked systems Dell EMC 40U P Cabinet Site Preparation Guide Dell EMC 40U P Cabinet Unpacking and Setup Guide Dell EMC Titan S Site Preparation Guide Dell EMC Titan S Unpacking and Setup Gui...

Страница 9: ...g on each power supply cord is used as the main device to disconnect power from the system Ensure that the socket outlets are located near the equipment and are easily accessible Permanently unplug the unit if you think it is damaged in any way and before moving the system A DD9800 system includes four power supplies To completely remove system power you must disconnect all four power supplies The...

Страница 10: ...ncluded in the lift kit http www corkc4 isus emc com wiki index php Lift_Tool describes the Lift equipment and the ordering process NOTE If you are using a portable lift other than the Alum A Lift adapt these instructions as necessary while following all required safety requirements Lift requirements For installations in racks that are 28U 49 inches or less above the floor use the lower mast which...

Страница 11: ... task If you are using the Alum A Lift to install or remove components above 49 inches 28U from the floor use the single lower mast configuration with the Voyager conversion kit and support table Steps 1 Unpack the Voyager kit 2 Use the instructions provided within the kit to reconfigure the lift Introduction and Preparation 11 ...

Страница 12: ...CL5422 1 2 Figure 3 Reconfiguring the portable lift with the Voyager conversion kit 12 Introduction and Preparation ...

Страница 13: ...by loosening the thumbscrew on each handle The handles must be saved for future use CAUTION Data Domain systems are heavy Always use two people or a mechanical lift to move a system The chassis displays warning labels Figure 4 Warning about lifting the system 3 Remove expansion shelves and their bezels from the shipping packages Install the rack brackets Data Domain systems are installed into rack...

Страница 14: ...t Figure 6 Rail bracket outside 1 Left outside bracket 2 Right outside bracket A cable management assembly CMA for organization of cables at the rear of the system is already installed onto the DD9800 system on a Data Domain rack For field installed systems the CMA is shipped with the DD9800 system Figure 7 Cable management assembly CMA 14 Install the System in the Rack ...

Страница 15: ...om of the chassis aligns with the 18U mark in the rack Steps 1 At each rack post determine the vertical position in the rack where the brackets are to be installed The top most mounting hole for a particular rack unit RU mounting position is typically identified by a mark or hole The bracket will be installed in the bottom hole of the 4 RU opening CAUTION If the bracket is mounted in holes that ar...

Страница 16: ...ching the front of the rack Figure 9 Insert screw in the front 5 Attach the front of the brackets with two screws each in the two middle holes innermost holes as shown in the picture Figure 10 Attach bracket to front of rack 6 Verify that the bracket is level 7 Repeat the steps to attach the remaining bracket to the other side of the rack 8 After installing both brackets make sure that they are le...

Страница 17: ...s procedure if your rack has tapped holes that are M5 M6 10 32 or 12 24 The adapter hardware is shipped in the rack mount kit You will need a long handled screwdriver with a shank diameter less than 7 0 mm and the wrench included in the kit to tighten the nuts Steps 1 Locate the two adapters from the rail kit Figure 11 Adapters 1 Long adapter 2 Short adapter 2 Attach the long adapter to the front ...

Страница 18: ... example the 10 32 threaded hole rack would require the installation of the 10 32 screws Install the screws in the appropriate locations until they are tight against the rack 6 As needed select the bracket marked right or left Orientation assumes you are facing the front of the rack 7 Slide the adjustable part of the bracket partly open 8 Attach the first rail to the rack as follows a Hold the rai...

Страница 19: ...CAUTION Data Domain systems are heavy Always use two people or a mechanical lift to move a system The chassis displays warning signs Figure 14 Warning about lifting the system CAUTION Do not apply AC power to the DD9800 system controller until all expansion shelves and cables are installed Make sure the PSNT label attached to the left rear of the chassis is not damaged or snagged during the instal...

Страница 20: ...les supplied for lifting to install the system in the rack in the correct location 3 At each side align the bottom of the chassis with the lip of each installed rack bracket 4 Carefully slide the chassis into the rack and remove the back handles while supporting the chassis weight Continue to slide the rest of the chassis and remove the front handles Finally push the chassis all the way into the b...

Страница 21: ... assembly A cable management assembly CMA for organization of cables at the rear of the system is already installed onto the DD9800 system on a Data Domain rack For field installed systems the CMA is shipped separately NOTE For non Data Domain racks it is acceptable to use the cable management products provided by the rack vendor Install the System in the Rack 21 ...

Страница 22: ... CMA brackets towards the direction of the white arrow see picture and turn the blue knobs in the direction of the yellow arrow on the left and right sides of the CMA so the tip of the knob is pulled away from the side of the bracket to fit in the rail slot Figure 18 Data Domain cable management assembly back inside 4 Locate the slots and the hole in the Data Domain rail to attach the CMA by follo...

Страница 23: ... designated rack location 2 Add shelves to the racks in order one at a time from the bottom of a rack to the top filling each string in that rack before going to the next NOTE Strings in add on racks may connect to the same string number in other racks Shelves are added in the order V1 1 V1 2 V1 3 V1 4 V2 1 V2 2 and so on Shelves are labeled VN M VN refers to string N and the M is the number of th...

Страница 24: ...SD shelf Racking and cabling EMC has adopted recommended racking guidelines To provide the best trade off in terms of serviceability system expansion and cabling mount the controller starting above the first set of shelves in the rack usually 13U for most systems You can connect the 2 meter cable attached to the controller to any shelf in the same rack Install filler panels in unused rack openings...

Страница 25: ...nt Install each rail in the cabinet Steps 1 From the front of the cabinet insert the rail alignment pins above and below the bottom U mark on the rear cabinet channel Alignment pins here EMC2892b 3U Rear channels Figure 20 Holes for alignment pins 2 Pull the sliding rail to the front of the cabinet and secure it to the front channel at the middle two holes of the rail using two of the provided scr...

Страница 26: ...32 or 12 24 The front edge of each rail is stamped L or R for left and right sides when facing the front of the rack Since the brackets cover these markings make a note as to which rack is L and which rack is R Use a 2 Phillips screwdriver with a shank diameter less than 7 0 mm and the wrench that was included in the kit to tighten the nuts CAUTION The adapter kit is only for static applications w...

Страница 27: ...acket aligned with the rear of the rack b Pull the front of the rail until it is aligned with the inside of the rack front c Attach the front of the rail bracket assembly to the front of the rack For M6 or 12 24 tapped rack holes insert M5 screws through the rack hole positions as shown in Attaching the rail to the rack on page 28 Secure the screws using the furnished nuts For M5 or 10 32 tapped r...

Страница 28: ...nclosure is heavy and should be installed into or removed from a rack by two people To avoid personal injury and or damage to the equipment do not attempt to lift and install the enclosure into a rack without a mechanical lift and or help from another person Steps 1 With help from another person lift the enclosure and from the front of the cabinet rack slide the enclosure onto the rails Sliding th...

Страница 29: ... enclosure 2 Once the enclosure is completely seated into the rear tabs secure the enclosure tighten the screws two on each rail that secure the rails to the channels 3 Secure the front of the enclosure to the front vertical channels with four screws two per side but do not tighten the screws until they are all in place Securing the front of the enclosure on page 29 Rear Front Screw 2 Screw 2 CL47...

Страница 30: ...the two M5 adapters from the adapter mounting block on the rails b Select the required adapters from the hardware kit and install the adapters into the adapter mounting block The following table shows the pins for third party racks Table 2 Pins for third party racks Rail Pins from kit Part Number and Description Suggested Use 036 028 018 Custom screw M4 x 10MM Quantity 4 per kit Used for any third...

Страница 31: ...two U spaces of the 4U space b With the release latch on the outer rear part of the rear channel place the catch mechanism over the channel c Push the rail back to secure the rail adapters in the cabinet channel An audible click indicates that the rail is secure in the channel d Make sure the rear post catch mechanism is secure and attached Install the Disk Shelves in the Rack 31 ...

Страница 32: ...n is secure Front Right CL4866 Figure 28 Installing the right rail to the front channel 6 Install the left rail by repeating step 3 or step 4 7 On both left and right rail assemblies install a single long screw between the rail posts in the upper screw hole to secure the rails as follows a For Dell EMC racks or racks that do not have threaded holes insert a single M5 screw into the larger of the t...

Страница 33: ...eople to install About this task CAUTION Secure the enclosure to the portable lift using the securing straps before moving the lift Steps 1 If a portable lift is not available or cannot access the rack you must remove the components from the shelf before it is installed on the rails a Refer to the procedures for removing the Power Supplies link control cards LCCs and Fan Modules and remove each FR...

Страница 34: ...casters by lifting the locking tabs as shown in the following figure and carefully slide the shelf into the cabinet as far as the lift allows CL5424 Figure 30 Unlocking the casters 5 Lock all four casters by pressing down on the locking tab as shown in the following figure so the lift does not roll as the shelf is pushed into the cabinet 34 Install the Disk Shelves in the Rack ...

Страница 35: ...ecured within the cabinet 8 If the shelf was depopulated before installation repopulate the shelf as follows a Reinstall the disk drives in the exact location from which they were removed b Reinstall the Fan modules c Slide the shelf into the cabinet d From the rear of the cabinet reinstall the power supplies and the link control cards LCCs into the shelf Inserting and securing the top cover and s...

Страница 36: ...lips with patch Can be used in non Dell EMC racks Steps 1 For Dell EMC racks use the orange shelf latch handles to push the shelf completely into the cabinet Align the two semi captive M5 shoulder screws on each side with the mounting holes on the cabinet Thread the shoulder screws into the mounting holes and finger tighten the shoulder screws Figure 33 Inserting and securing the shelf to the cabi...

Страница 37: ... cabinet To secure a top cover that does not have any mounting hardware use the screws or pins from the kit that accompanies the device These screws secure the shelf cover and prevent the cover from coming out of the cabinet during operation Secure the top cover to the rack as follows a If the shelf is being installed into a Dell EMC rack secure the top cover to the rack using M5 truss head screws...

Страница 38: ...to install the 1U cable management tray Racks and rails You can secure the 1U cable tray to Dell EMC and non Dell EMC racks that use a sliding rail system The rail kits are included in the cable tray packaging and are compatible with racks with the following types of holes 3 8 inch square holes 9 32 inch round holes 10 32 12 24 M5X 8 or M6X1 pre threaded holes The following table shows the hardwar...

Страница 39: ...Figure 38 Blue tab on rail must be pushed in About this task NOTE This procedure describes the installation of the 1U cable management tray into a standard Dell EMC rack For third party racks use the additional hardware that comes with the 1U cable management arm to install the rails as necessary The rails come preassembled with adapters that fit into standard round mounting holes If the rack has ...

Страница 40: ... fit the rack you are using Insert the two adapters on the rail into the mounting holes in both the front and the rear of the rails Secure the rails to the rack using two knurled screws from the hardware package one in the front of the rail and one in the rear of the rail Torque the screws to 12 16 inch pounds Repeat for the other rail Figure 41 Installing tray 40 Install the Disk Shelves in the R...

Страница 41: ...of the rack CL5523 Figure 42 Spring clips push up to release tray Figure 43 Opening the cable chain lids 4 Unclip and open all lids on the cable chains CL5505 Figure 44 Cable positioning in cable chains 5 Refer to the application guide for the shelf you are installing Using the 1 inch graduations on the back edge of the tray route the cables through the cable chains to their suggested lengths keep...

Страница 42: ...hains so the lids are facing up and the hinges are all facing each other Arrange the two cable chains so that they form a U shape Figure 46 Attaching cable chains to tray 7 Attach the Cable Chains to the tray by attaching the clips onto the tabs on the rear of the tray CL5500 Figure 47 Installing the chassis bracket into the shelf 8 Snap the chassis bracket clips into the brackets on the side of t...

Страница 43: ...ation guide and connect the cables as required Dress the cable runs with proper cable strain reliefs when routing to the rack Disconnecting cables for a shelf installed with the 1U cable management tray When servicing a shelf installed with the 1U cable management tray cables might need to be disconnected to perform servicing procedures Steps 1 Unplug disconnect all cables from the rear of the she...

Страница 44: ...ls and components in the customer racks Discard all silver screws removed from the shipping rack Modifying rail lengths This procedure details how to extend or shorten the rail lengths to accommodate third party racks About this task The rails have four adjustment ranges 18 22 22 26 default 26 30 30 34 The length adjustments provided in this procedure use the default length of 22 26 as a baseline ...

Страница 45: ... remove the forward most screw and nut 4 Slide the length adjustment bracket to the rear of the rail until it stops CL5502 Figure 52 26 30 Marking 5 Slide the inner rail mechanism to the rear of the rail until the 26 30 mark is visible If the inner mechanism is locked depress the leaf spring to free it 6 Adjust the hardware to make sure the mounting holes are aligned with the mounting slots 7 Secu...

Страница 46: ... the third party rack About this task CAUTION Exercise care when installing the short rails Exposed metal edges may be sharp and could damage cabling or cause injury to personnel Refer to the following tables and figures to install each shelf The following table shows the rail pins and their suggested use Table 4 Pins for third party racks Rail Pins from kit Part Number and Description Suggested U...

Страница 47: ...l location in 4U space n a n a 2 Universal Rail Pins see previous table for details n a Part of PN 106 569 300 and 106 529 209 3 Shelf rails 2 each kit for each node 2 PN 106 569 300 and 106 529 209 Figure 54 Rail installation Install the Disk Shelves in the Rack 47 ...

Страница 48: ...channel An audible click indicates that the rail is secure in the channel Make sure the rear post catch mechanism is secure and attached 4 Install the right rail to the front channel a Align the front of the right rail so that it is level and the front rail pins are aligned with the middle holes of the bottom two U spaces of the 4U space b Pull the rail forward with the posts aligned with the midd...

Страница 49: ...front and rear of the rack The following table lists the parts that are referenced in Location of securing screws and alignment pins on page 49 Table 6 Parts list Image Description Qty Part number 1 Node rail location in 4U space n a n a 2 Node rail square alignment pins n a Part of PN 100 569 209 4 M5 or M4 securing screws 4 PN 106 002 452 or 036 028 018 CL5552 4U space Front view 4 2 2 1 4 2 2 1...

Страница 50: ...e 4U space n a N A 3 Rail bracket alignment pins n a N A 4 Nutbar alignment pins n a Part of PN 051 000 357 and PN 051 000 356 5 Nutbar M5 securing screws black 4 PN 036 709 013 Figure 58 Nutbar installation Left nutbar shown NOTE The nutbars are not interchangeable There is a distinct nutbar for the left and right side Use part numbers for identification 50 Install the Disk Shelves in the Rack ...

Страница 51: ...ar 051 000 357 directly above the rail assembly 2 Secure the nutbar with two M5 securing screws one above the top alignment pin and one below the lower alignment pin 3 Repeat the previous steps for the right nutbar 051 000 356 Install the Disk Shelves in the Rack 51 ...

Страница 52: ...ES30 cable information Connecting multiple ES30 shelves to the DD9800 system DS60 cable information Connecting multiple DS60 shelves to the DD9800 system Connecting the HA interconnect Connect data cables on both nodes Power on the systems Install the bezel 4 52 Connect Cables and Power On ...

Страница 53: ...stem on page 56 to connect a DD9800 system Refer to the diagrams in the Connecting multiple DS60 shelves to the DD9800 system on page 67 to connect a DD9800 system For more information about specific shelf cabling rules and guidelines for different types of shelves see Data Domain ES30 and FS15 Expansion Shelf Hardware Guide Data Domain DS60 Expansion Shelf Hardware Guide ES30 cable information Th...

Страница 54: ...AS HDMS3 038 003 811 3 m 118 in X SAS HDMS5 038 003 813 5 m 196 in Figure 60 Node 1 SAS I O module to ES30 expansion port connector Table 9 Cables for node 1 to ES30 shelf loop HD mini SAS connector on controller SFF 8088 connector keyed for expansion port on ES30 Cable model Part number Cable length X HA ES30 SAS 2 038 004 108 2 m 79 in X HA ES30 SAS 5 038 004 111 5 m 196 in 54 Connect Cables and...

Страница 55: ... 79 in X SAS MSMS3 038 003 751 3 m 118 in X SAS MSMS4 038 003 628 4 m 158 in X SAS MSMS5 038 003 666 5 m 196 in CAUTION Observe the following considerations when cabling new shelves Work on one SAS loop at a time Allow at least two minutes between each cable removal or insertion on a SAS I O module in the Data Domain controller Verify all SAS cables are fully seated at both ends If possible utiliz...

Страница 56: ...last enclosure in a chain then each read write request has to go through many hops which introduces latency issues when compared to when the SSD shelf is on the 1st shelf of a chain 6 Use the cable management assembly to support and organize all cables from theDD9800 system Select the appropriate configuration from the following list and connect the disk shelves to the Data Domain controller DD980...

Страница 57: ...rt Shelf Port Length a 6 I O 6 Port 3 A controller HOST port of the highest number shelf in V6 3M a Cable lengths shown are designed for Data Domain racks Longer cables up to 5M can be used Figure 62 DD9800 with ES30 shelves Connect Cables and Power On 57 ...

Страница 58: ...n V3 2M a Cable lengths shown are designed for Data Domain racks Longer cables up to 5M can be used Table 13 DD9800 with ES30 HA standby node cabling instructions one rack String Loop I O Port Shelf Port Length a 1 I O 3 Port 1 A controller EXPANSION port of shelf V1 1 2M 1 I O 2 Port 0 B controller EXPANSION port of the highest number shelf in V1 2M 2 I O 3 Port 0 A controller EXPANSION port of s...

Страница 59: ...air in two racks Table 14 DD9800 with ES30 HA primary node cabling instructions two racks String Loop I O Port Shelf Port Length a 1 I O 3 Port 1 B controller HOST port of shelf V1 1 2M 1 I O 2 Port 0 A controller HOST port of the highest number shelf in V1 2M Connect Cables and Power On 59 ...

Страница 60: ...e 15 DD9800 with ES30 HA standby node cabling instructions two racks String Loop I O Port Shelf Port Length a 1 I O 3 Port 1 A controller EXPANSION port of shelf V1 1 2M 1 I O 2 Port 0 B controller EXPANSION port of the highest number shelf in V1 2M 2 I O 3 Port 0 A controller EXPANSION port of shelf V2 1 2M 2 I O 6 Port 1 B controller EXPANSION port of the highest number shelf in V2 2M 3 I O 2 Po...

Страница 61: ...or HA For a DD9800 system with DD Cloud Tier Single node or HA Table 16 DD9800 with ES30 DD Cloud Tier or HA and DD Cloud Tier primary node cabling instructions String Loop I O Port Shelf Port Length a 1 I O 3 Port 1 B controller HOST port of shelf V1 1 2M Connect Cables and Power On 61 ...

Страница 62: ...nger cables up to 5M can be used Table 17 DD9800 with ES30 DD Cloud Tier or HA and DD Cloud Tier standby node cabling instructions String Loop I O Port Shelf Port Length a 1 I O 3 Port 1 A controller EXPANSION port of shelf V1 1 2M 1 I O 2 Port 0 B controller EXPANSION port of the highest number shelf in V1 3M 2 I O 3 Port 0 A controller EXPANSION port of shelf V2 1 2M 2 I O 9 Port 1 B controller ...

Страница 63: ... ES30 ERSO String Loop I O Port Shelf Port Length a 1 I O 3 Port 1 B controller HOST port of shelf V1 1 2M 1 I O 2 Port 0 A controller HOST port of the highest number shelf in V1 5M 2 I O 3 Port 0 B controller HOST port of shelf V2 1 2M 2 I O 9 Port 1 A controller HOST port of the highest number shelf in V2 3M Connect Cables and Power On 63 ...

Страница 64: ... 1 3M 5 I O 9 Port 2 A controller HOST port of the highest number shelf in V5 5M 6 I O 2 Port 3 B controller HOST port of shelf V6 1 3M 6 I O 6 Port 3 A controller HOST port of the highest number shelf in V6 5M 7 I O 9 Port 0 B controller HOST port of shelf V7 1 3M 7 I O 6 Port 1 A controller HOST port of the highest number shelf in V7 5M 8 I O 6 Port 2 B controller HOST port of shelf V8 1 5M 8 I ...

Страница 65: ...Figure 66 DD9800 with ES30 shelves ERSO Connect Cables and Power On 65 ...

Страница 66: ...038 000 212 00 4 m 158 in XC DS60 SAS 5M 038 000 214 00 5 m 196 in CAUTION Observe the following considerations when cabling new shelves Work on one SAS loop at a time Allow at least eight minutes between each cable removal or insertion on a SAS I O module in the Data Domain controller to allow the Data Domain system to apply required firmware updates and device mapping on the DS60 shelf Verify al...

Страница 67: ...d to the last enclosure in a chain then each read write request has to go through many hops which introduces latency issues when compared to when the SSD shelf is on the 1st shelf of a chain 5 Use the cable management assembly to support and organize all cables from the DD9800 system Select the appropriate configuration from the following list and connect the disk shelves to the Data Domain contro...

Страница 68: ...Figure 68 DD9800 with DS60 shelves DD9800 with HA For an HA DD9800 pair 68 Connect Cables and Power On ...

Страница 69: ...gths shown are designed for Data Domain racks Longer cables up to 5M can be used Table 22 DD9800 with DS60 HA standby node cabling instructions String Loop I O Port Shelf Port Length a 1 I O 6 Port 0 B controller port 2 of shelf V1 1 2M 1 I O 2 Port 1 A controller port 2 of the highest number shelf in V1 2M 2 I O 3 Port 0 B controller port 2 of shelf V2 1 2M 2 I O 2 Port 0 A controller port 2 of t...

Страница 70: ...Figure 69 DD9800 with DS60 shelves HA 70 Connect Cables and Power On ...

Страница 71: ... 4 I O 2 Port 2 A controller port 0 of shelf V4 1 5M 4 I O 3 Port 2 B controller port 0 of the highest number shelf in V4 5M 5 I O 2 Port 3 A controller port 0 of shelf V5 1 5M 5 I O 9 Port 0 B controller port 0 of the highest number shelf in V5 5M 6 I O 6 Port 3 A controller HOST port of the SSD shelf or DD Cloud Tier metadata shelf 2M 6 I O 3 Port 3 B controller HOST port of the SSD shelf or DD ...

Страница 72: ...Figure 70 DD9800 with DS60 shelves DD Cloud Tier DD9800 with DD Cloud Tier HA For an HA DD9800 pair with DD Cloud Tier 72 Connect Cables and Power On ...

Страница 73: ...shown are designed for Data Domain racks Longer cables up to 5M can be used Table 25 DD9800 with DS60 HA and DD Cloud Tier standby node cabling instructions String Loop I O Port Shelf Port Length a 1 I O 6 Port 0 B controller port 2 of shelf V1 1 2M 1 I O 2 Port 1 A controller port 2 of the highest number shelf in V1 2M 2 I O 3 Port 0 B controller port 2 of shelf V2 1 2M 2 I O 2 Port 0 A controlle...

Страница 74: ...Figure 71 DD9800 with DS60 shelves HA and DD Cloud Tier DD9800 with ERSO For a DD9800 system with ERSO 74 Connect Cables and Power On ...

Страница 75: ... B controller port 0 of the highest number shelf in V4 5M 5 I O 2 Port 3 A controller port 0 of shelf V5 1 5M 5 I O 9 Port 0 B controller port 0 of the highest number shelf in V5 5M 6 I O 9 Port 3 A controller port 0 of shelf V6 1 5M 6 I O 6 Port 1 B controller port 0 of the highest number shelf in V6 5M 7 I O 6 Port 2 A controller port 0 of shelf V7 1 5M 7 I O 9 Port 1 B controller port 0 of the ...

Страница 76: ...andby node with the information it needs to failover if the active node suffers a failure and maintain the connections to hosts and clients after the failover is complete NOTE The interconnect IP address is automatically configured with the IPv6 prefix d d d d d 80 If there is an IP conflict set the registry key config net interconnect_ip6prefix Steps 1 Refer to the diagram for the port connection...

Страница 77: ...f using 10 Gb copper Ethernet with an SFP connector use a qualified SFP copper cable c If using 1 10 Gb fiber Ethernet use MMF 850nm cables with LC duplex connectors d For 10GBaseT connections use Cat6a S STP Ethernet cables 2 Enable data transfer Fibre Channel FC connectivity Repeat for each connection a Attach a Fibre Channel fiber optical cable LC connector to an I O module port on the controll...

Страница 78: ...s This enables one AC source to fail or be serviced without impacting system operation PSU0 and PSU1 should be attached to one AC source PSU2 and PSU3 should be attached to the other AC source a Connect power cables to each receptacle and attach the retention clips b Ensure that each power supply is connected to a different power source 78 Connect Cables and Power On ...

Страница 79: ...stall the bezel on your DD9800 system by grasping both hand holds and pressing toward the center of the bezel until the latches attach to the sides of the chassis The red circles identify the latches on each bezel Make sure the handhold locks lock into place Connect Cables and Power On 79 ...

Страница 80: ...sole to the serial port on the back panel of the system 2 NOTE You must have 115200 baud rate for the DD9800 system to work properly 9600 baud rate will not work for the DD9800 system Launch a terminal emulation program from your computer and configure the following communication settings Table 27 Communications settings Setting Value Baud rate 115200 Data bits 8 Stop bits 1 Parity None Flow contr...

Страница 81: ...ode as the password NOTE If you enter an incorrect password four consecutive times the system locks out the specified username for 120 seconds The login count and lockout period are configurable and might be different on your system See the Data Domain Operating System Administration Guide and the Data Domain Operating System Command Reference Guide for setting these values For Data Domain HA syst...

Страница 82: ... yourcompany com Or accept the host name if the system was able to discover it Enter the hostname for this system fully qualified domain name 4 Enter the DNS Domain Name System domain name for example yourcompany com Or accept the domain name if the system was able to discover it Domainname Enter your DNS domainname 5 Enable and configure each Ethernet interface Accept or decline DHCP for each int...

Страница 83: ...no n a n a n a ethMe no no n a n a n a ethMf no no n a n a n a Do you want to save these settings Save Cancel Retry Configuring additional system parameters About this task Most installations would benefit from the configuration of a few additional system parameters provided in this section for convenience NOTE You can also use the Data Domain DD System Manager GUI interface to configure the syste...

Страница 84: ...nections on both nodes are connected About this task Configure the two nodes as an HA pair NOTE Configuring an HA pair sets the system password on the standby node to match the system password on the active node however that synchronization is not set until the HA configuration is complete If the HA configuration fails or if there is a need to access either node before the HA configuration is comp...

Страница 85: ...e the same method to configure IP addresses Run the following command ha create peer ipaddr hostname ha name ha system name NOTE If no value is specified for the optional ha name parameter the ha create command promotes the primary node hostname to be the HA system name ha create peer mysystem p1 emc com This command Reboots both nodes and completes the HA pairing when the nodes come back online A...

Страница 86: ... DD System Manager to configure a floating IP address net config eth1a 2 2 2 1 netmask 255 255 255 0 type floating 11 Add the SSD enclosure to cache tier Run the following command storage add tier cache enclosure enclosure number 12 Enable the filesystem on node 0 Run the following command filesys enable 86 Configure System for Use ...

Отзывы: