Replacing RA7x Disk Drives
3.1 Installing and Removing an RA7x Disk Drive
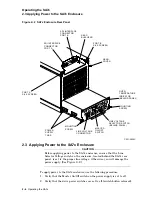
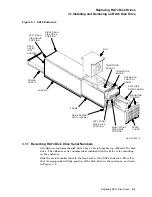
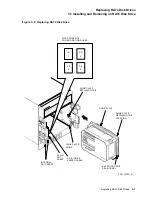
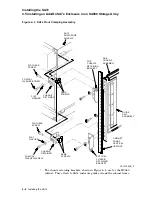
4. Loosen the two mounting screws in the upper corners of the cover, then lift
the cover up and outward to clear the enclosure, as shown in Figure 3–1.
5. Use the ESD grounding strap furnished with the cabinet, or connect your
ESD grounding strap to the enclosure chassis.
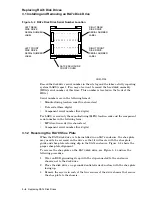
6. Disconnect the 4-pin drive power cable, the 20-pin OCP cable, and the two
internal SDI cables from the drive, as shown in Figure 3–4.
CAUTION
Grasp the paper tab on the OCP cable to disconnect the cable from drive.
Otherwise, you may damage the OCP connector strain relief.
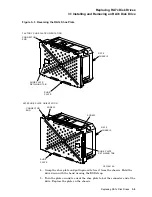
7. The drive is held in place with a shoe plate retaining clip on the outside wall
of the chassis disk position. The retaining clip locks with a tab on the drive
shoe plate. (Refer to Figures 3–3 and 3–4.) Release this retaining clip and
pull the drive out straight. After the drive is released, pull it slightly forward.
8. Grasp the drive firmly and remove it from the disk drive position. Be careful
not to damage the cables as you slide the drive out of the enclosure frame.
3.2 Installing and Removing a Drive Position Filler
The SA7x enclosure accommodates a single RA7x disk drive. However, if only
one drive is installed in the enclosure, a drive position filler is required to route
cooling air and prevent overheating. If you are adding a second drive to an
enclosure and the drive position filler is already installed, you must remove it.
The drive position filler is a Styrofoam block in the shape of a disk drive with
a shoe plate attached. It is installed in the drive position next to the single
installed drive (which should be installed in the rear of the enclosure).
To install the drive position filler in the SA7x enclosure, use the following
procedure:
1. Make sure the drive power switch for the drive position you are using is
turned off.
2. Remove the rear cover from the enclosure. Loosen the two mounting screws
in the upper corners of the cover, then lift the cover up and outward to clear
the enclosure. (Refer to Figure 3–1.)
3. Position the drive position filler so that the shoe plate and shoe plate guide
are side by side. Hold the connectors clear of the filler and slide it into the
selected position in the enclosure. (Refer to Figure 3–4.)
4. Verify that the drive position filler is locked into the enclosure with the shoe
plate retaining clip.
To remove the drive position filler, use the following procedure:
1. Make sure the drive power switch for the drive position you are using is
turned off.
2. Remove the rear cover from the enclosure. Loosen the two mounting screws
in the upper corners of the cover, then lift the cover up and outward to clear
the enclosure. (Refer to Figure 3–1.)
3–8 Replacing RA7x Disk Drives

