Replacing RA7x Disk Drives
3.1 Installing and Removing an RA7x Disk Drive
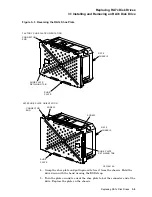
6. Reinstall the four shoe plate mounting screws. Do not over tighten.
WARNING
An RA70 disk drive weighs 4.8 kgs (10.5 lbs). The RA71 through RA73
disk drives weigh 2.9 kgs (6.4 lbs). Be prepared to handle this weight
when the drive comes free from the disk drive position. Otherwise, you
may cause personal injury or damage the equipment.
CAUTION
Do not place the disk drive on anything other than a properly grounded
antistatic work surface. Failure to observe this precaution may result in
ESD damage to the drives.
3.1.3 Installing an RA7x Disk Drive
Use the following procedure to install the RA7x disk drive:
1. Make sure the drive power switch for the drive position you are using is
turned off.
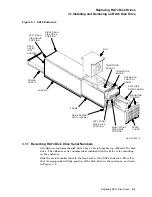
2. Depending on where the disk drive is located in the SA7x enclosure, remove
either the front or rear enclosure cover. Loosen or remove the two mounting
screws in the upper corners of the cover, then lift the cover up and outward to
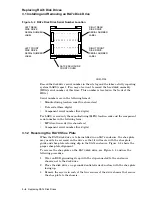
clear the enclosure. (See Figure 3–1.)
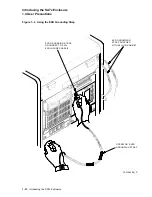
3. Use the ESD grounding strap furnished with the cabinet, or connect your
ESD grounding strap to the enclosure chassis.
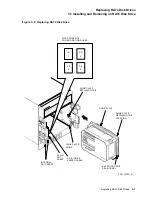
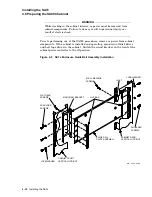
4. Orient the disk drive so that the shoe plate and shoe plate guide are side by
side. Hold the connectors clear of the drive and slide the disk drive into the
selected position in the enclosure as shown in Figure 3–4.
5. Verify the disk drive is locked into the enclosure with the shoe plate retaining
clip.
6. Connect the 4-pin drive power cable, the 20-pin OCP cable, and the two SDI
cables (in that order) to the rear panel of the disk drive.
7. Remove the ESD grounding strap and replace the covers on the enclosure.
You are now ready to place the drive on line. See Chapter 2 for instructions.
3.1.4 Removing an RA7x Disk Drive
To remove an RA7x disk drive from an SA7x enclosure, use the following
procedure:
1. Take off line the drive you are going to remove as explained in Chapter 2.
2. Make sure the drive power switch for the drive you are removing is turned
off.
3. Remove the front or rear enclosure cover, depending on which drive you are
going to remove.
3–6 Replacing RA7x Disk Drives

