DriveRack
®
DriveRack® 260 User Manual
47
Remote Control
Section 6
CONNECTION
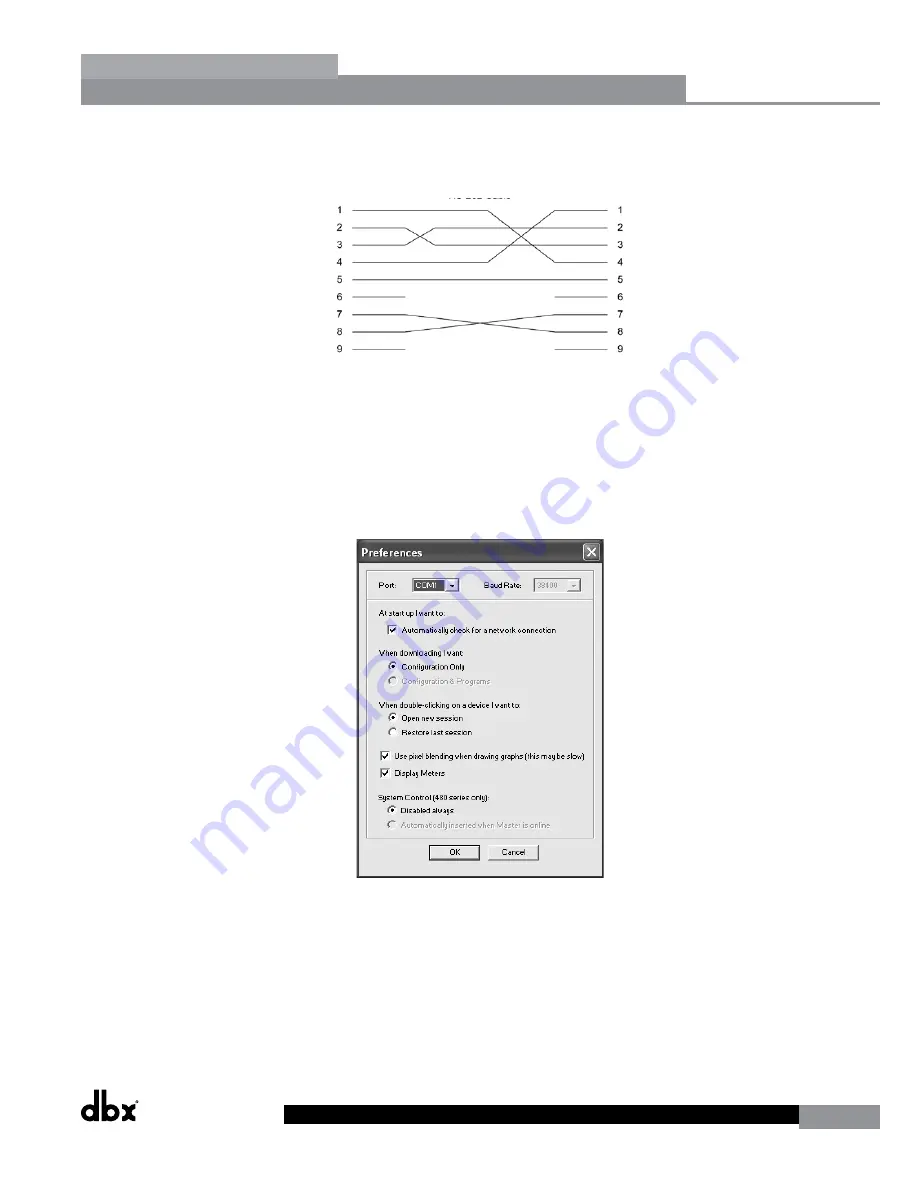
• Connect the included Null Modem cable between the computer’s RS-232 port and DriveRack’s PC (RS-232) port.
The cable must be wired as shown below.
DB-9 female-to-female null modem cable
Important Note!
A straight through RS-232 cable will not work with the DriveRack 260.
CONFIGURATION 2
• Boot up your computer and launch the DriveWare software application. The icon of the DriveRack 260 should
automatically appear in the upper left-hand corner of the main window (meaning you are online with the
device). If the DriveRack 260 icon does not appear, within DriveWare, go to File>Preferences.
• Here, you can tell DriveWare which COM port it needs to communicate through. Set DriveWare’s Port setting to
match the computer’s COM Port assignment number (see “Configuration 1” section on previous page). Also, make
sure the ‘Automatically check for a network connection’ option is checked.
• Click the OK button.
• DriveWare will now prompt you to close the program. Go ahead and close then relaunch the program. If the
icon of the 260 still does not appear, check all connections and settings.
Содержание DriveRack 260
Страница 1: ...User Manual DriveRack CompleteEqualization LoudspeakerManagementSystem Featuring Custom Tunings 260...
Страница 9: ...DriveRack DriveRack 260 User Manual 7 Getting Started Section 1 Step by step Setup Procedure...
Страница 10: ...8 DriveRack DriveRack 260 User Manual Getting Started Section 1...
Страница 11: ...DriveRack DriveRack 260 User Manual 9 Getting Started Section 1...
Страница 12: ...10 DriveRack DriveRack 260 User Manual Getting Started Section 1...
Страница 13: ...DriveRack DriveRack 260 User Manual 11 Getting Started Section 1...
Страница 14: ...12 DriveRack DriveRack 260 User Manual Getting Started Section 1...
Страница 15: ...DriveRack DriveRack 260 User Manual 13 Getting Started Section 1...
Страница 16: ...14 DriveRack DriveRack 260 User Manual Getting Started Section 1...
Страница 55: ...DriveRack DriveRack 260 User Manual 53 Remote Control Section 6 Diagram C ZC BOB ZC 1 ZC 2 ZC 3 ZC 4...


