background image

44208-00006-000   DSV3-SP User’s Manual 

Rev 0B 


2/12/2009 

30 

Copyright © 2009 by Datastrip, Inc.  All rights reserved.   

Reproduction in whole or in part is prohibited. 

11.1


ActiveSync via USB 2.0 Client Port 

11.1.1


Hardware/Software Requirements 

The following is required to establish an ActiveSync connection via the USB 2.0 Client Port: 


ActiveSync version 3.7.1 or later installed on the host PC (Version 4.5 recommended) 


A DSV3 terminal.  


USB 2.0 to Mini B Cable (Datastrip sales code DSVOSCAUSB). 


Datastrip DSV3_Turbo_USB Sync Setup utility found on the DSV3 User Manual CD. 

11.1.2


PC Configuration for USB 2.0 ActiveSync (First Time Only) 


Run the “DSV3_Turbo_USB Sync Setup” utility found on 
the DSV3 User Manual CD 


After running the Sync setup you will be prompted to 
connect your DSV3 terminal to the PC.  Turn your DSV3 
terminal on and connect it to any one of the host PC USB 
ports using the USB 2.0 to Mini B cable.  After the DSV3 
terminal has been connected, Windows will notify you that it 
has “Found New Hardware”.  You will then be asked “Can 
Windows Update search for new software?”  Answer: NO, not this time. 


The Wizard will then ask how you want to install software.  Answer: Install the software 
automatically (Recommended). 

11.1.3


Establishing a Connection 


Each time you connect the DSV3 terminal to the host PC you will be asked if you would like to 
set up a Partnership.  If you will be using this DSV3 terminal on this PC regularly then answer 
“Yes”.  If this is a one time use on this PC, answer “No”.  In either case you will be connected and 
can transfer files between the PC and the DSV3 terminal. 

11.1.4


Troubleshooting the Connection 

If a connection is not automatically established check the following: 


The DSV3 will not connect while it is in Suspend mode.  Wake the DSV3 from Suspend prior to 
connecting the USB cable. 


Verify that USB 2.0 is enabled on your terminal and that USB via COM3 is selected.  Go to the 
Control Panel and double click “PC Connection”.  On this screen you should see “USB via 
COM3”.  If not then click “Change Connection”. Click the scroll bar arrow.  If you see the option 
for “USB on COM3” then select it and click “OK”.  Click “OK” again to close the PC Connection 
screen. Re-insert your USB cable to get connected.  If you did not see the option for “USB on 
COM3” your terminal is not USB 2.0 enabled. 

11.2


ActiveSync via the Docking Station 

11.2.1


Software/Hardware Requirements and Setup 


ActiveSync version 3.7.1 or later installed on the host PC. 


Docking station, docking station serial cable and Datastrip power adapter. 


Connect the DB9 end of the Docking station serial cable to the PC COM1. 

11.2.2


Establishing the Connection 


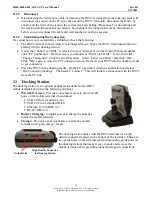
Turn on the DSV3 and when it has finished booting, place it in the docking cradle. 


Each time you connect the DSV3 terminal to the host PC you will be asked if you would like to 
set up a Partnership.  If you will be using this DSV3 terminal on this PC regularly then answer 
“Yes”.  If this is a one time use on this PC answer “No”.  In either case you will be connected and 
can transfer files between the PC and the DSV3 terminal. 

USB Client Port 

Содержание DSV3-SP

Страница 1: ...are Engineer Reviewer __________________________________________________ Date ___________ Scott Robinson Hardware Manager Reviewer __________________________________________________ Date ___________ S...

Страница 2: ...44208 00006 000 DSV3 SP User s Manual Rev 0B 2 12 2009 1 Copyright 2009 by Datastrip Inc All rights reserved Reproduction in whole or in part is prohibited DSV3 SPUser sManual...

Страница 3: ...ided equipment or software Copyright Notice No part of this publication may be reproduced stored in a retrieval system or transmitted in any form or by any means electronic mechanical photocopying rec...

Страница 4: ...udio Headset Jack 13 4 11 CONTACTLESS SMART CARD READER 13 4 12 DIGITAL STILL CAMERA PERIPHERAL MODULE 13 4 12 1 Digital Still Camera Installation Instructions 13 4 13 POINT SHOOT SCANNER PERIPHERAL M...

Страница 5: ...IER DATASTRIPPIVCARD_CHUIDVERIFIER EXE 27 10 4 DATA CAPTURE ENROLLMENT APPLICATION DATACAPTURE EXE 29 11 ACTIVE SYNC 29 11 1 ACTIVESYNC VIA USB 2 0 CLIENT PORT 30 11 1 1 Hardware Software Requirements...

Страница 6: ...gh AFIS quality biometric matching algorithms and rugged biometric sensors The DSV3 mobile terminal is a rugged and environmentally sealed unit that can be used in harsh and hostile environments It is...

Страница 7: ...nation Documentation including User Manual on CD End User License Agreement and Quick Reference Guide Please retain the shipping box in the event you need to return your product for service 3 Initial...

Страница 8: ...n adjacent tri color red green yellow LED indicator which identifies whether the system is on charging or running low on battery power see section 4 2 To power on the mobile terminal press the Power b...

Страница 9: ...w with Color Blink yes no battery Green Very Slow yes charging Green Red Continuous with Very Slow Color Blink yes fully charged Green Very Slow OS Running no not low Green Slow no low Red Green Conti...

Страница 10: ...ul shutdown Entering off state via power management Falling Tone see section 5 3 Definitions Beep Mid frequency tone Rising Tone Mid followed by a higher frequency tone Falling Tone Mid followed by a...

Страница 11: ...off This battery is automatically recharged by the system and does not require any operator service CAUTION Use ONLY approved replacement batteries and power adapters as provided by Datastrip CAUTION...

Страница 12: ...lgorithms from a variety of the industry leading vendors such as Identix Cogent Bioscrypt Motorola and NEC However the Identix algorithm is the only algorithm directly available from Datastrip for the...

Страница 13: ...ack 4 10 1 USB Ports There is one USB Host port and one USB client port on the DSV3 mobile terminal that are accessible under the rubber I O port cover These are USB 2 0 High Speed 480 Mbps ports howe...

Страница 14: ...ll Camera Peripheral Module The Digital Still Camera DSC is an optional module for the DSV3 mobile terminals It is a 3 2 Megapixel camera that can be installed in the Integrated Peripheral bay The DSC...

Страница 15: ...ck and easy targeting There is a comprehensive SDK that enables rapid custom application development The Point Shoot Scanner is designed for a variety of applications and markets such as Law Enforceme...

Страница 16: ...alibrate these setting to suit your personnel preferences the following options are available Calibration If your device is not responding properly to your screen taps you may need to recalibrate your...

Страница 17: ...been used for some amount of time user configurable In this state the backlight is dimmed to save power All other internal subsystems are on Tap the screen or give the power button a quick tap to wak...

Страница 18: ...aneously charging the battery 5 4 2 Battery Charge Level States The charge level state of the battery is also listed in the Power Properties Battery tab window There are three charge level states When...

Страница 19: ...ration programs available as source code for custom software development in the Datastrip MT SDK sold separately 6 1 Software Version Utility DatastripDSVerify2About exe This utility reports the Opera...

Страница 20: ...e SDK for developer use 7 Loading Software and Firmware 7 1 Loading DSV3 Software Updates The DsVerify2SoftwareUpdate application permits the user to download software updates from several source loca...

Страница 21: ...croll box and Select datastrip serveftp net if you have access to the Datastrip FTP server Select ftpserv2003 if you are using another valid FTP site Enter a valid Username and Password Click Connect...

Страница 22: ...re_update exe The application displays the current version number of the camera firmware and asks the question Do you want to update the camera firmware If you answer Yes then browse to the directory...

Страница 23: ...Non condensing Drop Resistance Exceeds MIL STD 810F Weather Resistant Ingress Protection IP54 Contactless Smartcard Reader Specification ISO 14443 A B Operating Frequency 13 56 MHz Contact Smartcard R...

Страница 24: ...ce with the instructions may cause harmful interference to radio communications However there is no guarantee that interference will not occur in a particular installation If this equipment does cause...

Страница 25: ...f internal memory RAM is allocated for the camera when capturing the highest quality images it is recommended that a minimum amount of internal memory be used by other applications and the proper amou...

Страница 26: ...Superscript Two Dimensional Barcodes PDF417 OCRB Linear Barcodes When SuperViewer application is launched the Main Screen is displayed and the unit is ready to scan a document or read a smart card The...

Страница 27: ...the DSV3 Clicking on the OK will save the settings and return the application to the Configuration Screen Clicking on the Cancel or the X will abort any changes to the settings and return the applica...

Страница 28: ...tons and the OK Exit controls as seen below The usage of each button is as follows The OK or X buttons These buttons located in the upper right corner of the application are used to close or terminate...

Страница 29: ...e Printed Info button will after PIN authentication display the stored printed personalization information on the card This data can be used as necessary for auditing logging or advanced determination...

Страница 30: ...red to a PC You Must Have a Digital Still Camera installed for this application New Record Enter the User Data Name Doc Date Location and Type Record Composer PHOTO Clicking on the Photo will open the...

Страница 31: ...wer Yes If this is a one time use on this PC answer No In either case you will be connected and can transfer files between the PC and the DSV3 terminal 11 1 4 Troubleshooting the Connection If a conne...

Страница 32: ...k the scroll bar arrow Select Serial via COM1 and click OK Click OK again to close the PC Connection screen Re insert your DSV3 into the docking cradle to get connected Place the DSV3 in the docking c...

Страница 33: ...ps head screws in the plastic backrest support repositioning the backrest support to the appropriate position and then re tighten the screws Forward Position This position should be used for DSV3 SP R...

Страница 34: ...44208 00006 000 DSV3 SP User s Manual Rev 0B 2 12 2009 33 Copyright 2009 by Datastrip Inc All rights reserved Reproduction in whole or in part is prohibited...

Страница 35: ...lumination Built in preview illumination Auto Exposure User configurable operation Demo application software included Full SDK support Bluetooth Wireless Mobile Wireless GSM GPRS EDGE Global Positioni...

Страница 36: ...900 to 1730 GMT BST To return your Datastrip for service upgrade or repairs please contact the tech support department by e mail or telephone An RMA will be issued and should be clearly marked on the...

Отзывы: