Chapter 2 - Printer Setup
4
2.1.2 Interface Connection
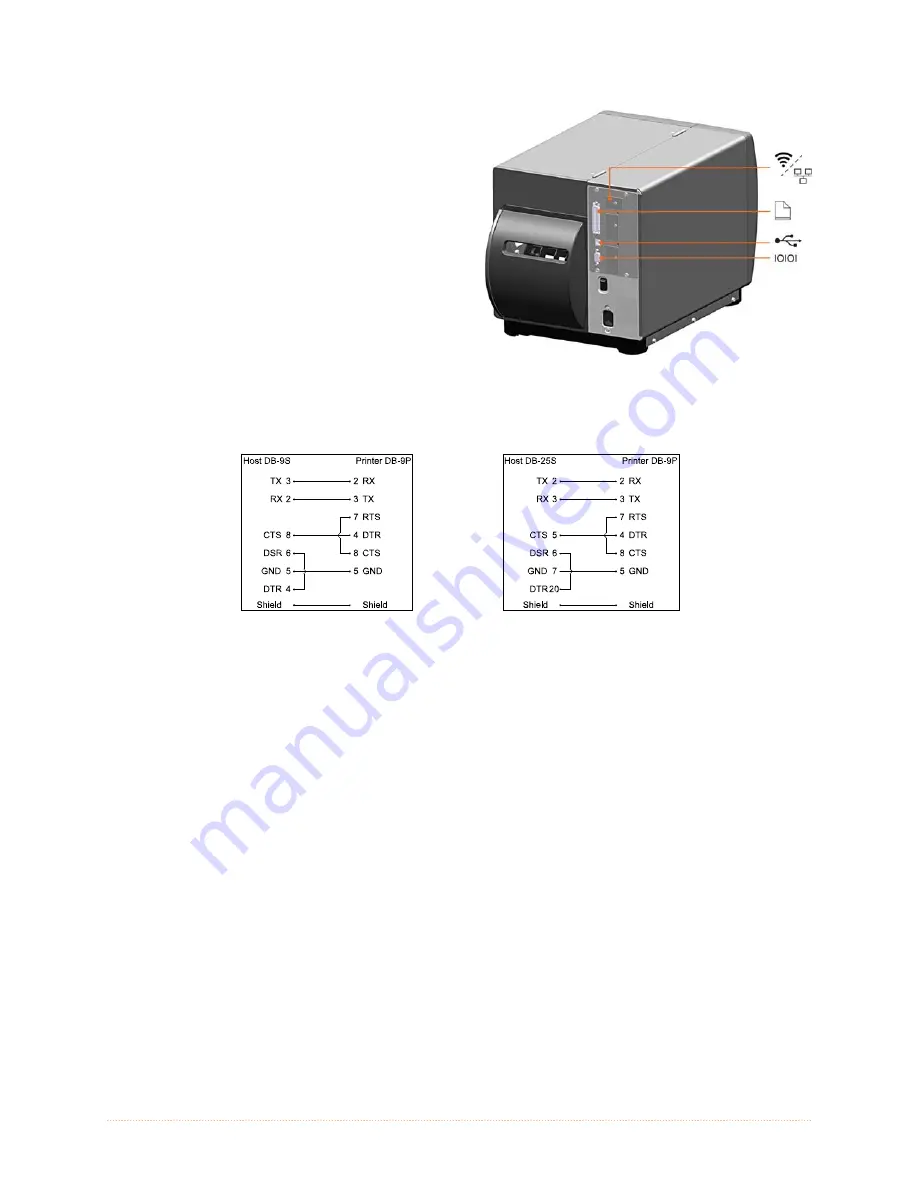
The printer can be connected to the host via the
parallel, USB, serial, or optional network
interface. The printer will automatically connect
to the first port that delivers valid data. Once
established, the printer’s power must be cycled
‘Off’ and ‘On’ to change an interface connection.
The Parallel Connection needs a Centronics
IEEE 1284 cable with a 36-pin male connector
for unidirectional (forward channel)
communications, or an IEEE 1284 Compliant
cable for bi-directional communications
(forward and reverse channels). Also, for bi-
directional communications your host must
have supporting software.
The Serial Connection needs a serial interface cable with specific pin-outs for proper
communications (part numbers and pin-outs are given, below; contact your reseller to order). The
interface supports RS-232C communications via a DB-9 connector. Serial port settings are menu-
selectable and must match your host’s serial port settings.
Part # 32-2300-01
Part # 32-2301-01
Optional Ethernet Print Servers (wired and wireless) are available. For information on using
these interfaces, see Appendix B.
The USB Connection needs a USB cable and is supported in Windows
95 and greater operating
systems. Depending upon the operating system of your host computer, installation requirements
may differ slightly, see section 2.1.3 for more information
Содержание I-Class Mark II I-4212E/203
Страница 1: ...Operator s Manual...
Страница 2: ......
Страница 8: ...Chapter 1 Getting Started 2...
Страница 20: ...Chapter 2 Printer Setup 14...
Страница 38: ...Chapter 3 Printer Operation 32...
Страница 62: ...Chapter 4 Menu System 56...
Страница 76: ...Chapter 6 Troubleshooting 70...
Страница 80: ...Appendix A Specifications 74...
Страница 88: ...Appendix B Wireless and Wired LAN Setup 82...
Страница 94: ......


