


Product Reference Guide
2-39
System Power-Up Recap
The System Power-Up procedure may vary depending upon the require-
ments of your POS system. It is generally a good practice to power-down
(switch off ) all equipment prior to connecting cables. Check with your
System Supervisor and/or refer to your POS terminal manual for proper
power-down and power-up procedures and interface requirements when
connecting any peripheral device.
If you have not identified any specific requirements for your POS system,
follow these steps.
1. Power-down the POS terminal.
2. Ensure that power is disconnected from the scanner.
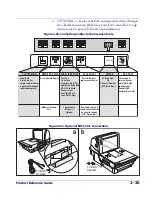
3. Connect the scanner and scale interface cables to your POS ter-
minal. This connection may use one or two cables depending
upon your POS terminal interface.
4. Connect the Remote Display cable if your model is a scanning-
scale and make any connections to optional equipment, such as
EAS
1
or a handheld scanner.
5. Power-up the scanner or scanning-scale by connecting the power
cord to an AC power outlet. Wait for the unit to complete the
Selftest routine (10 seconds maximum).
6. Power-up the POS terminal.
7. Verify that both scanning and weighing data are properly com-
municated between the scanner and your POS system. (Weigh,
deactivate
2
and scan a few items.) If problems are encountered,
refer to
Chapter 4, Problem Isolation
.
8. You have now completed installation and system integration of
the scanner or scanning-scale. At this point, the scale must be cal-
ibrated and certified in accordance with the requirements of your
state and/or local requirements. Refer to
Chapter 5, Calibration
Procedures, Single Interval
, for calibration procedures.
1. Some peripheral e
q
uipment must be connected or powered on in a specific order. Check the
e
q
uipment instructions to verify the correct se
q
uence.
2. Test EAS deactivation only if applicable for your model.
Содержание Magellan 8500Xt
Страница 1: ...MagellanTM 8500Xt Product Reference Guide...
Страница 14: ...12 MagellanTM 8500Xt Scanner NOTES...
Страница 70: ...2 40 MagellanTM 8500Xt Scanner NOTES...
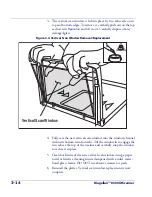
Страница 88: ...3 18 MagellanTM 8500Xt Scanner Figure 3 6 Removing Replacing the Gasketed DLC Window a b c d...
Страница 93: ...Product Reference Guide 4 5 Figure 4 1 7 Segment LED Display 7 Segment Display Models vary...
Страница 102: ...4 14 MagellanTM 8500Xt Scanner NOTES...
Страница 138: ...6 20 MagellanTM 8500Xt Scanner NOTES...
Страница 416: ...7 278 MagellanTM 8500Xt Scanner NOTES...
Страница 428: ...A 12 MagellanTM 8500Xt Scanner...
Страница 448: ...D 2 MagellanTM 8500Xt Scanner NOTES...
Страница 462: ...E 14 MagellanTM 8500Xt Scanner NOTES...
Страница 477: ...Product Reference Guide F 15 NOTES...
Страница 478: ...F 16 MagellanTM 8500Xt Scanner NOTES...