X64-AN Quad User's Manual
Appendix: X-I/O Module Option
101
Board Installation
Installing an X-I/O Module to an existing X64-AN Quad installation takes only a few minutes. Install
the X-I/O board into the host system as follows:
Power off the computer system that has the installed X64-AN Quad board.
Insert the X-I/O module into any free PCI slot (no PCI electrical connections are used), securing
the bracket.
Connect the X-I/O module 16 pin ribbon cable from J23 to the X64-AN Quad board J16.
Power on the computer again.
For new X64-AN Quad and X-I/O module installations, simply follow the procedure to install
Sapera and the X64-AN Quad driver (see
“
” on page 9
).
X64-AN Quad and X-I/O Driver Update
If both Sapera 5.30 and X64-AN Quad driver 1.10 need to be installed, follow the procedure
"Upgrading Sapera or any Teledyne DALSA Board Driver" on page 17. This procedure steps
through the upgrade of both Sapera and the board driver—typically required when installing the
X-I/O module in the field.
If the X64-AN Quad installation already has the required Sapera and board driver version, install
the X-I/O module and perform a firmware update as described in "Executing the Firmware Loader
from the Start Menu" on page 12.
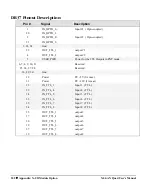
X-I/O Module External Connections to the DB37
Users can assemble their interface cable, using some or all of the signals available on the X-I/O
module DB37. Use a male DB37 with thumb screws for a secure fit. Wiring type should meet the
needs of the imaging environment.

