5 Configuration
Installation manual
14
EHYHBH05AAV3* + EHYHBH/X08AAV3*
Daikin Altherma hybrid heat pump – heat pump module
4P349587-1F – 2016.10
1
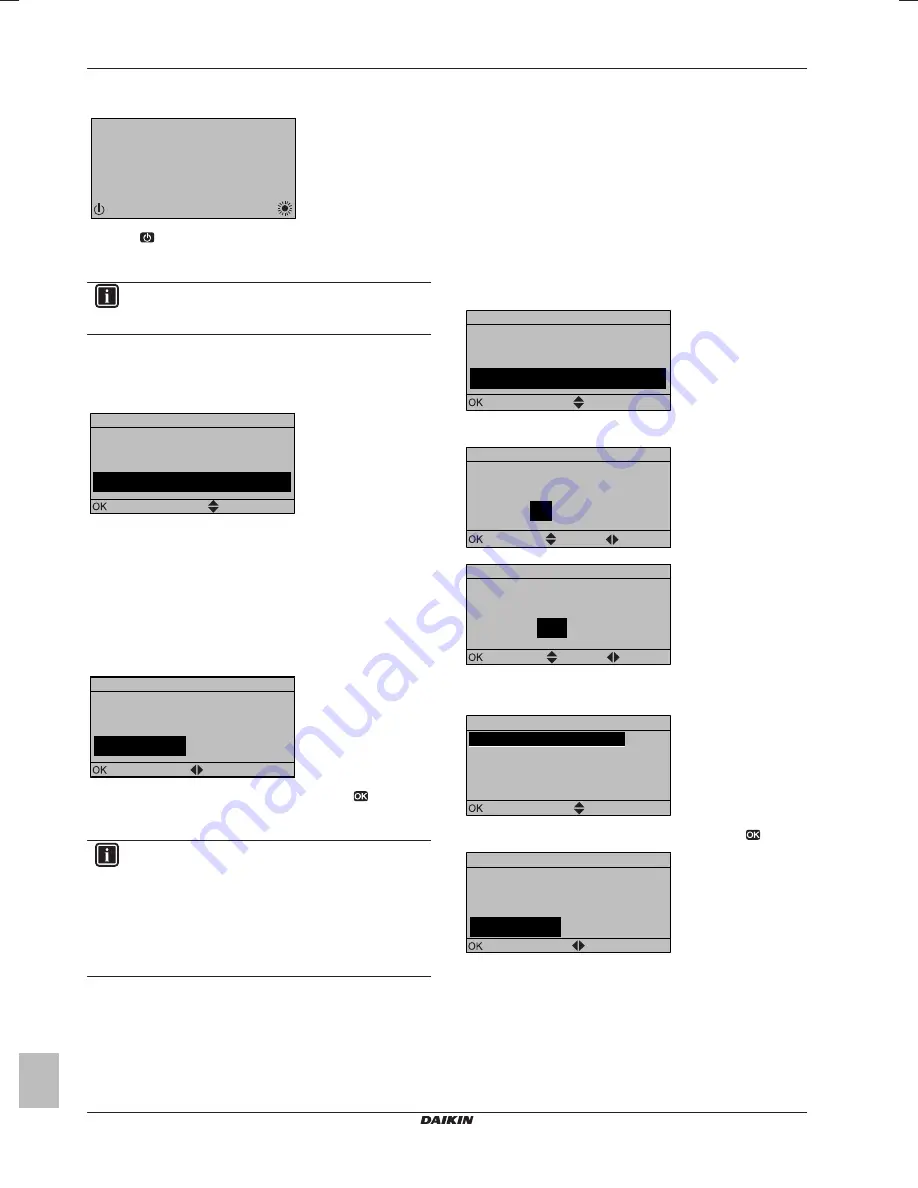
When power is turned on for the first time, both user interfaces
display:
15:10
Tue
U5:Auto address
Push 4 sec. to continue
2
Push
for 4 seconds on the user interface on which you want
to proceed to the quick wizard. This user interface is now the
main user interface.
INFORMATION
During the quick wizard, the second user interface displays
Busy and will NOT be possible to operate.
3
The quick wizard will guide you.
4
For proper operation of the system, the local data on the two
user interfaces must be the same. If this is NOT the case, both
user interfaces will display:
Synchronization
Data difference detected.
Please select action:
Send data
Confirm
Adjust
5
Select the required action:
▪ Send data: the user interface you are operating contains the
correct data and the data on the other user interface will be
overwritten.
▪ Receive data: the user interface you are operating does
NOT contain the correct data and the data on the other user
interface will be used to overwrite.
6
The user interface requests confirmation if you are sure to
proceed.
Start copy
Are you sure you want to
start the copy operation?
Cancel
OK
Confirm
Adjust
7
Confirm the selection on the screen by pushing
and all data
(languages, schedules etc.) will be synchronised from the
selected source user interface to the other one.
INFORMATION
▪ During the copying, both controllers will NOT allow
operation.
▪ The copy operation can take up until 90 minutes.
▪ It is recommended to change installer settings, or the
configuration of the unit, on the main user interface. If
not, it can take up to 5 minutes before these changes
are visible in the menu structure.
8
Your system is now set to be operated by the 2 user interfaces.
To copy the language set from the first to the
second user interface
See
"To copy the system settings from the first to the second user
interface" on page 13
.
Quick wizard: Set the system layout after first
power ON
After first power ON of the system, you are guided on the user
interface to do initial settings:
▪ language,
▪ date,
▪ time,
▪ system layout.
By confirming the system layout, you can proceed with the
installation and commissioning of the system.
1
At power ON, the quick wizard starts as long as the system
layout was NOT confirmed yet, by setting the language.
Language
Select the desired language
Confirm
Adjust
2
Set the current date and time.
1
2013
Jan
Tue
Confirm
Adjust
Scroll
Date
What is the date today?
00
: 00
What is the current time?
Time
Confirm
Adjust
Scroll
3
Set the system layout settings: Standard, Options, Capacities.
For more details, see
"5.1.2 Basic configuration" on page 15
.
A.2
1
Scroll
Select
System layout
Standard
Options
Capacities
Confirm layout
4
After configuration, select Confirm layout and press
.
Confirm layout
Please confirm the system
layout. The system will
restart and will be ready for
first startup.
OK
Cancel
Confirm
Adjust
5
The user interface re-initialises and you can proceed the
installation by setting the other applicable settings and
commissioning of the system.
When the installer settings are changed, the system will request to
confirm. When confirmation is complete, the screen will shortly turn
OFF and "busy" will be displayed for several seconds.
Содержание EHYHBH05AA
Страница 26: ......
Страница 27: ......
Страница 28: ...4P349587 1F 2016 10 Copyright 2013 Daikin ...


