255
Step 5 Click Apply button to complete setup.
Note
After set the heat map parameters, go to main menu->Info->Event->Heat map to view heat map
report. Refer to chapter 4.10.2.3.3 for detailed setup information.
4.7.7
Plate Recognition
4.7.7.1 Plate recognition settings
Device can generate an alarm when it detects the corresponding plate information.
Please follow the steps listed below.
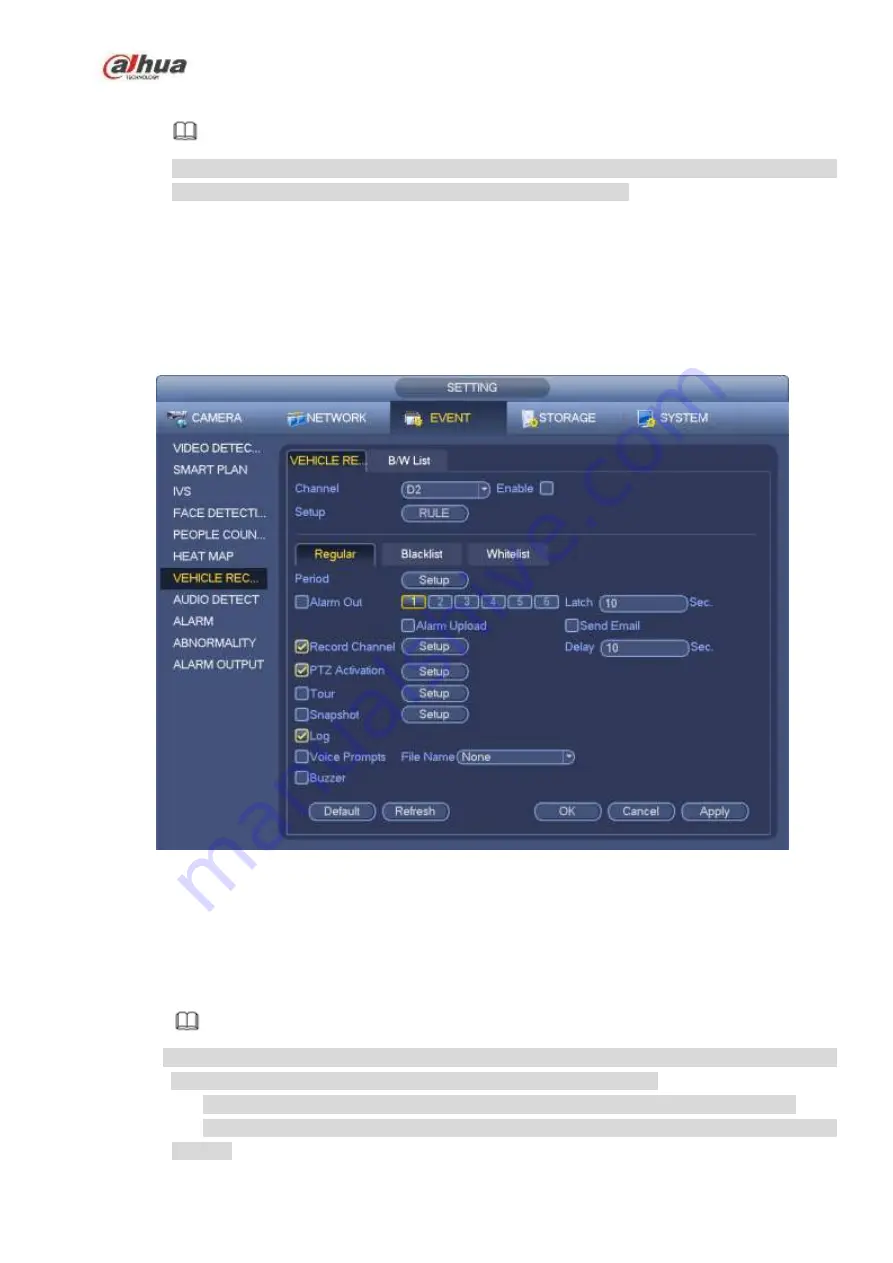
Step 1 From main menu->Setting->Event->Plate recognition->Plate recognition.
Enter plate recognition interface. See Figure 4-144.
Figure 4-144
Step 2 Check Enable to enable plate recognition function.
Step 3 Select a channel number and then click the Rule to set the plate recognition name and detection
zone.
Step 4 Click Regular, blacklist, whitelist to set.
Note
Before use blacklist alarm or whitelist alarm function, please add the corresponding plate
information. Refer to chapter 4.7.7.2 B/W list for detailed information.
Regular: In this interface, device triggers an alarm when it detects all plate numbers.
Blacklist: In this interface, device triggers an alarm when it detects plate number in the
blacklist.
Содержание NVR1A-4P Series
Страница 1: ...Dahua Network Video Recorder User s Manual V 4 3 0 ...
Страница 138: ...124 Figure 3 5 3 6 6 NVR42N Series Please refer to Figure 3 6 for connection sample Figure 3 6 ...
Страница 142: ...128 Figure 3 11 3 6 12 NVR42V 8P Series Please refer to Figure 3 12 for connection sample ...
Страница 143: ...129 Figure 3 12 ...
Страница 157: ...143 Figure 4 15 Step 2 Click device display edit interface See Figure 4 16 ...
Страница 220: ...206 Figure 4 93 Figure 4 94 ...
Страница 240: ...226 Figure 4 110 Figure 4 111 Figure 4 112 ...
Страница 251: ...237 Figure 4 123 Figure 4 124 ...
Страница 253: ...239 Figure 4 126 Click draw button to draw the zone See Figure 4 127 ...
Страница 257: ...243 Figure 4 130 Click Draw button to draw a zone See Figure 4 131 Figure 4 131 ...
Страница 262: ...248 Figure 4 136 Click draw button to draw the zone See Figure 4 137 ...
Страница 275: ...261 Figure 4 148 Figure 4 149 ...
Страница 276: ...262 Figure 4 150 Figure 4 151 ...
Страница 387: ...373 Figure 5 60 Figure 5 61 ...
Страница 388: ...374 Figure 5 62 Figure 5 63 ...
Страница 412: ...398 Figure 5 96 Figure 5 97 ...
Страница 418: ...404 Figure 5 106 5 10 4 4 Record Control The interface is shown as in Figure 5 107 Figure 5 107 ...


