background image


57 


Figure 4-53 


4.9.5.5  FTP 

You need to download or buy FTP service tool (such as Ser-U FTP SERVER) to establish FTP 

service. 

Please install Ser-

U FTP SERVER first. From “start” -> “program” -> Serv-U FTP Server -> Serv-U 

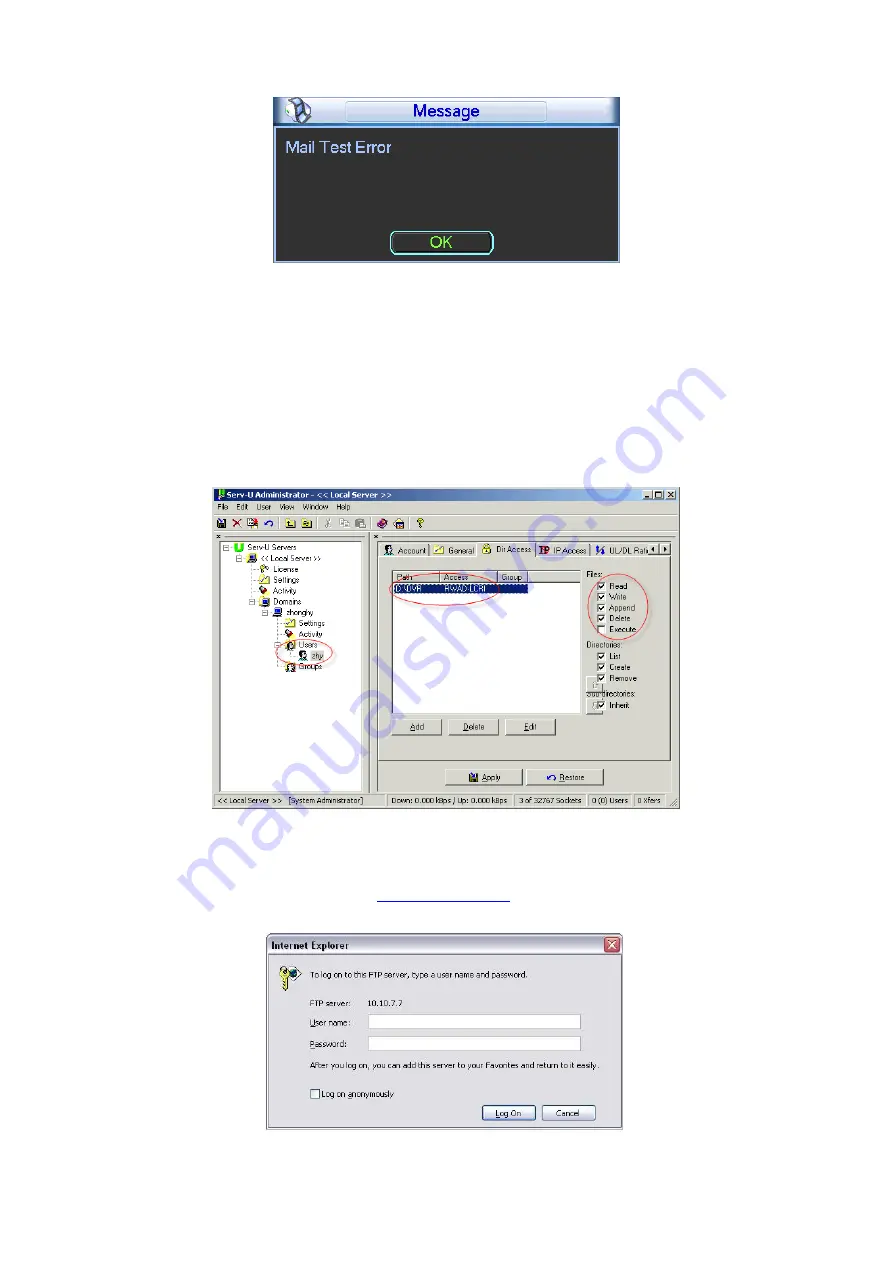
Administator. Now you can set user password and FTP folder. Please note you need to grant write 

right to FTP upload user. See Figure 4-54. 


Figure 4-54 

You can use a PC or FTP login tool to test setup is right or not. 

For example, you can login user ZHY t

FTP://10.10.7.7UT

H

      and then test it can modify or delete 

folder or not.    See Figure 4-55.   


Figure 4-55 

Содержание MCVR5104GCW

Страница 1: ...HDCVI Mobile Digital Video Recorder User s Manual V 1 0 0 ...

Страница 2: ...1 HDD Installation 15 3 3 2 SIM Card Installation 17 3 4 Connecting Power Supply 17 3 5 Connecting Audio Video Input and Output Devices 17 3 5 1 Video Input 17 3 5 2 Video output 18 3 5 3 Audio Output 18 3 6 Alarm Input and Output Connection 19 3 6 1 Alarm Input and Output Details 19 3 6 2 Alarm Input Port 20 3 6 3 Alarm Output Port 20 4 Operation 22 4 1 Boot up Shutdown 22 4 1 1 Boot up 22 4 1 2 ...

Страница 3: ...ter 42 4 8 5 Auto Maintenance 42 4 8 6 Abnormal 43 4 8 7 TV Adjust 44 4 8 8 Speed 45 4 9 Setting 45 4 9 1 General 46 4 9 2 Encode 47 4 9 3 Schedule 50 4 9 4 RS232 51 4 9 5 Network 52 4 9 5 1 Network Setting 53 4 9 5 2 NTP Setup 53 4 9 5 3 DDNS 54 4 9 5 4 Email 56 4 9 5 5 FTP 57 4 9 5 6 Alarm center 58 4 9 5 7 Ethernet Port 2 59 4 9 6 Alarm 59 4 9 7 Detect 61 4 9 7 1 Video Loss 61 4 9 7 2 Tampering...

Страница 4: ...n 78 5 2 Login 78 5 3 LAN Mode 80 5 4 Real time Monitor 81 5 5 PTZ 82 5 6 Image Relay out 83 5 6 1 Image 83 5 6 2 Relay output 84 5 7 Zero channel encoding 84 5 8 WAN Login 84 5 9 Setup 85 5 9 1 Channel 85 5 9 1 1 Conditions 85 5 9 1 2 Video and Audio 87 5 9 1 2 1 Encode 87 5 9 1 2 2 Snapshot 88 5 9 1 2 3 Overlay 89 5 9 1 2 4 Zero Ch Encoding 90 5 9 1 2 5 Preview Overlay 90 5 9 1 2 6 Path 91 5 9 1...

Страница 5: ... 4 Import Export 110 5 9 5 5 Upgrade 110 5 9 5 6 RS232 110 5 9 5 7 PTZ 111 5 9 6 Information 112 5 9 6 1 Version 112 5 9 6 2 Log 112 5 9 7 Vehicle 113 5 9 7 1 Vehicle 113 5 9 7 2 WIFI 114 5 9 7 3 3G 114 5 9 7 3 1 CDMA GPRS 115 5 9 7 3 2 Mobile 115 5 9 7 4 Auto Register 116 5 9 7 5 Auto Maintenance 116 5 9 7 6 Abnormality 117 5 9 7 7 Display 119 5 9 7 7 1 GUI 119 5 9 7 7 2 TV Adjust 120 5 9 7 8 Spe...

Страница 6: ...v 7 FAQ 128 8 Appendix A HDD Capacity Calculation 133 ...

Страница 7: ...video recorder This user s manual is designed to be a reference tool for your system Please open the accessory bag to check the items one by one in accordance with the list below Contact your local retailer ASAP if something is missing or damaged in the bag ...

Страница 8: ... not liable for any problems caused by unauthorized modifications or attempted repair 5 Environment The DVR should be installed in a cool dry place away from direct sunlight inflammable explosive substances and etc This series product shall be transported storage and used in the specified environments 6 Accessories Be sure to use all the accessories recommended by manufacturer Before installation ...

Страница 9: ...eo monitor Important Please note GPS WIFI 3G function are optional Please make sure you purchased product support these functions 1 2 Function Slight difference may be found due to different series products Storage function Special data format to guarantee data security and can avoid vicious data modification Compression format Support multiple channel audio and video signal An independent hardwar...

Страница 10: ...k Latest wireless network communication technology allows you to easily control the device Please note only the unit of 3G module supports this function Removable HDD design The professional removable anti vibration design supports fix and removable operation and can connect to PC USB port to realize fast and convenience data backup Dual stream Considering the wireless network band is small and th...

Страница 11: ... OS Embedded LINUX System Resources Multiplex operations Multiple channel record multiple channel playback and network operation simultaneously Interface User friendly graphical user interface Input Devices Mouse remote control Input Method Arabic number English character donation and extension Chinese optional Shortcut Function Copy paste operation USB mouse right key shortcut menu double click U...

Страница 12: ...l with black screen though system is encoding normally Screen lock function to prevent unauthorized user seeing secret video Channel Information Channel name recording status screen lock status video loss status and motion detection status are shown on the bottom left of display screen Color Configuratio n Hue brightness contrast saturation and gain setup for each channel Audio Audio Input 4 ch av...

Страница 13: ...control View monitor channel remotely DVR configuration through client end and web browser Upgrade via client or browser to realize remote maintenance View alarm information such as external alarm motion detection and video loss via client File download backup and playback Multiple devices share information via corresponding software such as professional surveillance software PSS Duplex transparen...

Страница 14: ...put and output amount system version and release date On line user Display current on line user User Management User Manageme nt Multi lever user management various management modes Integrated management for local user serial port user and network user Configurable user power Support user group and its corresponding rights modification No limit to the user or group amount Password Authenticati on ...

Страница 15: ...5 Working Humidity 10 90 Air Pressure 86kpa 106kpa Dimension 1DIN standard industrial case Front panel 190 60mm W H Rear panel 180 210 50mm W D H Weight 3 0Kg Include all packaging materials Installation Mode Desktop installation ...

Страница 16: ...Alarm indicator light There is an alarm when the blue light is on 6 9 Record indicator light 1 4 The blue light is on when system is recording 10 Backup indicator light The blue light is flashing when system is backup The blue light is on when the backup is finish The light is off when the backup error occurs or the flash disk is removed 11 GPS indicator light Please note only the unit of GPS modu...

Страница 17: ...e the HDD 2 2 Rear Panel 2 2 1 Rear Panel The rear panel is shown as in Figure 2 2 Figure 2 2 Please refer to the following sheet for front panel button information SN Name Function 1 4 CH1 CH4 Signal input port 5 OUT Audio video output port 6 VGA VGA port Including VGA and various signals port 7 Power device input Device power input port It is to provide power supplying 8 GPS port GPS port Please...

Страница 18: ...vices of CAN port 16 Audio input and output port Bidirectional input and output port Please refer to Figure 2 4 for detailed information 2 2 2 Extension Port This series has the built in power you do not need the mobile power supply sourcing The following contents are to introduce function of each port You can make connection cable by yourself or you can contact your local retailer to purchase The...

Страница 19: ... retailer to purchase The bidirectional talk port is shown as in Figure 2 4 Figure 2 4 Please refer to the following sheet for detailed information SN Function 12 12V output GND Mic In Mic Out 2 3 Remote Control The remote control interface is shown as in Figure 2 1 Please note remote control is not our standard accessory and it is not included in the accessory bag ...

Страница 20: ...rmal speed playback 4 Slow play Multiple slow play speeds or normal playback 5 Next record In playback mode playback the next video 6 Previous record In playback mode playback the previous video 7 Play Pause In pause mode click this button to realize normal playback In normal playback click this button to pause playback In real time monitor mode click this button to enter video search menu 8 Rever...

Страница 21: ...dow playback mode click left right button to control playback speed Aux function such as switch the PTZ menu enable disable reuse button 12 Confirm menu key go to default button go to the menu 13 Multiple window switch Switch between multiple window and one window 14 Auxiliary key In 1 ch monitor mode pop up assistant function PTZ control and Video color Switch the PTZ control menu in PTZ control ...

Страница 22: ..._ stands for clear and stands for deleting the previous numeral Double left click mouse Implement special control operation such as double click one item in the file list to playback the video In multiple window mode double left click one channel to view in full window Double left click current video again to go back to previous multiple window mode Right click mouse In real time monitor mode pops...

Страница 23: ...ormation of the function keys in the front panel and the ports in the rear panel please refer to the appendix for detailed information The model in the front panel is very important please check according to your purchase order The label in the rear panel is very important too Usually we need you to represent the serial number when we provide the service after sales 3 3 HDD SIM Card Installation 3...

Страница 24: ...DD box and then remove the bottom board Now you can see an interface shown as in Figure 3 2 Figure 3 2 3 Now you can see an interface shown as in Figure 3 3 Use four screws to secure the HDD on the bracket and then use two screws to fasten the bracket on the bottom board ...

Страница 25: ... close the cover Figure 3 4 3 4 Connecting Power Supply Please check input voltage and device power button match or not We recommend you use UPS to guarantee steady operation DVR life span and other peripheral equipment operation such as cameras 3 5 Connecting Audio Video Input and Output Devices 3 5 1 Video Input The input video format includes composite signal PAL NTSC 1 0VP P 75Ω ...

Страница 26: ...ection lugs in well contact The signal line and shielded wire should be fixed firmly and in well connection Avoid dry joint lap welding and oxidation 4 pin aviation output port for audio video input See Figure 3 5 Figure 3 5 3 5 2 Video output Video output includes a TBNC PAL NTSC BNC 1 0VP P 75Ω output and a VGA output When you are using pc type monitor to replace the monitor please pay attention...

Страница 27: ...d twisted wire is recommended and the shielded layer is used to connect to the grounding b Avoid high voltage Ensure proper wiring and some thunder protection measures c For too long signal wires 120Ω should be parallel connected between A B lines on the far end to reduce reflection and guarantee the signal quality d 485 A B of DVR cannot parallel connect with 485 port of other device e The voltag...

Страница 28: ...rt of the alarm sensor to the DVR alarm input ALARM Use the same ground with that of DVR if you use external power to the alarm device Figure 3 8 3 6 3 Alarm Output Port Alarm output is level input output voltage is 12V The max load shall be less than 12V 1A It should not be connected to high power load directly to avoid high current which may result in relay damage Please use the co contactor to ...

Страница 29: ... loop and contract 1000VAC 1min Between separated contact 400VAC 1min Operation time Rated voltage 5ms Release time Rated voltage 5ms Bound time Rated voltage About 5ms Loop temperature rise Rated voltage 65K Strike 98m s2 Vibration 10Hz 55 Hz 3 3mm Double amplitude Humidity 98 RH 40 Temperature 30 70 Weight About 2 2g leading out end mode DIP Seal mode Sealed Loop Rated Loop Power Standard mode 2...

Страница 30: ... the record period In the default setup the device will automatically shut down after the ACC power is disconnected The ACC delay value ranges from 0 to 65535 Unit minute System can delay shutting down for the specified time and then turn off Main menu Advanced Auto maintenance 4 1 2 Schedule Boot up Shutdown System enables schedule record function if the boot up is within the specified period You...

Страница 31: ...in Continuous three times login failure will result in system alarm and five times login failure will result in account lock Figure 4 2 4 4 Preview After you successfully logged in you can go to preview interface directly See Figure 4 3 You can overlay the corresponding date time and channel name on each screen You can refer to the following sheet for detailed information SN Icon 1 Display plate n...

Страница 32: ... preview interface right click mouse you can view menu interface shown as in Figure 4 4 This series product supports 1 4 window mode Figure 4 4 4 5 1 Window Switch System supports 1 4 window You can select from the dropdown list See Figure 4 5 ...

Страница 33: ...fore you go to PTZ control interface please go to chapter 4 9 8 to set PTZ parameter See Figure 4 6 Figure 4 6 4 5 3 Color Here you can set hue brightness contrast saturation gain white level color mode and etc See Figure 4 7 Figure 4 7 ...

Страница 34: ...ding Please refer to chapter 4 9 9 4 5 9 Main Menu After you logged in the system main menu is shown as below See Figure 4 8 There are total seven icons search Information vehicle setting backup advanced and shutdown Move the cursor to highlight the icon then double click mouse to enter the sub menu Figure 4 8 4 6 Search Playback Click search button in the main menu search interface is shown as be...

Страница 35: ...y from the read write HDD from I O device The interface is shown as below if you want to search a picture You can set activation interval See Figure 4 10 Figure 4 10 3 Calendar The blue highlighted date means there is picture or file Otherwise there is no picture or file In any play mode click the date you want to see you can see the corresponding record file trace in the time bar 4 Playback mode ...

Страница 36: ...an see the corresponding slide bar in the time bar of the corresponding channel such as and Click button to save current contents in a new file You can adjust the slide bar or input the accurate time to set the file end time Click button to save current contents in a new file 7 Save 8 Time bar Display current record type and its corresponding period 9 Time bar unit The option includes 24H 12H 1H a...

Страница 37: ...snapshot 1 picture per second System supports custom snap picture saved path Please connect the peripheral device first click snap button on the full screen mode you can select or create path Click Start button the snapshot picture can be saved to the specified path Other Functions 13 Other channel synchronization switch to play when playback When playing the file click the number button system ca...

Страница 38: ...remove the broken hard disk before you add a new one Once there is a hard disk confliction please check hard disk time and system time is the same or not Please go to setting then general to modify system time At last reboot the system to solve this problem After system booted up if there is any confliction system goes to HDD information interface directly Please note system does not ask you to de...

Страница 39: ...ace The HDD total capacity Free space The HDD free capacity Status HDD can work properly or not Bad track Display there is bad track or not Page up Click it to view previous page Page down Click it to view the next page View recording time Click it to view HDD record information file start time and end time View HDD type and capability Click it to view HDD property status and etc 4 7 2 BPS Here is...

Страница 40: ...splays 100 logs in one page It can max save 1024 log files Please use page up down button on the interface or the buttons of the front panel to view more Backup Please select a folder you want to save you can click the backup button to save the log files After the backup you can see there is a folder named Log_time on the backup path Double click the folder you can see the log file Details Click t...

Страница 41: ... Figure 4 16 System version Build Date Web Serial number Model Upgrade Start Please insert the USB device that have the update file to the device and then click the Start button to begin the update See Figure 4 17 Important Please make sure the upgrade file name shall be update bin Figure 4 16 ...

Страница 42: ...ormation It includes ACC status voltage record status HDD status GPS status DSS registration status 3G dial status WIFI connection status See Figure 4 18 Figure 4 18 4 7 6 Satellite Info It is to display satellite positioning status and searched results See Figure 4 19 ...

Страница 43: ...er if you have proper system right Figure 4 20 4 7 8 Network Test Network test interface is shown as in Figure 4 21 Destination IP Please input valid IPV4 address and domain name Test Click it to test the connection with the destination IP address The test results can display average delay and packet loss rate and you can also view the network status as OK bad no ...

Страница 44: ...e Click Browse button to select the snap path The steps here are same as preview backup operation Figure 4 21 4 7 9 Network Load Network load is shown as in Figure 4 22 Here you can view the follow statistics of the device network adapter The green wave is send out speed and red wave is receive speed Figure 4 22 4 8 Vehicle The vehicle interface is shown as below See Figure 4 23 It includes eight ...

Страница 45: ...same In this situation the device uses WIFI network by default and disconnect 3G network e If you find the 3G module can not connect to the platform after dial Please refer to the FAQ or contact your local retailer for help Please refer to the following contents for the parameter information Pane 1 Display 3G signal intensity after you enabled 3G function Pane 2 Display 3G module configuration inf...

Страница 46: ...rd for you to login the 3G network 3G wireless network Here is to display wireless network status SIM card status dial status If the 3G connection is OK then you can see the device IP address the wireless network automatically allocates Figure 4 24 3G flow control It is to show the 3G flow you used See Figure 4 25 Figure 4 25 4 8 2 WIFI The WIFI interface is shown as below See Figure 4 26 Please f...

Страница 47: ...from 1 to 5 and the 5 has the highest priority When there are several WIFI signals available system can try to connect one by one according to the priority setup h Please click Save button to save the setup and then click Connect button to connect manually i After you save WIFI hotspot setup you can view it on the static setup interface After device booted up system can auto connect to the hotspot...

Страница 48: ...etup list Device auto connects to hotspot After device booted up WIFI function is enabled device can automatically connect to the hotspot according to priority on the hotspot setup list System stops until it successfully connects to one hotspot Device is in the hotspot connection status if there is no saved hotspot within current range Delete It can delete a hotspot from the hotspot setup list WIF...

Страница 49: ...onnect to hotspot of OPEN encryption mode The Static setting does not support the SSID of open verification type System can switch between WIFI and 3G freely You can enable WIFI and 3G network at the same time WIFI connection has the higher priority System automatically connects to 3G network if the WIFI connection failed Figure 4 29 4 8 3 G Sensor The G Sensor interface is shown as in Figure 4 30...

Страница 50: ...n the previous step 3 Now you can add device Please do not input default port number such as the TCP port in the mapping port number The device ID here shall be the same with the ID you input in Figure 4 31 Click Add button to complete the setup 4 Now you can boot up the proxy server When you see the network status is Y it means your registration is OK You can view the proxy server when the device...

Страница 51: ... lower than the threshold here Latch Here you can set corresponding delaying time The value ranges from 1s 300s System automatically delays specified seconds in turning off alarm and activated output after external alarm cancelled Show message system can pop up the message in the local screen to alert you when an alarm occurs Alarm upload System can upload the alarm signal to the network including...

Страница 52: ... 33 Figure 4 34 4 8 7 TV Adjust Here is for you to adjust TV output setup See Figure 4 35 Please drag slide bar to adjust each item After all the setups please click OK button system goes back to the previous menu ...

Страница 53: ... In this interface you can view vehicle running kilometers information See Figure 4 36 Figure 4 36 4 9 Setting In main menu highlight setting icon and double click mouse System setting interface is shown as below See Figure 4 37 ...

Страница 54: ...s languages Chinese simplified Chinese Traditional English Italian Japanese French Spanish All languages listed here are optional Slight difference maybe found in various series HDD full Here is for you to select working mode when hard disk is full There are two options stop recording or rewrite If current working HDD is overwritten or the current HDD is full while the next HDD is no empty then sy...

Страница 55: ...tant do not modify time casually unless there is a must Before your time modification please stop record operation first After completing all the setups please click save button system goes back to the previous menu Figure 4 38 Figure 4 39 Figure 4 40 4 9 2 Encode Encode setting includes the following items See Figure 4 41 Please note some series do not support extra stream Channel Select the chan...

Страница 56: ...ule supports GPS overlay function Cover area Privacy mask Here is for you to set privacy mask section You can drag you mouse to set proper section size In one channel video system max supports 4 zones in one channel Preview monitor privacy mask has two types Preview and Monitor Preview means the privacy mask zone can not be viewed by user when system is in preview status Monitor means the privacy ...

Страница 57: ...rrent setup to other channel s You can see an interface is shown as in Figure 4 45 You can see current channel number is grey Please check the number to select the channel or you can check the box ALL Please click the OK button in Figure 4 45 and Figure 4 41 respectively to complete the setup Please highlight icon to select the corresponding function Figure 4 41 Figure 4 42 ...

Страница 58: ...re 4 46 Channel Please select the channel number first You can select all if you want to set for the whole channels Week day There are eight options ranges from Saturday to Sunday and all Pre record System can pre record the video before the event occurs into the file The value ranges from 1 to 30 seconds depending on the bit stream ...

Страница 59: ...back to the previous menu At the bottom of the menu there are color bars for your reference Green color stands for regular recording and red color stands for alarm recording Figure 4 46 4 9 4 RS232 RS232 interface is shown as below There are five items See Figure 4 47 Function There are various devices for you to select Console is for you to use the COM or mini end software to upgrade or debug the...

Страница 60: ...em needs to check the validity of all IPv6 addresses The IP address and the default gateway shall be in the same IP section That is to say the specified length of the subnet prefix shall have the same string DHCP It is to auto search IP When enable DHCP function you can not modify IP Subnet mask Gateway These values are from DHCP function If you have not enabled DHCP function IP Subnet mask Gatewa...

Страница 61: ...rnate DNS the input value shall be 128 digit It shall not be left in blank After completing all the setups please click save button system goes back to the previous menu Figure 4 48 4 9 5 1 Network Setting Network setting interface is shown as in Figure 4 49 Please draw a circle to enable corresponding function and then double click current item to go to setup interface Figure 4 49 4 9 5 2 NTP Set...

Страница 62: ...GMT 2 Moscow GMT 3 New Deli GMT 5 Bangkok GMT 7 Beijing Hong Kong GMT 8 Tokyo GMT 9 Sydney GMT 10 Hawaii GMT 10 Alaska GMT 9 Pacific Time P T GMT 8 American Mountain Time M T GMT 7 American Central Time C T GMT 6 American Eastern Time E T GMT 5 Atlantic Time GMT 4 Brazil GMT 3 Middle Atlantic Time GMT 2 Figure 4 50 4 9 5 3 DDNS DDNS setup interface is shown as in Figure 4 51 You need a PC of fixed...

Страница 63: ...S client has the same function as other DDNS client end It realizes the bonding of the domain name and the IP address Right now current DDNS server is for our own devices only You need to refresh the bonding relationship of the domain and the IP regularly There is no user name password or the ID registration on the server At the same time each device has a default domain name Generated by MAC addr...

Страница 64: ...mail address here System max supports 3 email boxes SSL enable System supports SSL encryption box Interval The send interval ranges from 0 to 3600 seconds 0 means there is no interval Health email enable Please check the box here to enable this function This function allows the system to send out the test email to check the connection is OK or not Interval Please check the above box to enable this...

Страница 65: ...gram Serv U FTP Server Serv U Administator Now you can set user password and FTP folder Please note you need to grant write right to FTP upload user See Figure 4 54 Figure 4 54 You can use a PC or FTP login tool to test setup is right or not For example you can login user ZHY to FTP 10 10 7 7UTH and then test it can modify or delete folder or not See Figure 4 55 Figure 4 55 ...

Страница 66: ...e account information for you to login the FTP File length is upload file length When setup is larger than the actual file length system will upload the whole file When setup here is smaller than the actual file length system only uploads the set length and auto ignore the left section When interval value is 0 system uploads all corresponding files After completed channel and weekday setup you can...

Страница 67: ...ce See Figure 4 60 c This series product support 6 channel level alarm information You can set its actual alarm name such as left turn right turn on the Alarm Name item Check the Overlay button you can overlay corresponding alarm information on the record file d If the alarm signal is 12V 24V voltage the trigger type shall be high valid If the alarm signal is ground signal the trigger type shall b...

Страница 68: ...zer tour PTZ activation snapshot record channel will begin another 10s while the screen prompt alarm upload email will not be activated again After 10s if system detects another alarm signal it can generate an alarm since the anti dither time is out Alarm output The number here is the device alarm output port You can select the corresponding ports s so that system can activate the corresponding al...

Страница 69: ...at the same time Snapshot You can enable this function to snapshoot image when an alarm occurs Buzzer Highlight the icon to enable this function The buzzer beeps when an alarm occurs Please highlight icon to select the corresponding function After setting all the setups please click save button system goes back to the previous menu Figure 4 60 Figure 4 61 4 9 7 Detect Go to Detect Menu In the main...

Страница 70: ...ou when an alarm occurs Record channel Select the channel to activate recording function once an alarm occurred Please make sure you have set MD record in encode interface Main Menu Setting Schedule and schedule record in manual record interface Main Menu Advanced Manual Record PTZ activation Here you can set PTZ movement when an alarm occurs System can go to a preset when there is an alarm Click ...

Страница 71: ...lid for the same type which means you can not copy a channel setup in video loss mode to tampering mode Figure 4 64 4 9 8 PTZ Note All the operations here are based on PELCOD protocol For other protocols there might be a little difference Cable Connection Please follow the procedures below to go on cable connection Connect the dome RS485 port to DVR 485 port Connect dome video output cable to DVR ...

Страница 72: ...e Default value is 9600 Data bit Select corresponding data bits Default value is 8 Stop bit Select corresponding stop bits Default value is 1 Parity There are three options odd even none Default setup is none Figure 4 65 After completing all the setting please click save button In one window display mode right click mouse click Fn Button in the front panel or click Fn key in the remote control Cli...

Страница 73: ...alue ranges from 128 to 255 Channel name Here is for you to set camera channel name Time display You can select to display time or not when system is playback Car number display You can select to display plate number or not when system is playback GPS display System displays GPS information in the screen for your reference Please note only the unit of GPS module supports this function Resolution P...

Страница 74: ...e and set zero channel encoding function so that you can view several video sources at one channel Enable This function is disabled by default Check the box here to enable this function so that you can control the zero channel encoding function at the WEB Compression System default setup is H 264 You can set according to device capability Resolution System supports D1 HD1 CIF 2CIF QCIF The resolut...

Страница 75: ...led this function login the Web and you can select zero channel encoding mode at the right corner of the interface Select a mode you can view the local preview video Figure 4 70 4 9 10 Default Caution Please think twice before you use the default function Click default icon system pops up a dialogue box You can highlight to restore default factory setup Select all General Encode Schedule RS232 Net...

Страница 76: ... the interface is shown as below See Figure 4 72 There are total five items HDD alarm output record account and import export Figure 4 72 4 10 1 HDD Management Here is for you to view and implement hard disk management See Figure 4 73 You can see current HDD type status capacity and record time When HDD is working properly system is shown as O When HDD error occurred system is shown as X ...

Страница 77: ...n select a HDD mode from the dropdown list such as read only or you can erase all data in the HDD Please note system needs to reboot to get all the modification activated HDD detect You can select HDD detect type quick global to view the HDD status Record time It is to display record start time and end time of current HDD Figure 4 73 Figure 4 74 4 10 2 Alarm Output Here is for you to set proper al...

Страница 78: ... 1 Manual record menu Right click mouse or in the main menu Advanced Manual Record Manual record menu is shown as in Figure 4 76 4 10 3 2 Basic operation There are two streams main stream extra stream There are three statuses schedule manual stop Please highlight icon to select corresponding channel Manual The highest priority After manual setup all selected channels will begin ordinary recording ...

Страница 79: ...el schedule record Please highlight ALL after Schedule See Figure 4 78 When system is in schedule recording all channels will record as you have previously set Main menu Setting Schedule The corresponding indication light in front panel will turn on Figure 4 78 All channel manual record Please highlight ALL after Manual See Figure 4 79 When system is in manual recording all scheduled set up you ha...

Страница 80: ...ase note For the user account name and the user group the string max length is 6 byte The backspace in front of or at the back of the string is invalid There can be backspace in the middle The string includes the valid character letter number underline subtraction sign and dot System account adopts two level management group and user No limit to group or user amount For group or user management th...

Страница 81: ...as in Figure 4 82 Here you can modify account password Please select the account from the dropdown list input the old password and then input the new password twice Click the Save button to confirm current modification For the users of user account right it can modify password of other users Figure 4 82 4 10 4 2 Add Modify Group Click add group button the interface is shown as below See Figure 4 8...

Страница 82: ...ights for current user For convenient user management usually we recommend the general user right is lower than the admin account The modify user interface is similar to Figure 4 84 Figure 4 84 4 10 5 Import Export The import export interface is shown as below See Figure 4 85 This function allows you to copy current system configuration to other devices It also supports import create new folder an...

Страница 83: ...or network download backup operation 4 11 1 Detect Device Click backup button you can see an interface is shown as in Figure 4 86 Here is for you to view device information You can view backup device name and its total space and free space Figure 4 86 4 11 2 Backup Select backup device and then set channel file start time and end time Click add button system begins search All matched files are lis...

Страница 84: ...t bottom Figure 4 88 When the system completes backup you can see a dialogue box prompting successful backup The file name format usually is SN_CH channel number Time In the file name the YDM format is Y M D H M S File extension name is dav Tips During backup process you can click ESC to exit current interface for other operation The system will not terminate backup process Note When you click sto...

Страница 85: ...estart application reboot device Shutdown system shuts down and turns off power Restart system system begins rebooting Switch user you can use another account to login If you shut down the device there is a process bar for your reference system waits for 3 seconds and then shut down You can not cancel Please note sometimes you need to input the proper password to shut down the device Figure 4 89 ...

Страница 86: ...e the previous one If you want to un install the web control please run uninstall webrec3 0 bat Or you can go to C Program Files webrec to remove single folder Please note before you un install please close all web pages otherwise the un installation might result in error Current series product supports IE and Maxthon browser only 5 2 Login Open IE and input DVR address in the address column For e...

Страница 87: ...own as below See Figure 5 3 Please input your user name and password Default factory name is admin and password is admin Then you can select the login mode LAN and WAN Note For security reasons please modify your password after you first login Figure 5 3 ...

Страница 88: ...it the button becomes yellow See Figure 5 5 Figure 5 5 Please refer to Figure 5 6 for main stream and extra stream switch information Figure 5 6 Section 3 Start dialogue button You can click this button to enable audio talk Click to select bidirectional talk mode There are four options DEFAULT G711a G711u and PCM After you enable the bidirectional talk the Start talk button becomes End Talk button...

Страница 89: ...screen vertical sync 1 window 4 window You can set video fluency and real time feature priority Section 7 PTZ operation panel Please refer to chapter 5 5 for detailed information Section 8 Image setup and alarm setup Please refer to chapter 5 6 for detailed information Section 9 It is to display several channels at one window Please refer to chapter 5 7 for detailed information 5 4 Real time Monit...

Страница 90: ...e sure you have properly set PTZ protocol Please refer to chapter 5 9 5 7 There are eight direction keys In the middle of the eight direction keys there is a 3D intelligent positioning key Click 3D intelligent positioning key system goes back to the single screen mode Drag the mouse in the screen to adjust section size It can realize PTZ automatically Please refer to the following sheet for PTZ se...

Страница 91: ...on and etc Then you can click Add button to set one pattern Aux Please input the corresponding aux value here You can select one option and then click AUX on or AUX off button Light and wiper You can turn on or turn off the light wiper Figure 5 12 5 6 Image Relay out Select one monitor channel video and then click Image button in section 8 the interface is shown as Figure 5 13 5 6 1 Image Here you...

Страница 92: ... output 1 2 of the rear panel Please refer to chapter 3 6 1 for detailed information Figure 5 14 5 7 Zero channel encoding System allows you to preview several channels on one channel It supports 1 4 window See Figure 5 15 Please note only the product of this icon supports current function Figure 5 15 5 8 WAN Login In WAN mode after you logged in the interface is shown as below See Figure 5 16 ...

Страница 93: ...main stream S stands for sub stream extra stream 4 If you login via the WAN mode system does not support alarm activation to open the video function in the Alarm setup interface Important For multiple channel monitor mode system adopts extra stream to monitor by default You can not modify manually All channels are trying to synchronize Please note the synchronization effect still depends on your n...

Страница 94: ...deo may become hazy if the value is too high The value ranges from 0 to 100 The recommended value ranges from 40 to 60 Contrast It is to adjust monitor window contrast The value ranges from 0 to 100 The default value is 50 The larger the number is the higher the contrast is You can use this function when the whole video bright is OK but the contrast is not proper Please note the video may become h...

Страница 95: ... encode interface is shown as below See Figure 5 18 Figure 5 18 Please refer to the following sheet for detailed information Parameter Function Channel Please select a channel from the dropdown list Video enable Check the box here to enable extra stream video This item is enabled by default Code stream type It includes main stream motion stream and alarm stream You can select different encode fram...

Страница 96: ...lease refer to recommend bit rate for the detailed information Extra stream In CBR the bit rate here is the max value In dynamic video system needs to low frame rate or video quality to guarantee the value The value is null in VBR mode Reference bit rate Recommended bit rate value according to the resolution and frame rate you have set Audio enable System supports G711a PCM G711μ Watermark enable ...

Страница 97: ... can copy current channel setup to other channel s 5 9 1 2 3 Overlay The video overlay interface is shown as in Figure 5 20 Figure 5 20 Please refer to the following sheet for detailed information Parameter Function Cover area Privacy mask Check Preview or Monitor first Click Set button you can privacy mask the specified video in the preview or monitor video System max supports 4 privacy mask zone...

Страница 98: ... Ch Encoding The zero channel encoding interface is shown as in Figure 5 21 Figure 5 21 Please refer to the following sheet for detailed information Parameter Function Compression H 264 Resolution D1 HD1 CIF 2CIF QCIF Frame Rate 1 25 30 Bit Rate kb s 640 768 896 1024 5 9 1 2 5 Preview Overlay The preview overlay interface is shown as in Figure 5 22 You can overlay time speed plate information and ...

Страница 99: ...in Figure 5 23 Here you can set snap image saved path and the record storage path The default setup is C PictureDownload and C RecordDownload Please click the Save button to save current setup Figure 5 23 5 9 1 3 Channel Name Here you can set channel name See Figure 5 24 ...

Страница 100: ...IP submask gateway from the DHCP If you switch from the DHCP mode to the static mode you need to reset the IP parameters Mac Address It is to display host Mac address MTU Max transmission unit IP Version It is to select IP version IPV4 or IPV6 You can access the IP address of these two versions IP Address Please use the keyboard to input the corresponding number to modify the IP address and then s...

Страница 101: ...7777 You can input the actual port number if necessary UDP port The default value is 37778 You can input the actual port number if necessary HTTP port The default value is 80 You can input the actual port number if necessary HTTPS The default value is 443 You can input the actual port number if necessary RTSP port The default value is 554 5 9 2 3 DDNS The DDNS interface is shown as in Figure 5 27 ...

Страница 102: ...ered domain name Besides the general DDNS the quick DDNS works with the device from the manufacturer so that it can add the extension function 2 Function Introduction The quick DDNS client has the same function as other DDNS client end It realizes the bonding of the domain name and the IP address Right now current DDNS server is for our own devices only You need to refresh the bonding relationship...

Страница 103: ... email before the cancel operation if your email address setup is OK 5 9 2 4 Email The email interface is shown as in Figure 5 28 Figure 5 28 Please refer to the following sheet for detailed information Parameter Function Enable Please check the box here to enable email function SMTP Server Input server address and then enable this function Port Default value is 25 You can modify it if necessary A...

Страница 104: ...server Health mail enable Please check the box here to enable this function Update period interval This function allows the system to send out the test email to check the connection is OK or not Please check the box to enable this function and then set the corresponding interval System can send out the email regularly as you set here Email test The system will automatically sent out a email once t...

Страница 105: ... in Figure 5 30 This function allows you to be informed when video loss phenomenon occurred You can enable alarm output channel and then enable show message function Figure 5 30 Figure 5 31 Please refer to the following sheet for detailed information Parameter Function Enable You need to check the box to enable video loss function Please select a channel from the dropdown list Record channel Syste...

Страница 106: ...m upload System can upload the alarm signal to the centre Including alarm centre Message When 3G network connection is OK system can send out a message when an video loss occurs Send Email If you enabled this function System can send out an email to alert you when an alarm occurs PTZ Activation Here you can set PTZ movement when alarm occurs Such as go to preset X See Figure 5 31 5 9 3 1 2 Tamperi...

Страница 107: ...down list Period This function becomes activated in the specified periods There are six periods in one day Please draw a circle to enable corresponding period Select date If you do not select current setup applies to today only You can select all week column to apply to the whole week Click OK button system goes back to local alarm interface please click save button to exit Type Normal open or nor...

Страница 108: ...n activate corresponding alarm device when an alarm occurs Latch System can delay the alarm output for specified time after an alarm ended The value ranges from 1s to 300s Show message System can pop up a message to alarm you in the local host screen if you enabled this function Buzzer Check the box here to enable this function The buzzer beeps when an alarm occurs Alarm upload System can upload t...

Страница 109: ...or remove the schedule record setup See Figure 5 37 There are three record modes general auto and alarm There are six periods in one day Please make sure you have enabled the corresponding record mode in the Setup Storage Conditions You can view the current time period setup from the color bar Green color stands for the general record snapshot Red color stands for the alarm record snapshot ...

Страница 110: ...102 Figure 5 37 Figure 5 38 Figure 5 39 Please refer to the following sheet for detailed information Parameter Function Channel Please select a channel from the dropdown list ...

Страница 111: ...re six periods in one day If you check Holiday box current channel shall record as your holiday setup here Copy Copy function allows you to copy one channel setup to another After setting in channel click Copy button you can go to interface Figure 5 39 You can see current channel name is grey such as channel 1 Now you can select the channel you wan to paste such as channel 2 If you wan to save cur...

Страница 112: ...l interface is shown as in Figure 5 42 Figure 5 42 Please refer to the following sheet for detailed information Parameter Function Channel Here you can view channel number The number displayed here is the max channel amount of your device Status There are three statuses schedule manual and stop Schedule System enables auto record function as you set in record schedule setup general and alarm ...

Страница 113: ...tion Device ID It is to set device name Device No It is device channel number Language You can select the language from the dropdown list Please note the device needs to reboot to get the modification activated Video Standard This is to display video standard such as PAL HDD full Here is for you to select working mode when hard disk is full There are two options stop recording or rewrite If curren...

Страница 114: ...te format or according to the week format NTP You can check the box to enable NTP function NTP server You can set the time server address Port It is to set the time server port Interval It is to set the sync periods between the device and the time server 5 9 5 2 Account Note For the character in the following user name or the user group name system max supports 6 digits The space in the front or a...

Страница 115: ...ator users admin 888888 and hidden user default Hidden user default is for system interior use only and can not be deleted When there is no login user hidden user default automatically login You can set some rights such as monitor for this user so that you can view some channel view without login Here you can input the user name and password and then select one group for current user Please note t...

Страница 116: ...t to 6 digit It shall include the number only For the user of the account rights he can modify the password of other users Figure 5 47 5 9 5 2 2 Group The group management interface can add remove group modify group password and etc The interface is shown as in Figure 5 48 Figure 5 48 Add group It is to add group and set its corresponding rights See Figure 5 49 Please input the group name and then...

Страница 117: ...shown as in Figure 5 50 Here you can modify group information such as remarks and rights Figure 5 50 5 9 5 3 Default The default setup interface is shown as in Figure 5 51 Here you can select Channel Network Event Storage System Or you can check the All box to select all items Figure 5 51 ...

Страница 118: ...nding WEB setup to your local PC 5 9 5 5 Upgrade The upgrade interface is shown as in Figure 5 53 Please select the upgrade file and then click the update button to begin update Please note the file name shall be as bin During the upgrade process do not unplug the power cable network cable or shutdown the device Important Improper upgrade program may result in device malfunction Figure 5 53 5 9 5 ...

Страница 119: ... is 8 Stop bit There are two options 1 2 Default setup is 1 Parity There are five options none odd even space mark Default setup is none 5 9 5 7 PTZ The PTZ interface is shown as in Figure 5 55 Before setup please check the following connections are right PTZ and decoder connection is right Decoder address setup is right Decoder A B line connects with DVR A B line Click Save button after you compl...

Страница 120: ...dial switch setup Stop bit Default setup is 1 Please set according to the speed dome dial switch setup Parity Default setup is none Please set according to the speed dome dial switch setup Note For HD CVI protocol you can use RS485 port to control the HDCVI camera On the preview interface right click mouse and then select PTZ Click the of the Iris button you can see the corresponding menu 5 9 6 In...

Страница 121: ...type from the drop down list and then click search button to view the list You can click the stop button to terminate current search operation Detailed information You can select one item to view the detailed information Clear You can click this button to delete all displayed log files Please note system does not support clear by type Backup You can click this button to backup log files to current...

Страница 122: ...n and then click the Search SSID button Now you can view all the wireless network information in the following list Double click a name to connect to it Click Refresh button you can view latest connection status Click Static setting button you can go to WIFI setup interface Here you can input SSID wireless network name and verification type such as OPEN WEP WPA PSK and WPA2 PSK 5 9 7 3 3G Please r...

Страница 123: ... Dial No The network dial number you got from your ISP User Name The user name you login the 3G network Password The password you login the 3G network SIM State Display SIM card status IP Address Display automatically got IP address after 3G online Wireless Signal Display signal intensity Flow Use Policy Select flow policy Flow Threshold M Set flow threshold Current Used Flow K Currently used flow...

Страница 124: ...he following sheet for detailed information Parameter Function Server IP DSS server IP address Port DSS server port value Sub device ID The device ID set from the DSS 5 9 7 5 Auto Maintenance The auto maintenance interface is shown as in Figure 5 63 Here you can select auto reboot and auto delete old files interval from the dropdown list If you want to use the auto delete old files function you ne...

Страница 125: ...117 Figure 5 63 5 9 7 6 Abnormality It includes six statuses No disk disk error disk no space battery low temperature high See Figure 5 64 through Figure 5 68 Figure 5 64 Figure 5 65 ...

Страница 126: ...118 Figure 5 66 Figure 5 67 Figure 5 68 Please refer to the following sheet for detailed information ...

Страница 127: ...tion Alarm upload System can upload the alarm signal to the centre Including alarm centre Send Email If you enabled this function System can send out an email to alert you when an alarm occurs Buzzer Check the box here to enable this function The buzzer beeps when an alarm occurs 5 9 7 7 Display Display interface includes GUI and TV adjust 5 9 7 7 1 GUI Here you can set background color and transp...

Страница 128: ... user remains inactive for a specified time Startup wizard Check the box here system goes to the startup wizard when the device boots up the next time Otherwise it goes to the system login interface directly Navigation bar Check the box here system displays the navigation bar on the interface 5 9 7 7 2 TV Adjust It is to set TV output region See Figure 5 70 Figure 5 70 5 9 7 8 Speed In this interf...

Страница 129: ...efer to the following sheet for detailed information SN Function Description 1 Display window Click to switch window amount During the playback process double click a window to zoom in 2 Playback control pane From left to right pause play stop previous frame next frame slow play fast play volume Note The next frame button is only valid when record is in pause mode Once the volume button becomes th...

Страница 130: ...e record Please refer to chapter 5 10 2 for detailed information 5 10 1 Playback Record There are three playback modes Click play button click any valid file position in the time bar double click any file in the file list 5 10 2 Clip and Save Record It is to edit the file and save the interested footages to your local PC Use the calendar and time bar to search file s Select corresponding channel s...

Страница 131: ...e 2 Before the setup please go to the playback window Here you can select window mode and channel on the right pane Pane 7 in Figure 5 72 3 System displays all records of current date by default Click Enter button or double a record file you can begin playback The record type includes normal MD and alarm 4 Check the file s you want to backup and then click Download to save on your local PC 5 Retur...

Страница 132: ...arch record or picture You can select record channel record type and record time to download There are two download types The download by file interface is shown as in Figure 5 75 and the download by time interface is shown as in Figure 5 76 Figure 5 75 Figure 5 76 Watermark Watermark interface is shown as In Figure 5 75 Please select a file and then click Verify button to see the file has been ta...

Страница 133: ...re current device can upload the alarm Type Parameter Function Alarm Type Video loss System alarms when video loss occurs Camera masking Tampering System alarms when camera is viciously masking Disk full System alarms when disk is full Disk error System alarms when disk error occurs External alarm Alarm input device sends out alarm Temperature high System alarms when temperature is high Battery lo...

Страница 134: ...s You can specify as you wish Sound path Here you can specify alarm sound file 5 12 Log out Click log out button system goes back to log in interface See Figure 5 79 You need to input user name and password to login again Figure 5 79 5 13 Un install Web Control You can use web un install tool uninstall web bat to un install web control Please note before you un installation please close all web pa...

Страница 135: ...127 6 Digital Surveillance System Besides Web you can use our Digital Surveillance Software DSS to login the device For detailed information please refer to DSS user s manual ...

Страница 136: ...r is not enough Front video signal is not stable Working environment is too harsh too much dust Hardware malfunction 3 System can not detect hard disk There are following possibilities HDD is broken HDD ribbon is damaged HDD cable connection is loose Main board SATA port is broken 4 There is no video output whether it is one channel multiple channel or all channel output There are following possib...

Страница 137: ...ardware malfunctions 8 There is no audio when monitor There are following possibilities It is not a power picker It is not a power acoustics Audio cable is damaged DVR hardware malfunctions 9 There is audio when monitor but there is no audio when system playback There are following possibilities Setup is not correct Please enable audio function Corresponding channel has no video input Playback is ...

Страница 138: ... end is not compatible with DVR program 13 There is only mosaic no video when preview or playback video file remotely There are following possibilities Network fluency is not good Client end resources are limit There is multiple cast group setup in DVR This mode can result in mosaic Usually we do not recommend this mode There is privacy mask or channel protection setup Current user has no right to...

Страница 139: ...ot enough There are following possibilities Camera quality is too low Lens is dirty Camera is installed against the light Camera aperture setup is not correct HDD capacity is not enough HDD is damaged 20 Can not detect SIM card There are following possibilities There is no SIM card SIM card direction is wrong SIM card is malfunction 21 My cell phone 3G dial failed There are following possibilities...

Страница 140: ...r cable neat in case it obstacles the driver or the passenger Please remove the negative end of the connection terminal before you configure the cable Please unlock the key before you draw out the HDD box Otherwise it may result in device damage When washing the vehicle please keep the DVR away from the water Otherwise it may result in short circuit fire or device malfunctions Please make sure the...

Страница 141: ...ng time for each day hour i D means number of days for which the video shall be kept Step 3 According to Formula 3 to calculate total capacity accumulation T q that is needed for all channels in the device during scheduled video recording c i i T m q 1 3 In the formula c means total number of channels in one device Step 4 According to Formula 4 to calculate total capacity accumulation T q that is ...

Страница 142: ...134 If there is any uncertainty or controversy please refer to the final explanation of us Please visit our website or contact your local service engineer for more information ...

Отзывы: