background image

Operation

Page 3-1

3 - Operation

Read and understand all instructions and warnings prior to using the unit. See all of the safety related 
information located in Chapter 1.

NOTE: 

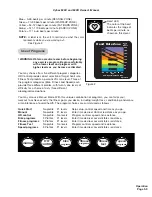
Standard units contain a 

Pause/end

 key. See Figure 1A. Total access units contain a 

Stop

 key. 

See Figure 1B.

Cybex 530C and 530R Owner’s Manual

This section lists some of the common terms and symbols used in this chapter. Other terms and 
symbols are listed in this chapter as appropriate.

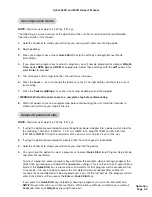
Dormant Mode -

  The 

Dormant Mode

 occurs when the unit is not in use. The control panel will display 

a beating heart when the unit is in 

Dormant Mode

NOTE:

 The Dormant mode only occurs when the 

cycle is used with the optional power adapter.

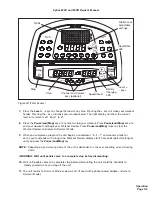
Program Setup Mode -

  This begins after pressing any program key. Upon entering a program the 

LEDs flash, prompting the user to adjust the appropriate settings.

Active Mode -

  This begins immediately after pressing the 

Quick Start

 key 

(Manual Mode),

 or after the 

Program Setup Mode.

 The beginning of 

Active Mode

 is marked by a long tone.

 Active Mode

 continues 

until you reach the end of a program, press the 

Pause/end(Stop)

 key or stop pedaling.

Quick Start -

  This begins by pressing the 

Quick Start

 key. 

Quick Start

 skips the 

Program Setup 

Mode

 and begins immediately in 

Manual Mode.

Manual Mode -

  This begins immediately after pressing the 

Quick Start

 key or after pressing the 

Manual

 program key. In 

Manual Mode

 you can customize your workout 

Level

 and 

Time

 and enter your 

Weight

 by pressing those keys. 

NOTE:


Manual Mode features differ from the Manual Program. See the 

Manual Mode section in this chapter.

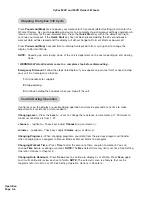
Workout Review -

  This begins after pressing the 

Pause/end(Stop)

 key once, at the end of a program 

or when you stop pedaling for 25 seconds. The workout statistics accumulated during the previous 
workout session will display for 20 seconds (default setting) or until 

Pause/end(Stop)

 is pressed again. 

NOTE:

 You can change the 20 second default. See Setting Operation Options in Chapter 5.

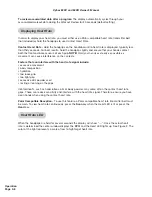
Pause Mode -

  This begins when the you stop pedaling for 25 seconds or when you press 

Pause/

end(Stop)

 once. While in 

Workout Review

 you can press the 

Quick Start

 key to resume your workout 

in 

Manual Mode.

 The time, calories burned and other accumulated data is remembered and added to.


-

  These keys adjust 

RPM,


Weight, Time 

or 

Level

 up or down.

level


+ -  - 

These keys adjust 

Level

 up (

+

) or down (

-

).

channel


+ - 

(optional)

 - 

These keys adjust 

Channel

 up (

+

) or down (

-

). 

volume


+ - 

(optional)

 - 

These keys adjust 

Volume

 up (

+

) or down (

-

).

Terms and Symbols Used

Содержание 530C

Страница 1: ...Cybex 530C and 530R Cycle Owner s Manual Cardiovascular Systems Part Number LT 18171 4 Rev H www cybexinternational com ...

Страница 2: ......

Страница 3: ...ies regarding the contents of this manual We reserve the right to revise this document at any time or to make changes to the product described within it without notice or obligation to notify any person of such revisions or changes 2007 Cybex International Inc All rights reserved Printed in United States of America 10 Trotter Drive Medway MA 02053 888 462 9239 508 533 4300 FAX 508 533 5183 www cyb...

Страница 4: ......

Страница 5: ...mits are designed to provide reasonable protection against harmful interference in a residential installation This equipment generates uses and can radiate radio frequency energy and if not installed and used in accordance with the instructions may cause harmful interference to radio communications However there is no guarantee that interference will not occur in a particular installation If this ...

Страница 6: ... 530R Recumbent Stationary Bicycle Cybex 530C Upright Stationary Bicycle to which this declaration relates is in conformity with the EEC directives listed herein below including any and all relevant modifications 73 23 EEC Low Voltage Directive 89 336 EEC Electromagnetic Compatibility 2002 95 EC Restriction of Hazardous Substances RoHS Directive Art Hicks Chief Operating Officer Cybex Internationa...

Страница 7: ...d measurement techniques Electrostatic discharge immunity test EN 61000 4 3 Electromagnetic compatibility EMC Part 4 3 Testing and measurement techniques Radiated radio frequency electromagnetic field immunity test EN 61000 4 4 Electromagnetic compatibility EMC Part 4 Testing and measurement techniques Section 4 Electrical fast transient burst immunity test EN 61000 4 5 Electromagnetic compatibili...

Страница 8: ...equipment General safety requirements and test methods EN 957 5 Stationary training equipment Pedal crank training equipment Additional specific safety requirements and test methods ASTM F1250 00 Standard Safety Specification for Stationary Exercise Bikes FCC Part 15 Subpart B Class B Emissions CAN CSA C22 2 No 68 92 Motor Operated Appliances Household and Commercial General Instruction No 1 2 CAN...

Страница 9: ...rate Control 3 13 Fitness Test 3 13 Bike Hills 3 14 Bike Rolling Hills 3 15 Bike Pikes Peak 3 16 Fitness Interval 3 17 Fitness Weight Loss 3 18 Fitness Cardio 3 19 Speed Strength 3 20 Speed Steady 3 21 Speed Ramps 3 22 Table of Contents 4 Preventive Maintenance Warnings 4 1 Regular Maintenance Activities 4 1 Cleaning Your 530 Cycle 4 2 Drive Belt Maintenance 4 3 Environment 4 10 Storage 4 10 Recha...

Страница 10: ...Cybex 530C and 530R Owner s Manual This page intentionally left blank Page vi ...

Страница 11: ... data and statistics displayed on the unit including heart rate are not to be used to make a medical diagnosis from Consult your physician User Safety Precautions Obtain a medical exam before beginning any exercise program Stop exercising if you feel faint dizzy or experience pain and consult your physician Obtain instruction before using Lisez les instructions avant l utilisation Read and underst...

Страница 12: ...pairs electrical or mechanical Seek qualified repair personnel when servicing If you live in the USA contact Cybex Customer Service at 888 462 9239 If you live outside the USA contact Cybex Customer Service at 508 533 4300 Disconnect the optional power adapter before servicing the cycle Keep a repair log of all maintenance activities Use only Cybex supplied components to maintain repair the equipm...

Страница 13: ...a compatible interface All devices must be used for their intended purpose Signal or mains isolation devices and additional protective earth may be needed to assure compliance with IEC EN 60601 1 1 Do not power the entire system from a single outlet or power strip If the unit is used with the optional power supply ensure that this power supply is plugged in to a separate outlet than any connected ...

Страница 14: ... Lisez les instructions avant I utilisation 4 Read and understand the Owner s Manual and all warnings posted on the unit before using DE 18181 4 WARNING Warning decal part number DE 18181 4 Cybex 530C and 530R Owner s Manual Safety Page 1 4 Warning decals indicate a potentially hazardous situation which if not avoided could result in death or serious injury The warning decals used on the Cybex 530...

Страница 15: ...s eloignes Les adolescents et les handicapes doivent etre surveilles 4 DO NOT use the unit if you exceed 400 lbs 180 kg This is the rated maximum user weight 5 Report any malfunctions damage or repairs to the facility 6 Replace any warning labels if damaged worn or illegible DE 18186 4 WARNING Input 9v 1 7A DC Use Cybex supplied adapter only NEMA 5 15 TR 18231 or IEC 320 TR 18230 Cybex 530C and 53...

Страница 16: ...3 4 Hot Flywheel Wait until it cools before servicing Warning decal part number DE 18363 4 Cybex 530C and 530R Owner s Manual Safety Page 1 6 NOTE This decal is located inside the cycle applied to the brake generator ...

Страница 17: ...THESE PRECAUTIONS ARE NOT OBSERVED 1 Read and understand the Owner s Manual and all warnings posted on the unit before using 2 Use only NiMH Nickel Metal Hydride batteries AA 1 2v 1600mAh or higher NiMH 3 Install batteries with positive end down 4 Dispose of used batteries appropriately WARNING Warning decal part number DE 18250 4 Cybex 530C and 530R Owner s Manual ...

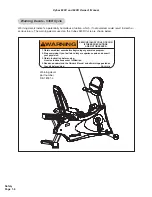
Страница 18: ...ion before using Lisez les instructions avant I utilisation 4 Read and understand the Owner s Manual and all warnings posted on the unit before using DE 18181 4 WARNING Warning decals indicate a potentially hazardous situation which if not avoided could result in death or serious injury The warning decals used on the Cybex 530R Cycle are shown below Warning Decals 530R Cycle Warning decal part num...

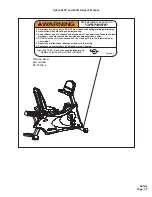
Страница 19: ...Tenez les enfants eloignes Les adolescents et les handicapes doivent etre surveilles 4 DO NOT use the unit if you exceed 400 lbs 180 kg This is the rated maximum user weight 5 Report any malfunctions damage or repairs to the facility 6 Replace any warning labels if damaged worn or illegible DE 18186 4 WARNING Input 9v 1 7A DC Use Cybex supplied adapter only NEMA 5 15 TR 18231 or IEC 320 TR 18230 W...

Страница 20: ...WARNING DE 18363 4 Hot Flywheel Wait until it cools before servicing Warning decal part number DE 18363 4 Cybex 530C and 530R Owner s Manual Safety Page 1 10 ...

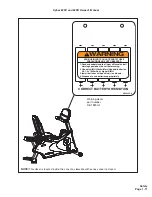
Страница 21: ...ed on the unit before using 2 Use only NiMH Nickel Metal Hydride batteries AA 1 2v 1600mAh or higher NiMH 3 Install batteries with positive end down 4 Dispose of used batteries appropriately WARNING Cybex 530C and 530R Owner s Manual Safety Page 1 11 NOTE This decal is located inside the console viewable with access cover removed Warning decal part number DE 18250 4 ...

Страница 22: ...e accessible through the rear battery door is the only port in the Cybex cycle that carries BOTH the CSAFE communication lines AND the 8 0v DC CSAFE power supply If you are attaching a CSAFE compliant device that requires power you MUST use this connection Power is present only when the cycle is in use or when a power supply is attached NOTE The CSAFE ports provided at the base of the unit are onl...

Страница 23: ...ck CE The CE Conformitè Europèenne mark is a European Union approval indicating that a product complies with a European Directive Pause End Stop Press once to pause program Quick Start Press to skip Program Setup Mode and enter Manual Mode Up Arrow This key adjusts Time Level Weight or RPM up Down Arrow This key adjusts Time Level Weight or RPM down Level Plus This key adjusts Level up Level Minus...

Страница 24: ...Safety Page 1 14 Cybex 530C and 530R Owner s Manual This page intentionally left blank ...

Страница 25: ...lories calories per hour METS Watts rotations per minute and heart rate Lower Console LED display of time speed and level Heart Rate Features Built in wireless heart rate receiver transmitter not included and contact heart rate monitoring Frame Colors Standard White texture black texture silver vein black chrome platinum sparkle Custom Unlimited colors available Resistance Range Minimum 15 Watts M...

Страница 26: ...Cybex 530C and 530R Owner s Manual Technical Specifications Page 2 2 This page intentionally left blank ...

Страница 27: ... Start This begins by pressing the Quick Start key Quick Start skips the Program Setup Mode and begins immediately in Manual Mode Manual Mode This begins immediately after pressing the Quick Start key or after pressing the Manual program key In Manual Mode you can customize your workout Level and Time and enter your Weight by pressing those keys NOTE Manual Mode features differ from the Manual Pro...

Страница 28: ...d use of this exercise equipment is to aid or improve general physical fitness and exercise For Household or Commercial use 530C Cycle 530R Cycle Operation Page 3 2 Cybex 530C and 530R Owner s Manual Intended Use ...

Страница 29: ...plug the optional power adapter into a power outlet rated for the following 100 240 V 50 60 Hz 1 0 A AC NEMA 5 15 plug TR 18231 or IEC 320 inlet TR 18230 NOTE Coil up the remainder of the power cord and place it out of the way 2 If using the optional power adapter observe that the control panel is illuminated 3 Hold the handrails to steady yourself while you step into the pedals 4 You now have the...

Страница 30: ...uring your workout the time will show in the format of minutes seconds If your workout exceeds ninety nine minutes and fifty nine seconds the time format will change to minutes only The lower right display shows the user s current resistance level then shows speed in miles per hour The top center display begins showing your program profile at the left side The center display shows statistics or ad...

Страница 31: ... Stop key at any time to stop your workout Press Pause end Stop once to end your workout and begin your Workout Review Press Pause end Stop twice to clear the Workout Review and return to Dormant Mode 9 When you complete a program the unit begins a countdown 3 2 1 and sounds a tone for each count and ends with a long tone Workout Review displays for 20 seconds default setting or until you press th...

Страница 32: ...handrails for support 2 Stop pedaling 3 Continue holding the handrails while you step off the unit Control keys on the display are usable during operation and may be pressed at any time to make adjustments in resistance or data readouts Changing Level Press the Level keys to change the resistance in increments of 1 Minimum to maximum resistance is from 1 21 channel optional These keys adjust Chann...

Страница 33: ...umes at rest For example two mets would be twice that amount If an individual were working at four METs he she would be consuming oxygen at a rate equal to four times their rest ing consumption METs can be used to compare walking on a grade with running or even to cycling and other activities See The Workout Profile in this chapter for more information Watts Present workload energy exertion in Wat...

Страница 34: ...that can interfere with the heart rate signal include excessive movement body composition hydration too loose grip too tight grip excessive dirt powder or oil resting or leaning on the grips Contaminant s such as hand lotions oils or body powder may come off on the contact heart rate grips These can reduce sensitivity and interfere with the heart rate signal Therefore ensure you have clean hands w...

Страница 35: ...ance as you go HR control No profile No levels Program controls speed and resistance Bike programs 3 Profiles 21 levels Enter time desired Level dictates resistance Fitness programs 3 Profiles 21 levels Enter time desired Level dictates resistance Fitness Test No profile No levels Program controls speed and resistance Speed programs 3 Profiles 21 levels Enter time desired Level dictates resistance...

Страница 36: ... session The dot matrix has a horizontal weight of fifteen seconds per dot Vertical weight is mode specific The resistance mode is pre defined in Setup to default to Bike mode bike factory default options are Constant Power Mode CP or Speed Control Mode ISO Follow the instructions in the Setup and Assembly chapter to learn how to change setup default values Bike mode bike User selects the level or...

Страница 37: ...classified as vigorous require greater than six METs Sport Fitness Activities METs Activities of Daily Living METs Treadmill 3 mph 4 incline 3 5 Cooking standing 2 0 Treadmill 5 mph 0 incline 3 5 Cleaning gutters 5 0 Golf walking and carrying clubs 4 5 Watching television 1 0 Cybex Arc Trainer incline 5 Gardening w heavy resistance 50 100 strides min 12 5 power tools 6 0 Soccer competitive 10 Mowi...

Страница 38: ...itness Programs 3 Speed Programs Each of the program groups work with the cycles resistance modes 1 Bike Programs are used to simulate outdoor cycling As in outdoor cycling the effort level increases with pedal speed With the Bike mode programs the blinking dot at the center of the dot matrix display corresponds to the workload for that level at 80 rpm Should the user pedal faster more LEDs will l...

Страница 39: ...ve 110 bpm or if four stages have been completed When the test is complete the cycle will calculate the VO2 max level and return a number This number can then be referenced on the VO2 max Comparison Table See Figure 3 Program Overview The Heart Rate Control program is interactive By selecting a predetermined heart rate the cycle will adapt the resistance to keep the users heart rate at that level ...

Страница 40: ...ls of substantially greater resistance to simulate steeper grades Likewise the two minute work segments are intended to tax the users capabilities while the two minute rest allows for recuperation and allows for repeated work segments See Figure 4 Hills 15 1 2 3 4 5 6 7 15 15 15 15 15 15 15 15 15 15 15 15 15 15 Repeating segment Figure 4 Cybex 530C and 530R Owner s Manual Operation Page 3 14 Bike ...

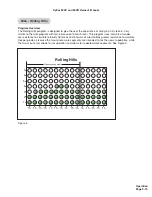
Страница 41: ...is program uses intervals of moder ate resistance to simulate relatively flat areas and intervals of substantially greater resistance to simulate steeper grades Likewise the two minute work segments are intended to tax the users capabilities while the two minute rest allows for recuperation and allows for repeated work segments See Figure 5 Rolling Hills 15 1 2 3 4 5 6 7 15 15 15 15 15 15 15 15 15...

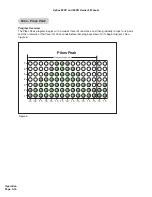
Страница 42: ...ally ramps to its peak and then remains at that level for 45 seconds before ramping back down to its beginning level See Figure 6 Pikes Peak 15 1 2 3 4 5 6 7 15 15 15 15 15 15 15 15 15 15 15 15 15 15 Repeating segment Cybex 530C and 530R Owner s Manual Operation Page 3 16 Bike Pikes Peak Figure 6 ...

Страница 43: ...sting for 30 seconds This allows for moderate and balanced taxation of both the aerobic and anaerobic energy systems As such this program is useful to those who desire improving both their aerobic and anaerobic capabilities See Figure 7 Figure 7 Interval 15 1 2 3 4 5 6 7 15 15 15 15 15 15 15 15 15 15 15 15 15 15 Repeating segment Fitness Interval ...

Страница 44: ... include segments of higher resistance The different resistance levels provide for periods of higher expenditure and training without the introduction of undue fatigue allowing the user to perform for longer periods of time See Figure 8 Weight Loss 15 1 2 3 4 5 6 7 15 15 15 15 15 15 15 15 15 15 15 15 15 15 Repeating segment Cybex 530C and 530R Owner s Manual Operation Page 3 18 Fitness Weight Loss...

Страница 45: ...scular training experience The two minute work interval with high resistance ensures that the aerobic energy system is completely taxed while the subsequent two minute rest interval allows for recovery enabling a repeat at the higher work rate See Figure 9 Cardio 15 1 2 3 4 5 6 7 15 15 15 15 15 15 15 15 15 15 15 15 15 15 Repeating segment Fitness Cardio Figure 9 ...

Страница 46: ...ork rest ratio using 15 second intervals The work period displays a high workload goal during work segments to encourage the user to work maximally while the rest periods show very low workloads to encourage recuperation See Figure 10 Strength 15 1 2 3 4 5 6 7 15 15 15 15 15 15 15 15 15 15 15 15 15 15 Repeating segment Cybex 530C and 530R Owner s Manual Operation Page 3 20 Speed Strength ...

Страница 47: ...m Overview The Steady program is designed to encourage the user to pedal at a steady state with the predetermined level at the selected speed See Figure 11 Figure 11 Steady 15 1 2 3 4 5 6 7 15 15 15 15 15 15 15 15 15 15 15 15 15 15 Repeating segment Speed Steady ...

Страница 48: ...The Ramps program is designed to encourage the user to work progressively towards their anaero bic energy system The Speed program mode will allow the user to maintain pedal speed as the user fatigues When the user is not capable of attaining the targeted workload the accommodating resistance adjusts the load accordingly See Figure 12 Speed Ramps ...

Страница 49: ... cools before servicing WARNING Use only NiMH batteries Use of any other kind of battery may cause them to leak rupture or explode resulting in personal injury and property damage WARNING All maintenance activities shall be performed by qualified personnel Failure to do so could result in serious injury Preventive maintenance activities must be performed to maintain normal operation of your unit K...

Страница 50: ...NING Disconnect the optional power adapter before beginning this procedure Keep wet items away from inside parts of the unit Do not touch components on the lower board A charge can remain even if the unit is unplugged To clean inside the unit remove the Phillips head screws securing the covers in place Use a vacuum attachment or hand vacuum to clean the exposed areas and remove dirt and debris off...

Страница 51: ... procedure Keep wet items away from inside parts of the unit Do not touch components on the lower board A charge can remain even if the unit is unplugged 1 Read and understand this Drive Belt Maintenance section thoroughly before proceeding to step 2 2 Disconnect the optional external power source A If your unit is has an optional power adapter Unplug the power adapter from the power outlet Cybex ...

Страница 52: ...re 4 B Remove the front cap C Remove the six screws securing the top cap in place Remove top cap See Figure 5 D Remove the seven screws securing the right cover in place Remove right cover See Figure 5 E Remove the two screws securing the left cover in place Remove left cover See Figure 5 Figure 4 Screws 3 Front Cap Front Cap Left Cover Top Cap Screws 6 Screws 7 Figure 5 Right Cover Screws 2 o ...

Страница 53: ...R Owner s Manual Preventive Maintenance Page 4 5 F Locate Primary and Secondary Drive Belts See Figures 6 and 7 Cybex 530C Cycle Primary and Secondary Drive Belts Figure 6 Primary Drive Belt Secondary Drive Belt Figure 7 ...

Страница 54: ...arms See Figure 8 B Remove the crank arms NOTE The cycle is equipped with a left and a right crank arm The right crank arm has a pin that inserts into a hole in the drive sprocket 6 Remove the access covers A Using a Phillips head screwdriver remove the three screws securing the front cap in place See Figure 9 Figure 8 Figure 9 Screws 3 Front Cap Crank Arm Washer Screws 2 Drive Sprocket Hole Pin ...

Страница 55: ...ews securing the top cap in place Remove top cap See Figure 10 D Remove the seven screws securing the right cover in place Remove right cover See Figure 10 E Remove the two screws securing the left cover in place Remove left cover See Figure 10 Front Cap Left Cover Top Cap Screws 4 Screws 7 Figure 10 Right Cover ...

Страница 56: ...Owner s Manual Preventive Maintenance Page 4 8 Cybex 530R Cycle Primary and Secondary Drive Belts Figure 11 Figure 12 Primary Drive Belt Secondary Drive Belt F Locate Primary and Secondary Drive Belts See Figures 11 and 12 ...

Страница 57: ...tion of each belt A Rotate each belt by slowly turning pulleys backwards NOTE Be careful to not pinch your fingers between belts and pulleys Examine the condition of each belt If a belt has cracks or appears worn it must be replaced immediately by a qualified service technician See Figures 13 14 and 15 Good Belt Figure 13 Figure 15 Wear Figure 14 Cracks ...

Страница 58: ...he electronics as well as other parts of the machine Temperature The unit is designed to functionally normally in an environment with an ambient temperature range of 50o F 10o C to 104o F 40o C degrees Humidity The unit can be shipped and stored in an environment with a relative humidity range of 10 to 90 NOTE Do not store the unit in an area of high humidity such as in the vicinity of a steam roo...

Страница 59: ...xplode resulting in personal injury and property damage Always replace all batteries at the same time never leave an old battery in the company of new ones Using any old battery with new batteries will result in overheating the old battery non charging of the new batteries and possible leaking or rupturing Always use five equal batteries of the same current rating and manufacturer Battery Charging...

Страница 60: ...crew Batteries Dispose of used batteries appropriately Remove the batteries if storing the unit for periods in excess of six months The batteries are located in the console They can be accessed by removing a Phillips head screw from the back cover with a Phillips head screwdriver See Figure 17 ...

Страница 61: ... the next page for direction in locating your voltage requirements NOTE The power adapter is optional on the Cybex Cycle The area you select for the unit should be well lit and well ventilated Locate the unit on a structurally sound and level surface Allow enough clearance for safe access and passage during use of the unit Humidity The unit is designed to function normally in an environment with a...

Страница 62: ... 4 Allen wrench supplied Phillips screwdriver NOTE The words left and right denote the user s orientation 1 Read and understand all instructions thoroughly before assembling the unit NOTE Each step number in the assembly instructions tells you what you will be doing The lettered steps following each step number describe the procedure required Do not continue with step 2 until you have carefully re...

Страница 63: ... parts are missing contact Cybex Customer Service Figure 1 Cybex 530C Cycle Assembly Item Qty Part Number Description 1 1 Varies Base with covers attached 2 1 Varies Console assembly 3 1 PL 18235 Front Cap in box 4 1 AF 17970 Upright Tube 5 1 AX 18340 Hardware pack in box 6 1 LT 18171 4 Owner s Manual in box 7 1 LT 18260 Assembly poster 8 1 LT 18259 Warranty sheet 6 5 7 8 3 2 4 1 ...

Страница 64: ...ber Description 9 4 HS 18183 Screw 5 16 18 X 75 SHCS Socket Head Cap Screw 10 8 HW 53018 Washer 5 16 Split 11 2 HS 15706 Screw 8 16 x 50 PNHD 12 4 HS 18157 Screw 5 16 18 X 1 25 BTN BLK 13 1 HS 41006 Screw 10 24 x 50 SLFTP BLK 14 1 HX 00438 3 16 Allen wrench 15 1 HX 17117 1 4 Allen wrench Figure 2 Hardware 9 5 2 10 12 9 10 4 13 11 3 1 10 11 12 13 14 15 ...

Страница 65: ...washers 5 16 10 See Figure 3 B Locate the upper display cable and ground wire Insert the cables into the upright tube 4 Pull cables through tube to exit at bottom See Figure 4 C Place the console assembly 2 in the correct position on the upright tube 4 and hand thread each of the four screws 5 16 18 X 1 25 12 See Figure 3 D Securely fasten the screws 5 16 18 X 1 25 12 with the 3 16 Allen wrench 14...

Страница 66: ...See Figure 6 NOTE Confirm that no cables are pinched lowering the console E Using a 1 4 Allen wrench 15 attach the upright tube 4 with the four screws 5 16 18 x 75 9 and four washers 5 16 10 See Figure 6 7 Install the front cap A Locate and place front cap 3 on the front of the unit as shown in Figure 7 B Using a Phillips screwdriver secure with two screws 8 16 x 50 11 and one screw 10 24 x 50 13 ...

Страница 67: ... the optional power adapter into the inlet near the front of the unit NOTE Do not plug the power cord into an outlet at this time See Figure 9 NOTE Use Cybex supplied adapter only NEMA 5 15 plug TR 18231 or IEC 320 inlet TR 18230 If using the IEC 320 inlet adapter ensure a proper power cord is sourced and connected properly Consult an electrician if you have any questions Cybex 530C and 530R Owner...

Страница 68: ...of the parts are missing contact Cybex Customer Service Figure 1 Cybex 530R Cycle Assembly Item Qty Part Number Description 1 1 Varies Base with covers attached 2 1 Varies Console Assembly 3 1 PL 18235 Front Cap in box 4 1 AX 18361 Hardware pack in box 5 1 LT 18171 4 Owner s Manual in box 6 1 LT 18260 Assembly poster 7 1 LT 18259 Warranty sheet 8 1 NA Seat Back Assembly NOTE NA means not applicabl...

Страница 69: ...83 Screw 5 16 18 X 75 SHCS Socket Head Cap Screw 10 8 HW 53018 Washer 5 16 Split 11 2 HS 15706 Screw 8 16 x 50 PNHD BLK 12 4 HS 41107 Screw 5 16 18 X 1 50 13 1 HS 41006 Screw 10 24 X 50 SLFTP BLK 14 1 HX 00438 3 16 Allen wrench 15 1 HX 17117 1 4 Allen wrench Setup and Assembly Page 5 9 Hardware Figure 2 9 4 8 10 12 2 9 10 13 11 3 1 10 11 12 13 14 15 ...

Страница 70: ... V bracket installation instructions supplied with the A V bracket A Locate the console assembly 2 four mounting screws 5 16 18 x 75 9 and four washers 5 16 10 See Figure 4 B Locate the upper display cable and plug it into the lower display cable in the main frame assembly See Figure 5 C Locate the upper ground cable and plug it into the lower ground cable tab on the main frame assembly See Figure...

Страница 71: ...s 6 Install the front cap A Locate and place front cap 3 on the front of the unit as shown in Figure 7 B Using a Phillips screwdriver secure with two screws 8 16 x 50 11 and one screw 10 24 x 50 13 7 Connect the Seat Back Assembly A Locate the seat back assembly 8 four screws 5 16 18 x 1 50 12 and four washers 5 16 10 B Place the seat back assembly in the correct position and hand thread each of t...

Страница 72: ...e inlet near the front of the unit NOTE Do not plug the power cord into an outlet at this time See Figure 10 NOTE Use Cybex supplied adapter only NEMA 5 15 plug TR 18231 or IEC 320 inlet TR 18230 If using the IEC 320 inlet adapter ensure a proper power cord is sourced and connected properly Consult an electrician if you have any questions Cybex 530C and 530R Owner s Manual Figure 9 Leveling Feet S...

Страница 73: ...quirements in this chapter NOTE Coil up the remainder of the power cord and place it out of the way See Figure 1 NOTE Cybex recommends that the unit be unplugged when not in use NOTE Power adapter IEC 320 TR 18230 is not supplied with additional power cord Additional power cord plug varies per country Ensure a proper power cord is sourced and connected properly Consult an electrician if you have a...

Страница 74: ...me or choose none for unlimited time Choices in minutes include 20 30 40 50 60 90 120 and none for no time limit Default is 60 Idle or Workout Review This is how long the unit retains and displays your current workout data during a pause in the workout or after a workout Choices include 20 seconds 30 seconds 40 seconds 1 minute and 5 minutes default is 20 seconds Bike Mode Options during setup Cha...

Страница 75: ...mers living outside the USA contact Cybex Customer Service at 508 533 4300 or fax 508 533 5183 Order parts and find information on the web at www cybexinternational com or by e mail at techhelp cybexintl com Your serial number can be found on the front end of the unit See Figure 1 For your convenience record your serial number below so that you will have it ready if you call Cybex Customer Service...

Страница 76: ...m you wish to return 3 Provide the model and serial number The serial number is located on the front of the unit as shown in Figure 1 The serial number begins with a letter for example R09 101331100 4 At Cybex s discretion the technician may request that you return the problem part s to Cybex for evaluation and repair or replacement The technician will assign you an RMA number and will send you an...

Страница 77: ...s possible Upon discovery of the damage a written or phone request to the carrier asking them to perform an inspection of the materials must be made within ten days of the date of delivery Keep all shipping containers and packing materials they will be needed as part of the inspection process The carrier will provide you with an inspection report and the necessary forms for filing a concealed dama...

Страница 78: ...EAT ADJUSTING 29 1 FS 18063 PLATE SEAT POST STOP FRAME 30 1 FS 18220 COVER LOWER CONTROLLER 530C 31 1 FS 18261 PLATE CONSOLE CABLE CONNECTOR 32 2 HN 11136 KEPS 5 16 18 HEX STL ZINC 33 4 HS 13765 SCREW 10 32 X 1 0 SCHD STL ZN 34 1 HN 41157 NUT 7 8 24 LH 86A ZN 35 2 HS 11874 BOLT LOCK 1 4 20 X 75 G5 37 10 HS 15706 SCREW 8 16 X 50 PNHD STL BLK ZN C 39 2 HS 15763 BOLT 1 4 20 X 375 FLHD NYLOCK 40 4 HS ...

Страница 79: ...ATING 84 4 HX 18407 CAP ROUND 563 ID X 54 L LDPE 87 2 FS 18014 BRACKET SAFETY STOP REMOVABLE 88 4 HS 11347 BOLT 1 4 20 X 0 75 SCHD BTN BLK 100 1 AF 17899 WELDMENT FRAME 530C 101 1 AF 17970 WELDMENT MID TUBE 530C 102 1 AF 18270 WELDMENT CONSOLE SUPPORT 530C 200 1 AC 18234 4 ASSY CONSOLE 530C ENGLISH 201 1 AX 18297 4 ASSY ACCESSORY TRAY 530C ENGLISH 202 1 DE 18248 4 LABEL CALIBRATION BRAKE GEN ENGLI...

Страница 80: ...RIGHT 364 4 HB 18056 BUSHING FLANGE 375 X 469 X 25 365 2 HB 18059 IDLER WHEEL 1 88 X 1 15 366 2 HN 42043 NUT 3 8 16 FLANGED SS BO 367 1 AF 18053 BRACKET SPRING TENSIONER LEFT 373 1 FM 54075 RACE CRANK LEFT 374 2 HB 44062 BEARING RADIAL BALL 30 MM W SEALS 375 1 FM 54074 RACE CRANK RIGHT 401 1 DE 50122 LABEL SEAT POSITION 401 1 DE 20713 LABEL SEAT POSITION IFI 402 4 HS 18298 BOLT 5 16 18 X 88 BTHD C...

Страница 81: ...TROLLER 530R 31 12 HS 15706 SCREW 8 16 X 50 PNHD STL BLK ZN 32 4 HN 11136 KEPS 5 16 18 HEX STL ZINC 33 4 HS 13765 SCREW 10 32 X 1 0 SCHD STL ZN 34 4 HW 00123 WASHER SAE NO 10 STL ZINC 35 4 HS 18294 SCREW SEMS 10 32 X 38 SLOT HXHD 36 3 HS 18374 SCREW SEMS 6 32 X 875 PNHD PHIL 37 4 HS 18289 SCREW SLFTP 10 X 1 5 STL ZN BLK 38 18 HW 53018 WASHER 5 16 SPLIT SS BLK 40 4 HS 18127 BOLT 1 4 20 X 1 25 BHCS ...

Страница 82: ...H 202 1 DE 18248 4 LABEL CALIBRATION BRAKE GEN ENGLISH 203 1 DE 18186 4 DECAL WARNING ENG 204 1 DE 18362 4 DECAL CAUTION MOVING PARTS ENGLISH 205 1 DE 18363 4 LABEL WARNING HOT FLYWHEEL ENGLISH 206 1 LT 18171 4 MANUAL 530C 530R ENGLISH 207 1 LT 03051 SIGN FACILITY SAFETY 301 1 AD 17872 PCA 530 MAIN DISPLAY 302 1 AD 18025 PCA BATTERY CHARGER DISPLAY 303 1 AF 18076 PLATE CONSOLE MOUNTING 304 1 AX 18...

Страница 83: ...AF 18000 WELDMENT SHUTTLE HANDLE 452 1 AX 17578 ASSY CONTACT GRIP PAIR 453 4 AX 18148 ASSY SEAT SHUTTLE WHEEL 454 1 AW 17882 CABLE CHR GRIPS 530R 456 2 CW 18141 WHEEL LOWER RIGHT TAPERED 457 2 CW 18144 WHEEL LOWER LEFT BEVELED 458 4 FM 18143 SPACER LOWER SHUTTLE WHEEL 459 4 FS 18023 PLATE WHEEL TENSION ADJUSTER 460 2 HB 18121 BUSHING FLANGED PLASTIC 5 16 ID 461 2 HN 11925 KEPS 10 32 HEX STL ZN 462...

Страница 84: ...43 LABEL CYBEX 492 2 DE 18281 DECAL MODEL NAME 530R 497 1 SK 18450 FAN 92 X 25 MM 12V 498 4 HS 18320 SCREW 6 19 X 1 2 PNHD PHIL ZN 501 1 DE 18181 4 LABEL 530 INSTRUCTIONS ENGLISH 502 1 DE 18182 4 LABEL HEART RATE ZONE ENGLISH NS N A TR 18230 POWER ADAPTER IEC 320 220 VAC NS N A TR 18231 POWER ADAPTER NEMA 5 15 PLUG 115 VAC ITEM QTY PART NO DESCRIPTION ...

Страница 85: ...25 402 20 22 412 413 411 13 68 30 12 46 40 53 102 SEE CRANK ASSY DETAIL 14 318 Items 322 324 and 325 used on AC 18234 Upright Cycle only 305 315 304 310 320 309 302 306 76 37 311 311 314 316 317 313 301 312 325 324 322 308 303 37 26 84 33 78 81 79 80 202 204 205 200 60 415 416 201 INCLUDES DECALS INCLUDES DECALS INCLUDES DECALS INCLUDES DECAL SEAT PAD AND HARDWARE 530C Upright Cycle CRANK ASSEMBLY...

Страница 86: ...0 477 7 100 6 101 13 492 491 75 203 28 47 31 31 31 47 47 47 47 498 497 53 9 51 201 25 49 52 53 53 12 54 54 65 65 59 47 3 58 55 60 200 16 20 22 21 2 30 43 40 502 501 41 38 47 35 27 24 48 78 56 56 66 27 91 76 36 70 32 64 37 38 484 482 27 66 48 47 490 486 488 487 38 31 35 44 63 SEE SEAT ASSY DETAIL SEE CONSOLE ASSY DETAIL INCLUDES DECALS SEE BRAKE ASSY DETAIL INCLUDES DECALS INCLUDES DECALS 19 SEE CR...

Страница 87: ...A V MONITOR CP 20794 ATSC NTSC CP 20665 SECAM PAL Cybex 530C and 530R Owner s Manual Cybex 530C Schematic Service Page 6 13 ...

Страница 88: ...A V MONITOR CP 20794 ATSC NTSC CP 20665 SECAM PAL Service Page 6 14 Cybex 530R Schematic Cybex 530C and 530R Owner s Manual ...

Отзывы: