14
Section 6 Electrosurgical Precautions
The safety and effectiveness of electrosurgery is dependent to a large degree upon the skill of the user/
operator . It is important that the user/operator read, understand, and follow these operating instructions
supplied with the CooperSurgical LEEP PRECISION Generator as well as thoroughly understand the
principles and use of electrosurgical systems .
WARNING
Electrosurgery uses radio-frequency energy to cut and coagulate tissue . Because of the sparking and heat
associated with electrosurgery, do not use with flammable anesthetics or other flammable gases, near
flammable fluids or objects, or with oxidizing agents .
• Skin-to-skin contact, for instance between the patient’s arm and body, should be avoided by the
placement of an appropriate separating device, such as two to three inches of dry gauze . This will reduce
the potential for alternate site burns .
• If monitoring, stimulation, imaging, or similar devices are used simultaneously with electrosurgery, the
monitoring electrodes must be placed as far as possible from the electrosurgery site and the Patient
Return Electrode . Position the Patient Return Electrode close to the electrosurgery site, for example, on
the thigh when treating the cervix . NOTE: Monitoring Needle Electrodes are not recommended .
Section 7 LEEP PRECISION Smoke Evacuator Operation
7.1 Automatic Mode Option
The CooperSurgical Smoke Evacuation System is set up to operate automatically from the LEEP PRECISION
Generator . This is accomplished by means of a special Infrared Light Emitting Diode (IR LED) in the Integration
Unit, which is mounted on the LEEP PRECISION Generator’s rear panel . When the R/F Output is activated by
the operator, the rear panel LED produces an output that is received by the interface module of the interface
assembly . The motor will come ON and stay ON for five (5) seconds after the energized output is terminated .
7.2 Purge Button
The LEEP PRECISION Smoke Evacuator may also be tested or used without the LEEP PRECISION Generator
output by pressing PURGE on the front panel . The motor will stay on for five (5) seconds after the button is
released . Most purge operations (removing excess smoke) take only a few seconds .
Section 8 Setup and Operation of the LEEP PRECISION Generator
8.1 Practice
Cutting and coagulating are described in the following section . First, practice methods are suggested, including
how to adjust the settings for optimal cutting and coagulating . Then general techniques are described, which
should help determine and develop the best specific techniques .
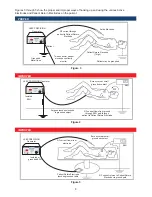
1 . Place the console on a flat, stable surface near the Smoke Evacuator .
2 . Connect the A/C power cord(s) accordingly . Plug the removable Foot Switch into the front panel if foot
control is desired . Set it up in a convenient low-traffic area .
3 . Set the ON/OFF switch to OFF, and plug the console into a grounded 120 VAC or a grounded 230 VAC
electrical receptacle . This is an important safety feature .
4 . Use only CooperSurgical-approved disposable accessories . See pages 18 and 19 for further information .
5 . Remove the disposable Patient Return Electrode from its packaging and attach it to the patient in
accordance with the instructions . Be sure to follow all instructions regarding the location of the Patient
Return Electrode, to ensure that good contact is made with the patient .
6 . Attach the Patient Return Electrode securely to the Dispersive Electrode Socket on the LEEP
PRECISION Generator’s front panel .
8
Содержание LEEP PRECISION LP-20-120
Страница 24: ...24 CUT mode 16 1 Power Output Characteristics ...
Страница 25: ...25 CUT mode BLEND mode COAG mode 16 2 Power Output at Various Load Resistance ...
Страница 52: ...52 16 1 Eigenschaften der Ausgangsleistung ...
Страница 53: ...53 16 2 Leistung bei variablem Lastwiderstand ...
Страница 80: ...80 16 1 Características de la potencia de salida ...
Страница 81: ...81 16 2 Potencia de salida con diferentes resistencias de carga ...
Страница 108: ...108 16 1 Caractéristiques de sortie de puissance ...
Страница 109: ...109 16 2 Sortie de puissance à résistance de charge variable ...
Страница 136: ...136 16 1 Caratteristiche della potenza in uscita ...
Страница 137: ...137 16 2 Potenza in uscita a diverse resistenze di carico ...
Страница 164: ...164 16 1 Características de potência de saída ...
Страница 165: ...165 16 2 Potência de saída a várias resistências de carga ...
Страница 192: ...192 16 1 功率輸出特徵 ...
Страница 193: ...193 16 2 各種負載電阻下的功率輸出 ...
Страница 199: ...Notes Notizen Notas Notes Note Notas 備註 198 ...


