95
6.4 Wireless Bridge
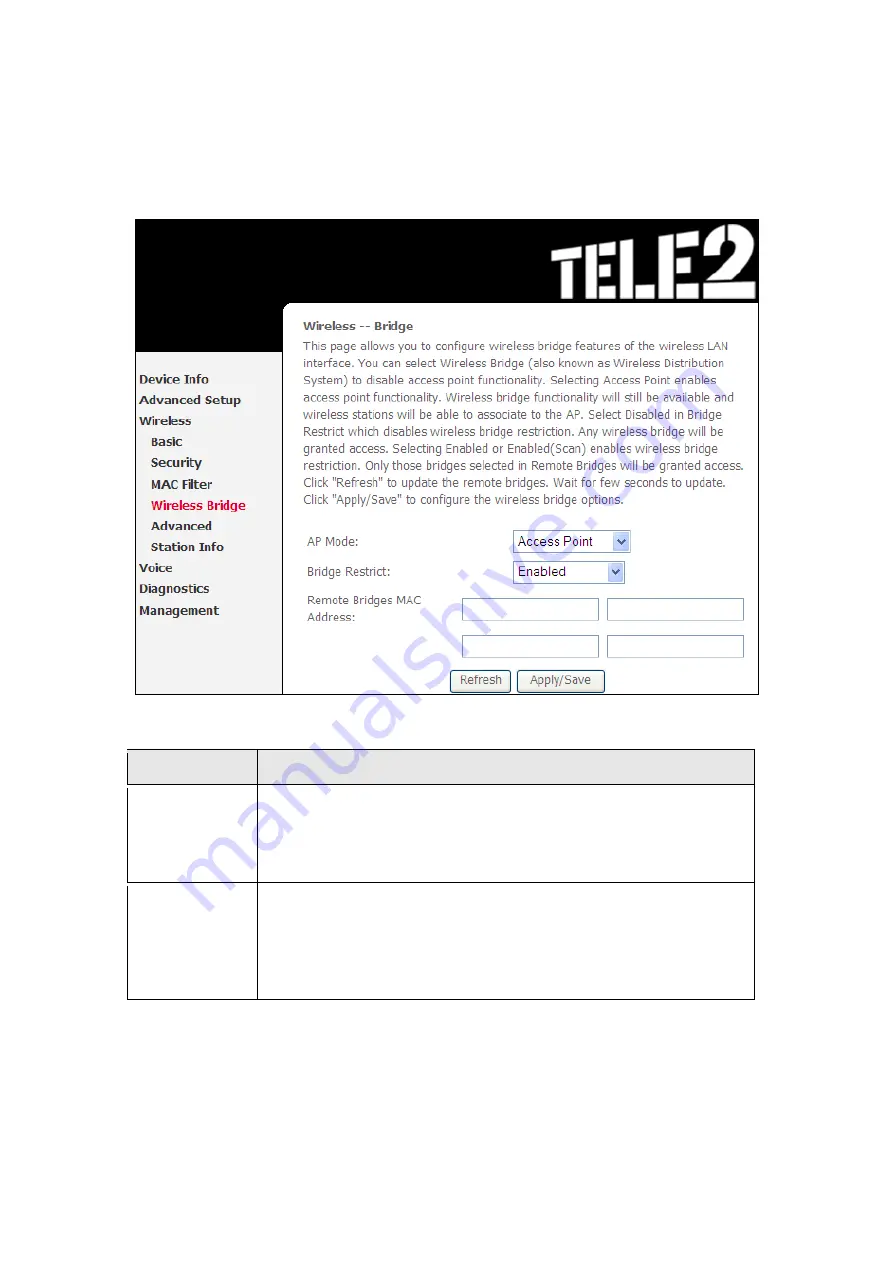
This screen allows for the configuration of wireless bridge features of the WLAN
interface. See the table beneath for detailed explanations of the various options.
Click
Apply/Save
to implement new configuration settings.
Feature
Description
AP Mode
Selecting
Wireless Bridge
(aka Wireless Distribution System)
disables Access Point (AP) functionality, while selecting
Access
Point
enables AP functionality. In
Access Point
mode, wireless
bridge functionality will still be available and wireless stations
will be able to associate to the AP.
Bridge Restrict Selecting
Disabled
disables wireless bridge restriction, which
means that any wireless bridge will be granted access.
Selecting
Enabled
or
Enabled (Scan)
enables wireless bridge
restriction. Only those bridges selected in the Remote Bridges
list will be granted access. Click
Refresh
to update the station
list when Bridge Restrict is enabled.
Содержание VI-3223u
Страница 1: ...VI 3223u Multi DSL WLAN IAD User Manual Version B1 0 July 19 2013 261099 020...
Страница 7: ...6 1 2 Application The following diagram depicts a typical application of the VI 3223u...
Страница 16: ...15 STEP 3 After successfully logging in for the first time you will reach this screen...
Страница 26: ...25...
Страница 32: ...31 Chapter 5 Advanced Setup The following screen shows the advanced menu options...
Страница 67: ...66 5 11 UPnP Select the checkbox provided and click Apply Save to enable UPnP protocol...
Страница 72: ...71 5 15 1 Storage Device Info Display after storage device attached for your reference...
Страница 74: ...73 Automatically Add Clients With Following DHCP Vendor IDs...
Страница 98: ...97 Click Apply Save to set new advanced wireless options...
Страница 103: ...102 7 1 SIP Basic Setting 7 1 1 Global Parameters A common parameter setting...
Страница 104: ...103 7 1 2 Service Provider This screen contains basic SIP configuration settings...
Страница 106: ...105 7 2 SIP Advanced This screen contains the advanced SIP configuration settings...
Страница 107: ...106 7 2 1 Global Parameters A common parameter setting...
Страница 144: ...143 STEP 6 Click Have Disk and insert the printer driver CD STEP 7 Select driver file directory on CD ROM and click OK...
Страница 146: ...145 STEP 11 Check the status of printer from Windows Control Panel printer window Status should show as Ready...
Страница 172: ...171 Click Next to continue or click Back to return to the previous step...


