13
STATIC IP MODE
In static IP mode, you assign IP settings to your PC manually.
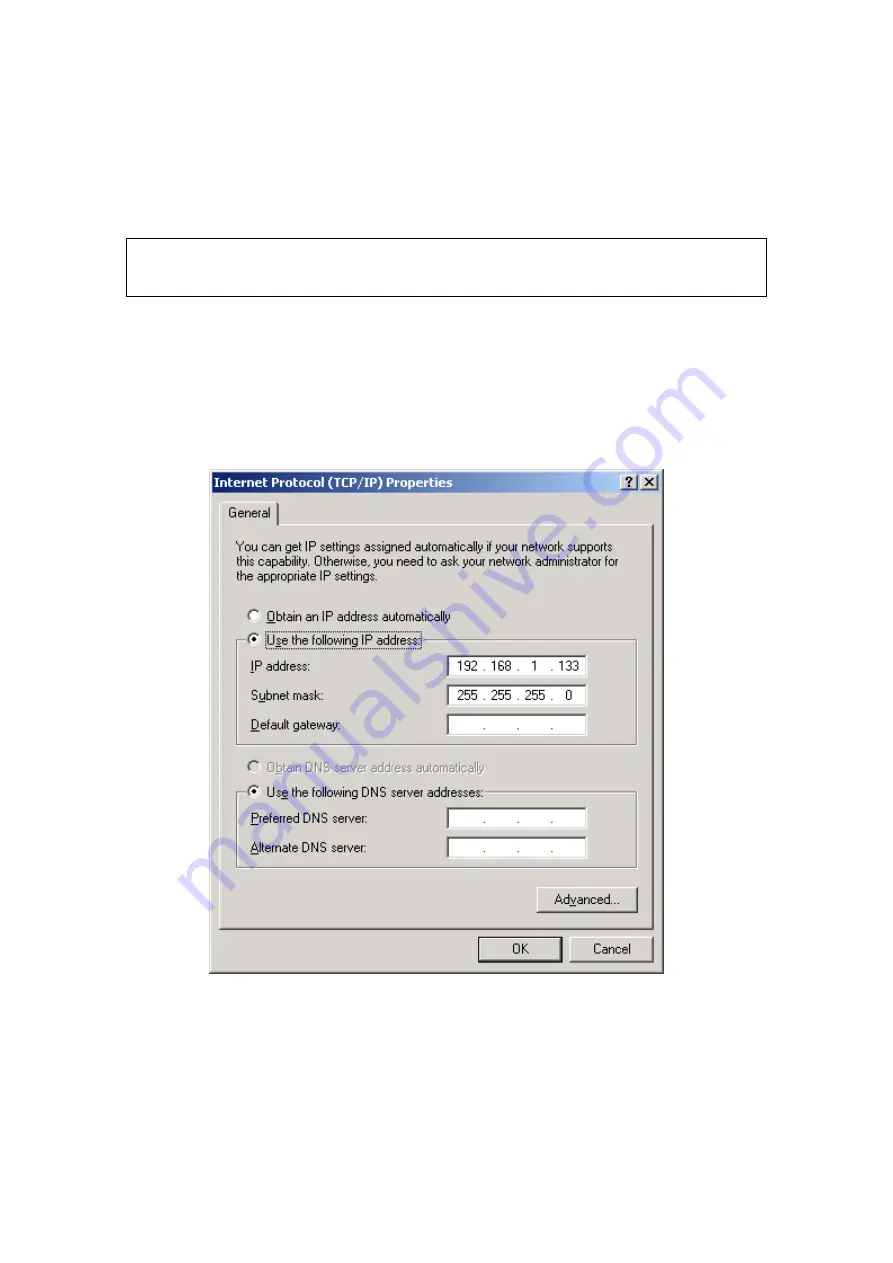
Follow these steps to configure your PC IP address to use subnet 192.168.1.x.
NOTE:
The following procedure assumes you are running Windows XP.
However, the general steps involved are similar for most operating
systems (OS). Check your OS support documentation for further details.
STEP 1
: From the Network Connections window, open Local Area Connection (
You
may also access this screen by double-clicking the Local Area Connection
icon on your taskbar
). Click the
Properties
button.
STEP 2
: Select Internet Protocol (TCP/IP)
and click the
Properties button.
STEP 3:
Change the IP address to the 192.168.1.x (1<x<255) subnet with subnet
mask of 255.255.255.0. The screen should now display as shown below.
STEP 4:
Click
OK
to submit these settings.
Содержание VI-3223u
Страница 1: ...VI 3223u Multi DSL WLAN IAD User Manual Version B1 0 July 19 2013 261099 020...
Страница 7: ...6 1 2 Application The following diagram depicts a typical application of the VI 3223u...
Страница 16: ...15 STEP 3 After successfully logging in for the first time you will reach this screen...
Страница 26: ...25...
Страница 32: ...31 Chapter 5 Advanced Setup The following screen shows the advanced menu options...
Страница 67: ...66 5 11 UPnP Select the checkbox provided and click Apply Save to enable UPnP protocol...
Страница 72: ...71 5 15 1 Storage Device Info Display after storage device attached for your reference...
Страница 74: ...73 Automatically Add Clients With Following DHCP Vendor IDs...
Страница 98: ...97 Click Apply Save to set new advanced wireless options...
Страница 103: ...102 7 1 SIP Basic Setting 7 1 1 Global Parameters A common parameter setting...
Страница 104: ...103 7 1 2 Service Provider This screen contains basic SIP configuration settings...
Страница 106: ...105 7 2 SIP Advanced This screen contains the advanced SIP configuration settings...
Страница 107: ...106 7 2 1 Global Parameters A common parameter setting...
Страница 144: ...143 STEP 6 Click Have Disk and insert the printer driver CD STEP 7 Select driver file directory on CD ROM and click OK...
Страница 146: ...145 STEP 11 Check the status of printer from Windows Control Panel printer window Status should show as Ready...
Страница 172: ...171 Click Next to continue or click Back to return to the previous step...


