3. For 2 ton units, assemble a slotted nut to one
end of each suspension bolt and secure it using a
cotter pin. Spread legs of cotter pin to keep it in
place. Using Table 2 as a reference for washer
spacing, assemble side frames and bolts and
washers together as shown below. Do not install
remaining cotter pins at this time. These are to
be installed after the trolley is mounted on the
beam.
For 3-7½ ton units, temporarily assemble trolley to
hoist using 3 or 4 washers at each end of suspension
pins, between side plates and suspension lug. Tighten
pin nuts for accurate check of spacing. Measure the
distance between the inside faces of the trackwheel
flanges and compare to the dimension required.
Remove trolley side plates and add or remove an
equal number of inside spacer washers as required to
obtain proper distance between wheels. When spac-
ing is correct, install all remaining spacer washers on
the outside ends of each suspension pin and secure
the pins with lockwashers and hex nut (See Note
Below). The nuts should not be completely tightened
until after hoist and trolley are mounted onto beam.
NOTE: It is very important that all spacer
washers that come with the trolley be
used. Install remaining spacer washers
equally on outside ends of each
suspension pin.
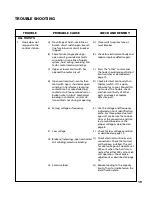
4. On geared and motor driven trolleys, make sure
the handwheel or motor is on loose end/chain
container side of the hoist.
INSTALLING TROLLEY SUSPENDED HOIST ON
BEAM
Stops must be positioned to contact the trolley side
frames and not exert impact force on the hoist.
Trolleys are mounted on the hoist prior to shipment and side
frames are positioned for the nominal beam flange specified
on the order. However, due to variations in beam flange
widths, actual beam flange width should be measured to
determine the exact distribution of the spacer washers. See
Mounting Trolley On Hoist Section.
WARNING
Operating the trolley on a beam that has no rail stops
may allow the trolley to fall off the end of the beam.
TO AVOID INJURY:
Install rail stops at each end of the beam on which
the trolley is to operate.
WARNING
If washer spacing recommendations are not followed, trol-
ley may fall from beam.
TO AVOID INJURY:
Measure the actual beam flange on which the trolley
is to operate and use Table 2 to determine the
arrangement of the spacer washers for that flange
width.
NOTE: USE OF OTHER THAN SUPPLIED SPACER WASHERS
MAY CAUSE IMPROPER TRACKWHEEL SPACING.
!
Table 2. Trolley Spacer Washer Arrangement
A
B
C
D
3-3/8 (85.7)
13
0
0
13
3-5/8 (92.0)
11
2
2
11
3-7/8 (98.4)
10
3
4
9
4 (101.6)
9
4
4
9
Standard
4-1/8 (104.7)
8
5
5
8
Trolleys
4-5/8 (117.4)
5
8
8
5
5 (127.0)
3
10
10
3
5-1/8 (130.1)
3
10
11
2
5-1/4 (133.3)
2
11
12
1
5-1/2 (139.7)
0
13
13
0
5-5/8 (142.9)
12
1
1
12
6 (152.4)
10
3
3
10
6-1/4 (158.7)
9
4
5
8
6-3/8 (161.9)
8
5
6
7
Special
7 (177.8)
4
9
9
4
Trolleys
7-1/8 (181.0)
3
10
10
3
7-1/4 (184.1)
3
10
11
2
7-3/8 (187.3)
2
11
12
1
7-1/2 (190.5)
1
12
12
1
7-5/8 (193.7)
0
13
13
0
* Minimum Beam
Radius ft.(M)
4’-0”(1.22)
*Dimension applies to minimum S-beam and will
vary with larger S-beams
Flange
Width
in.(mm)
2 Ton
No. of Washers
!
Figure 2.
Figure 1.
QUANTITY OF
OUTSIDE WASHERS
SHOULD BE EQUAL
-BOTH SIDES
QUANTITY OF
INSIDE WASHERS
SHOULD BE EQUAL
-BOTH SIDES
7
Содержание Lodestar XL
Страница 4: ...iii ...
Страница 31: ...27 TWO SPEED HOIST ONLY 2 TON TWO SPEED HOIST WITH TROLLEY ...
Страница 32: ...28 3 7 TON SINGLE SPEED HOIST WITH TROLLEY 3 7 TON 2 SPEED HOIST WITH SINGLE SPEED TROLLEY ...
Страница 42: ...39 40 2 TON ANTI TIPPING BRACKET KIT 670 464 ...
Страница 45: ...43 3 THRU 7 TON PLAIN GEARED AND MOTOR DRIVEN TROLLEYS EXPLODED VIEW 29 ANTI TIPPING BRACKET KIT ...
Страница 51: ...49 NOTES ...


