9
PANNELLO DI CONTROLLO
CONTROL PANEL
PANNEAU DE CONTROLE
STEUERPULT
PANNEL DE CONTROL
I
GB
D
E
F
®
CLAY PAKY
S.p.A.
Via Pastrengo, 3/b
24068 Seriate (BG) ITALY
Tel. +39 035 654311
3
= SIGNAL
2
= SIGNAL
1
= SCREEN
DIGITAL INPUT DMX 512
Code:
C11072
Serial Number:
VOLTAGE
230V 50Hz
240V 50Hz
208V 60Hz
200V 50Hz
200V 60Hz
POWER
3000VA
PFC
1500VA
13
Continua / Continue
➔
LED
Verde
Green
Vert
Grün
Verde
Giallo
Yellow
Jaune
Gelb
Amarillo
Rosso
Red
Rouge
Rojo
Rot
Acceso se il segnale DMX è presente
Is lit if the DMX signal is present
Allumé si le signal DMX est présent
Leuchtet, wenn das Signal DMX vorhanden ist
Encendido si la señal DMX está presente
Lampeggia se il segnale DMX è assente
Blinks if the DMX signal is not present
Clignote si le signal DMX est présent
Blinkt, wenn das Signal DMX fehlt
Parpadea si la señal DMX no está presente
Non usato
Not used
Non utilisé
Nicht belegt
No utilizada
Acceso quando il display è in fase di impostazione
Is lit when the display is in the setting phase
Allumé quand l’afficheur est en phase de sélection
Leuchtet, wenn sich das Display in der Einstellphase befindet
Encendido cuando la pantalla está en fase de programación
Spento quando il display è in fase di riposo
Is off when the display is in the rest mode
Éteint quand l’afficheur est en état de repos
Ist ausgeschaltet, wenn sich das Display in Ruhestellung befindet
Apagado cuando la pantalla está en estado de reposo
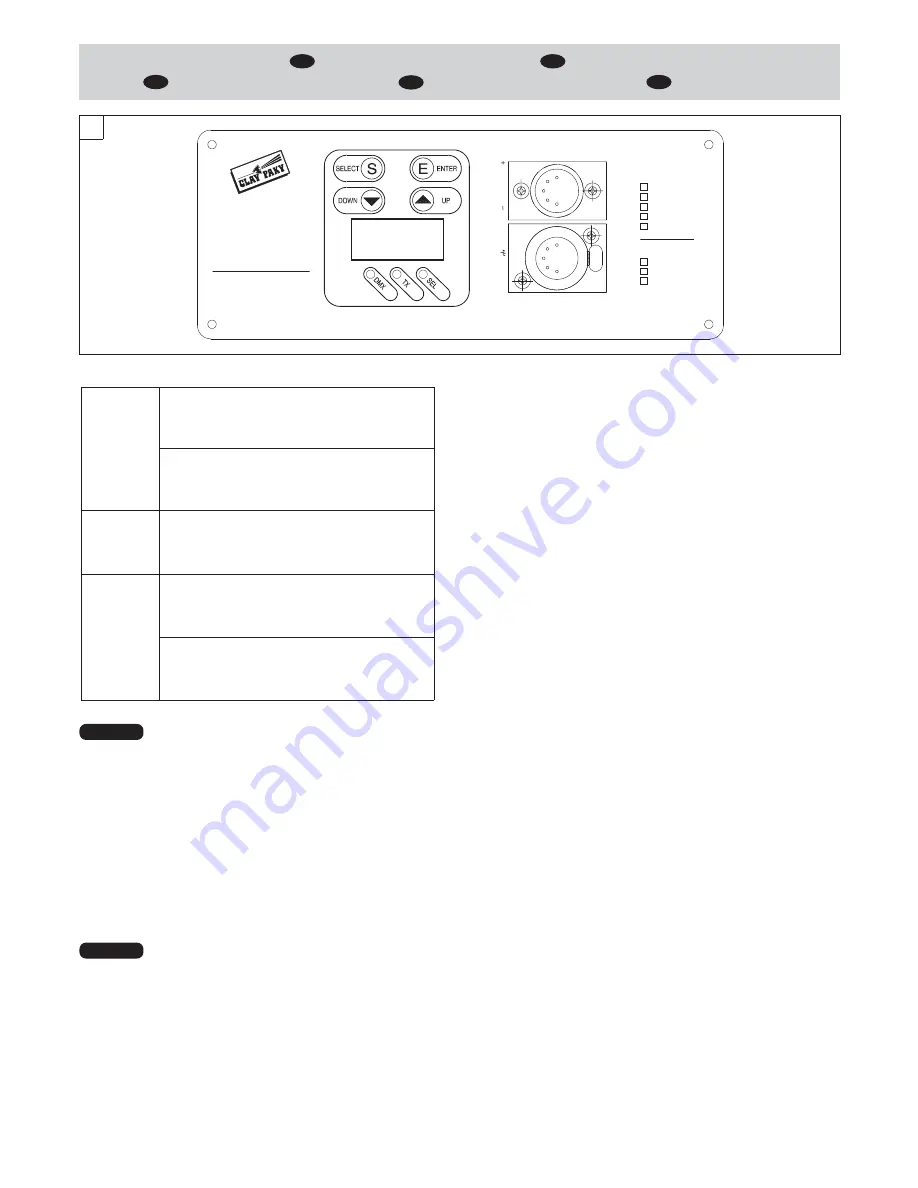
Sul pannello di controllo (figura 13) sono presenti il display, i led e dei pulsanti che permettono
la corretta configurazione del proiettore.
The control panel (fig. 13) has a display, LEDs and buttons for configuring the projector
correctly.
Sur le panneau de contrôle (figure 13) le display, les led et des touches sont présents
permettant de configurer correctement le projecteur.
Auf dem Steuerpult befinden (Abb. 13) sich das Display, die Leds und die Tasten, mit denen
man den Projektor korrekt einstellen kann.
En el panel de control (figura 13) están presentes la pantalla, los led y pulsadores que permiten
la configuración correcta del proyector.
Funzioni dei tasti:
Sono presenti quattro tasti che consentono la completa programmazione e gestione del
proiettore.
Functions of the buttons:
There are four buttons used for the complete programming and management of the projector.
Fonctions des touches :
Quatre touches sont présentes permettant la complète programmation et gestion du projecteur.
Funktionen der Tasten:
Der Projektor kann mit vier Tasten vollständig programmiert und gesteuert werden.
Funciones de las teclas:
Están presentes cuatro teclas que permiten la completa programación y control del proyector.
Tasto SELECT
• Se viene premuto in stato di riposo: Commuta ciclicamente fra lo stato di riposo, l’impostazione dell’indirizzo DMX e le impostazioni nei menu.
• Se viene premuto durante l’impostazione di un menu: Sale di un livello senza modificare nulla (esce dalla funzione).
Tasto DOWN
Decrementa il valore visualizzato (con auto-ripetizione), oppure passa alla voce seguente di un menu.
Per passare rapidamente al valore minimo di un parametro, oppure alla prima voce di un menu, premere il tasto UP mentre si tiene premuto DOWN.
Tasto UP
Incrementa il valore visualizzato (con auto-ripetizione), oppure passa alla voce precedente di un menu.
Per passare rapidamente al valore massimo di un parametro, oppure all’ultima voce di un menu, premere il tasto DOWN mentre si tiene premuto UP.
Tasto ENTER
Conferma il valore visualizzato, oppure attiva la funzione visualizzata, oppure entra nel menu successivo. Si noti che fino a quando non si preme ENTER, nessuna impostazione viene confermata.
Inversione del display
Per attivare questa funzione, premere contemporaneamente UP e DOWN mentre il display si trova nello stato di riposo. La condizione viene memorizzata e viene mantenuta anche alle
successive accensioni. Per tornare allo stato iniziale, ripetere nuovamente la funzione.
ITALIANO
DMX
SEL
TX
SELECT button
• If it is pressed to the rest mode: Switches over in cyclical movements between rest mode, DMX address setting and the settings in the menu.
• If it is pressed while setting a menu: Goes to the upper level without changing anything (exits from the function).
DOWN button
Decreases the value displayed (with auto-repetitions) or passes to the next item in the menu.
For a quick access to a parameter’s minimum value or to the first item of a menu, press the UP button while holding down the DOWN button.
UP button
Increases the value displayed (with auto-repetitions) or passes to the next item in a menu.
For a quick access to a parameter’s maximum value or to the first item of a menu, press the DOWN button while pressing the UP button.
ENTER button
Confirms the displayed value, or activates the displayed function, or enters the successive menu. If ENTER is not pressed no settings will be confirmed.
Reversal of the display
To activate this function, press UP and DOWN buttons simultaneously while the display is in the rest mode. This status will be memorised and maintained even for the next time it will be switched
on. To return to the initial state, repeat the operation all over again.
ENGLISH


