3-50
Cisco ONS 15454 DWDM Installation and Operations Guide, R6.0
September 2005
Chapter 3 Turn Up a Node
NTP-G34 Install Fiber-Optic Cables on DWDM Cards and DCUs
•
Unit-2—The ONS 15454 DWDM card (unit) that is installed in the Position-2 slot.
•
Port #2—The port identifier shown in CTC for the first Position-2 connection.
•
Port ID-2—The port identifier shown in TL1 for the Position-2 connection.
•
Port Label-2—The name of the physical port printed on the card’s front plate and shown in CTC
card view for the Position-2 connection.
•
Manually Set—Indicates whether you must create the connection manually in CTC. A Yes
appearing in this column means that you must create the connection manually.
Caution
Failure to create the required manual connections will prevent the node from turning up properly.
Step 3
Verify that fibers are available to complete the connections shown in the Internal Connections table.
Step 4
Complete the
“NTP-G115 Clean Fiber Connectors” procedure on page 13-25
for all fiber connections,
even new fiber. Dust particles can degrade performance. Put caps on any fiber connectors that are not
used.
Step 5
If you will not perform node acceptance tests for this site, complete the
Cables for OSC Link Terminations Between Two Adjacent Nodes” task on page 3-51
. Otherwise,
continue with
.
Step 6
On the front of the fiber-storage tray (usually installed below the node you are fibering), push the tabs
on the left and right sides inward to release the lock on the tray.
Step 7
Pull the fiber-storage tray away from the shelf until it is fully opened.
Step 8
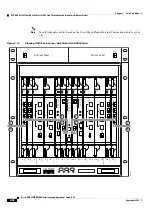
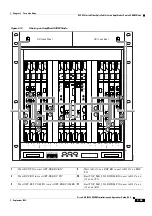
Open the fold-down door that at the bottom of the shelf assembly to expose the cable-routing channel
(
).
Step 9
Using the Cisco MetroPlanner Internal Connection table, install the fiber-optic cables. Steps provided in
the following tasks can be used as general guidelines; however, the fiber-optic cabling at your site will
probably differ from the examples shown in the tasks.
•
DLP-G66 Install Fiber-Optic Cables for a Hub Node, page 3-54
•
DLP-G67 Install Fiber-Optic Cables for a Terminal Node, page 3-56
•
DLP-G68 Install Fiber-Optic Cables for a Line Amplifier Node, page 3-58
•
DLP-G69 Install Fiber-Optic Cables for an OSC Regeneration Node, page 3-60
•
DLP-G70 Install Fiber-Optic Cables for an Amplified or Passive OADM Node, page 3-63
•
DLP-G71 Install Fiber-Optic Cables for an ROADM Node, page 3-68
Step 10
To close the fiber-storage tray, push the tray back toward the rack until it locks into place.
Stop. You have completed this procedure.
Содержание ONS 15454 DWDM
Страница 38: ...Figures xxxviii Cisco ONS 15454 DWDM Installation and Operations Guide R6 0 August 2005 ...
Страница 54: ...Procedures liv Cisco ONS 15454 DWDM Installation and Operations Guide R6 0 August 2005 ...
Страница 64: ... 64 Cisco ONS 15454 DWDM Installation and Operations Guide R6 0 August 2005 Chapter ...

