Chapter 7 Inspect the Modulator
130
4004834 Rev D
6
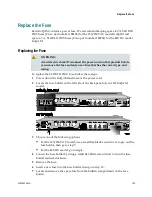
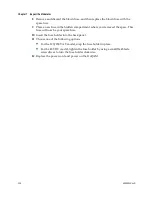
Carefully remove the screws and sleeves that secure the fan unit to the side panel
and place them in a safe location nearby.
Important:
The sleeves are loose and are not connected to the fan. Be careful not
to drop them.
7
Remove the non-functioning fan unit and carefully disconnect the 9-pin
connector. Set this fan unit aside for safe disposal later.
8
Hold the new fan unit in place on the side panel of the GoQAM so that the rotor
with three fan blades is visible.
9
Place the sleeves in the proper location on the fan (as shown in the diagram),
insert the screws through the sleeves, and then carefully tighten the screws that
secure the fan to the side panel.
Important:
Do not over tighten or cross thread the screws!
10
Carefully insert the 9-pin connector into the 9-pin socket, and then replace and
carefully tighten the screws that secure the 9-pin connector to the side panel.
Important:
Do not over tighten or cross thread the screws!
11
Did you have to remove the GoQAM completely from the rack?
If
yes
, go to step 13.
If
no
, go to step 12.
12
Replace the GoQAM into its original position in the rack and secure it in the rack
using the original screws. Then, go to step 14.
13
Replace the GoQAM into its original position in the rack, secure it in the rack
using the original screws, reconnect all cables, reconnect the power cord, and
then power on the GoQAM.
14
Does the new fan unit operate properly?
If
yes
, you have completed this procedure.
If
no
, contact Cisco Services for assistance.
Содержание GoQAM
Страница 1: ...GoQAM Modulator RF Output and IF Output Hardware Installation and Operation Guide ...
Страница 2: ......
Страница 8: ......
Страница 14: ......
Страница 30: ......
Страница 52: ......
Страница 67: ...Provision GoQAMs on the DNCS 4004834 Rev D 51 ...
Страница 68: ......
Страница 116: ......
Страница 138: ......
Страница 164: ......
Страница 176: ......

