background image

Section 3: Operation

Roadie HD+35K User Manual

3-33

020-100340-02 Rev. 1  (01-2010)

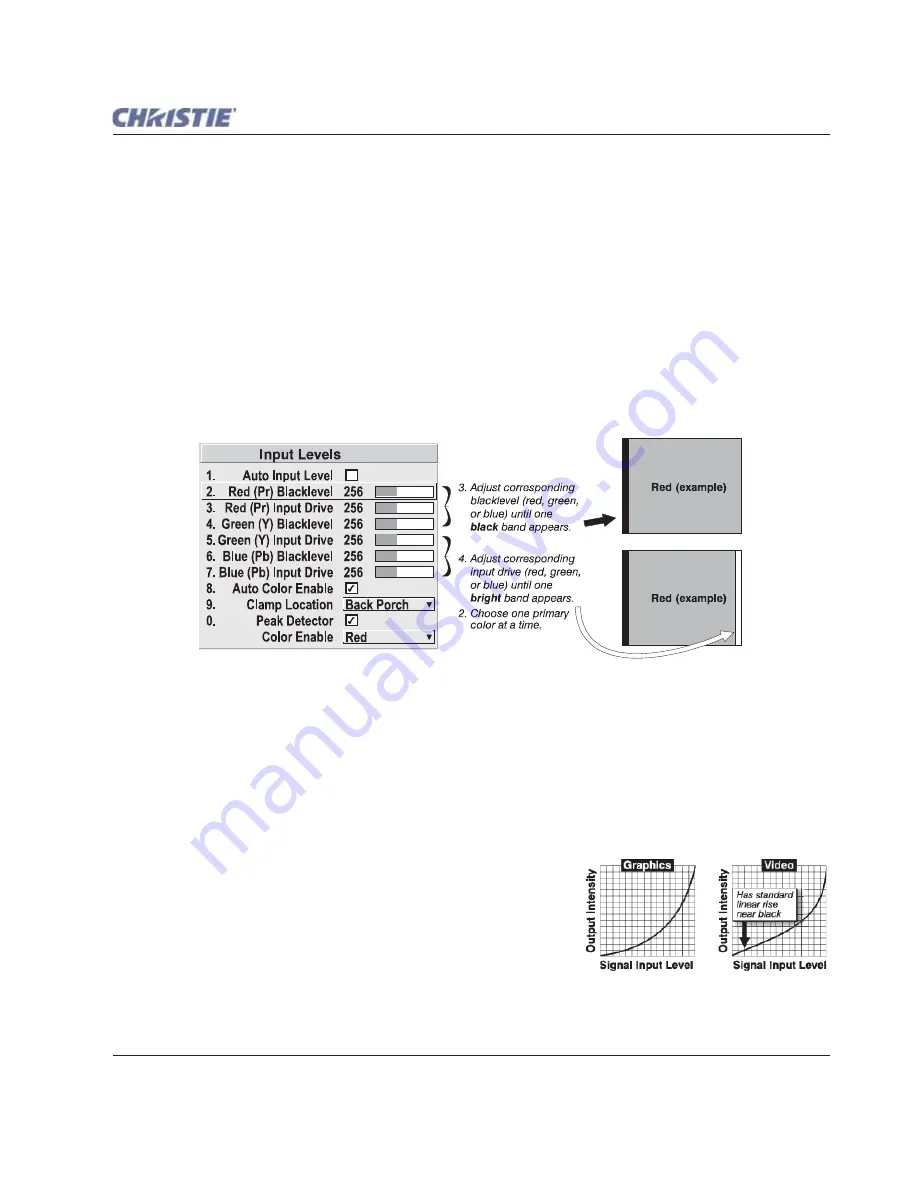
3. For the current color, adjust its corresponding "Blacklevel" slidebar just until a single band of black 

appears at one edge of the screen. This band represents the first band of the grayscale pattern, which 
should be 100% black. Do not adjust too far.

4. With the same color still active, adjust its corresponding "Input Drive" slidebar just until a single band of 

color appears at the opposite edge of the screen. This band represents the last band of the grayscale pattern, 
which should be 100% white (or the current color, if a certain color is enabled). Do not adjust too far.

5. It may be advantageous to go back and check the black band. You can adjust the blacklevel using the 

slidebar if necessary. 

NOTE: 

Re-adjusting blacklevels at this point affects the gain; only re-adjust if absolutely necessary. Adjust until 
both bands are just optimized.

6. Repeat Steps 2-5 with the other two remaining primary colors. When each primary color shows 

one


optimized black band and white (or colored) band, the input levels for this source are correctly set. Upon 
exiting the 

Input Levels

 menu, the Peak Detector check box is cleared.

 Figure 3-18   Adjusting Input Levels Using the Peak Detector  (

RED EXAMPLE SHOWN

)

Advanced Image Settings

Use the 

Advanced Image Settings

 secondary menu to adjust lesser-used options used for more specialized 

applications.

Gamma Table

This control applies a default video, graphics or simple gamma table or "curve" to your images, controlling the 
intensity of midlevel colors and producing maximum contrast, brightness and color performance. 

As shown at right, the graphics curve is a simple power curve while 
the video curve has a linear segment near black to compensate for 
increased blacklevels typical of video signals. A simple gamma 
curve is a value of 2.2 and is correct for most signal conditions. 
Although the projector automatically applies either the graphics or 
video curve according to what type of incoming signal is detected, 
in some cases you may wish to override this default and use 
graphics gamma for a video source or video gamma for a graphics 
source. 

Содержание Roadie HD+35K

Страница 1: ...Roadie HD 35K U S E R M A N U A L 020 100340 02 ...

Страница 2: ......

Страница 3: ...Roadie HD 35K U S E R M A N U A L 020 100340 02 ...

Страница 4: ... quality materials and components that can be recycled and reused This symbol means that electrical and electronic equipment at their end of life should be disposed of separately from regular waste Please dispose of the product appropriately and according to local regulations In the European Union there are separate collection systems for used electrical and electronic products Please help us to c...

Страница 5: ...unting 2 12 2 3 1 Throw Distance 2 12 2 3 2 Vertical Horizontal Position 2 13 2 3 3 Floor Mounting and Leveling 2 15 2 3 4 Tilting and Special Orientations 2 16 2 3 5 Hoisting and Stacking 2 17 2 4 Installing Lens Lamp and Cooling 2 20 2 4 1 Lens Installation 2 20 2 4 2 Install First Lamp 2 22 2 5 Connecting Sources 2 23 2 5 1 RGB Signals 2 25 2 5 2 YPbPr Signals Component Video 2 26 2 5 3 Composi...

Страница 6: ...mizing Brightness 2 46 2 13 4 DMD Convergence 2 46 2 13 5 Fold Mirror Adjustment 2 46 2 14 IR Remote Protocols and Adjustment 2 47 2 14 1 Standard IR Remote Protocols 2 48 2 14 2 Converting a Remote 2 49 3 Operation 3 1 Projector Basics 3 1 3 1 1 Air Filter 3 1 3 1 2 Ballast Breaker Power Switch ON OFF 3 2 3 1 3 Control Panel Rear of Projector 3 2 3 1 4 Handles 3 3 3 1 5 Channels for FredFrame 3 3...

Страница 7: ...a Channel 3 39 3 7 6 Deleting One or More Channels 3 40 3 7 7 Editing a Channel Setup 3 41 3 8 Adjusting System Parameters and Advanced Controls 3 42 3 8 1 System Configuration General Settings 3 42 3 8 2 System Configuration Communication 3 44 3 8 3 System Configuration Geometry Color 3 48 3 8 4 System Configuration Diagnostics Calibration 3 51 3 8 5 System Configuration Optional Input Modules 3 ...

Страница 8: ...Procedure 4 9 4 5 Replacing a Lens 4 10 5 Troubleshooting 5 1 Power 5 1 5 1 1 Projector Does Not Power ON 5 1 5 2 Lamp 5 1 5 2 1 Lamp Does Not Ignite 5 1 5 2 2 Lamp Suddenly Goes OFF 5 1 5 2 3 Flicker Shadows Or Dimness 5 2 5 2 4 LampLOC Does Not Seem to Work 5 2 5 2 5 LiteLOC Does Not Seem to Work 5 2 5 3 Calibrating the Lens Mount 5 3 5 4 Built In Keypad 5 3 5 4 1 Projector ON but No Backlight o...

Страница 9: ... at INPUT 1 6 2 6 3 2 Analog Video INPUTS 3 and 4 6 2 6 3 3 Analog Sync Interlaced or Progressive Scan Format 6 3 6 3 4 DVI I INPUT 2 6 3 6 3 5 Dual SD HD SDI INPUT 5 or 6 Standard with Projector 6 3 6 4 Control 6 4 6 4 1 Wired Remote Converted from IR Remote 6 4 6 4 2 IR Remote 6 4 6 4 3 Ethernet 6 4 6 4 4 RS 232 Serial Input 6 4 6 4 5 RS 422 Serial Input 6 4 6 4 6 GPIO Input 6 5 6 4 7 Control Po...

Страница 10: ...A 1 A 1 1 General Communications A 1 A 1 2 Software Downloads A 1 A 1 3 RS 422 Connections A 1 B Menu Tree B 1 OnScreen Menu Tree B 1 C System Integration C 1 Introduction C 1 C 1 1 Configuring the GPIO C 1 C 1 2 Query Command C 2 C 1 3 Real Time Event C 2 D Optional Input Modules D 1 DVI Input Module D 1 D 2 Dual SD HD SDI Module D 1 ...

Страница 11: ...ble about all potential hazards associated with high voltage ultraviolet exposure and high temperatures generated by the lamp and associated circuits are authorized to 1 assemble install the projector and 2 perform service functions inside the projector This manual contains the following sections Section 1 Introduction Section 2 Installation and Setup Section 3 Operation Section 4 Maintenance Sect...

Страница 12: ...e options appear italicized such as Main menu Preferences User input or messages that appear on screen in status display units or other control modules appear in Courier font For example No Signal Present Login christiedigital Error codes LED status appear in bold e g LP A1 etc Operational states of modules appear capitalized such as switch ON OFF 1 2 Purchase Record and Service Contacts Whether t...

Страница 13: ...ated by a short arc Xenon lamp and then modulated by three Digital Micromirror Device DMDs panels responding to incoming data streams of digitized red green or blue color information As these digital streams flow from the source light from the responding ON pixels of each panel is reflected converged and then projected to the screen through one or more front lenses where all pixel reflections are ...

Страница 14: ... lumens 6kW lamp Standard achievable contrast ratio 500 1 ANSI up to 2800 1 full field ON OFF LampLOC motorized lamp alignment auto or custom adjustment LiteLOC for maintaining brightness over time Internal electromechanical shutter for quick picture mute and black stand by Optional internal optical components for improved contrast ratio and or wider color gamut Inputs There are two different type...

Страница 15: ... Motorized Zoom kit optional lens accessory is available for lens upgrade Special Display Functions Selected Functionality Auto setup Picture in Picture PIP Electronic brightness uniformity whitelevel edge blending and color matching Optional image warping blending for unusual angles and or screens Christie TWIST Input 5 Opt 1 Input 6 Opt 2 Ethernet Input 4 S Video Input 3 Video Input 2 DVI RS422 ...

Страница 16: ...d and convertible IR to wired remote Front and rear IR sensors Ethernet RS232 RS422 and GPIO control ports Built in ChristieNET connectivity and control LED for two digit error codes plus LCD for text based status display Large status light for long distance alerts Double voltmeters one for lamp ballast one for projection head ...

Страница 17: ...tup 1 Position the Projection Head Locate the projection head at an appropriate throw distance projector to screen distance and vertical position Refer to Section 2 3 Projector Position and Mounting and the Christie website for Throw Distance calculations Refer to Section 6 2 Lenses Make sure that the projector is level from side to side and is not inverted The projector s front to back and side t...

Страница 18: ...onnect Head to Ballast Ballast to AC Refer to Figure 2 3 NOTE Before connecting the ballast to the AC supply a Christie accredited service technician must make sure the ballast s plug type and Input Power Range Switch match the line voltage available at the site Remove the lamp ballast cover to access the switch and determine it s setting toggle LEFT for 200 VAC supplies toggle RIGHT for 400 VAC s...

Страница 19: ... ON Lights on the ballast indicate only that the ballast is plugged in Figure 2 3 Ballast Connection and Switch On Head to AC Connect the Christie supplied IEC 320 220V 15 amp line cord to your AC supply Do not substitute other cords Input power required is 200 240 VAC nominal 50 60 Hz 3A for 208V Refer to Figure 2 4 Voltmeter 400V 3 phase Interlocks Control DC DC 6 line cord Connect to AC supply ...

Страница 20: ... the lamp type EXPLOSION HAZARD Keep the projection head OFF until you have defined which lamp type is installed Before switching the projector ON and igniting the lamp you must define in memory which size lamp is installed otherwise you risk severely over driving or under driving a lamp NOTE Ensure that you record the lamp size on the Lamp Installed label a Press MENU The Status Display at the re...

Страница 21: ... to toggle from the projector s present ON OFF state The main PROJ STATUS light at the rear of the projector should be green when the projector is up and running For best results let the projector warm up for about 5 minutes 7 Select the source Using either the IR remote or built in keypad press the appropriate Input key 1 6 to display the image for the corresponding source connected as described ...

Страница 22: ...ur with longer ballast cables the ballast does not achieve the same maximum power Press AUTO SETUP and or MENU to refine other display parameters as necessary Refer to Section 3 6 3 Image Settings Menu 2 2 Installation Considerations Although the Roadie HD 35K is carefully engineered to deliver exceptional quality high brightness and high resolution output your final display results could still be...

Страница 23: ...w ambient room lighting 2 2 2 Screen Size Screen size image size may be up to 150 feet across depending on your lens and ambient light level Choose a screen size appropriate for your lens and application Keep in mind that if the projector will be used to display much text information the image size must allow the audience to recognize all text clearly The eye usually sees a letter clearly if eye t...

Страница 24: ...ource material is wider typically called a letterbox display Alternatively if the area of unused pixels is considered minimal you may prefer to use the projector s software control to slightly stretch the image either horizontally or vertically enough to utilize the remaining pixels while not noticeably distorting the image Using a Cinema Flat Screen 1 85 aspect ratio By default source signals clo...

Страница 25: ...rower area characterized by unusually thin people so that its pixels can then be stretched horizontally through the anamorphic lens to regain the full and properly proportioned 2 39 display This optical widening can stretch the image by approximately 25 See Figure 2 9 Figure 2 9 Typical Method for Achieving Scope Masking Options In order to conveniently present different types of incoming data for...

Страница 26: ...s for scope displays In some cases the room will have both side and top bottom masking installed This arrangement is the most flexible of all Refer to Figure 2 12 for a summary of the basic factors affecting wide displays in a variety of rooms Figure 2 11 Side Masking for Flat 2 39 image 1 85 image Top bottom masking to hide screen edges Masking moved aside TOP MASKING SCREEN 1 85 screens 1 85 ima...

Страница 27: ... drifts in the projector circuitry that may affect performance Keep the projector away from devices that radiate electromagnetic energy such as motors and transformers Common sources of these include slide projectors speakers power amplifiers elevators etc Choose the best screen size for the application Since more magnification reduces brightness use a screen size appropriate for the venue but not...

Страница 28: ...image With zoom lenses you ll want to know the approximate minimum and maximum image sizes possible from a given throw distance so that the most appropriate lens is installed at the site throw distance screen width throw ratio Figure 2 13 Estimating Throw Distance Example NOTE If your projector is slightly tilted in relation to the screen typical for large venues and or elevated installations thro...

Страница 29: ...the elevation of the projector in relation to the screen For many typical rental staging installations the projector is mounted above screen center An ideal vertical position helps to ensure that images are accurately rectangular in shape rather than distorted into a keystoned shape with non parallel sides that both image focus and brightness remains optimized NOTE Proper vertical position is reco...

Страница 30: ... This concept of image movement is illustrated in the example below Figure 2 15 Example of Alternative Offset Specification For any projector if you find that you cannot raise or lower the image enough using mechanical vertical offset try adjusting V Position in the Size and Position menu when displaying at less than the minimum size see Section 3 6 3 Image Settings Menu If images remain keystoned...

Страница 31: ... the other See Figure 2 16 NOTE Example only Beyond range for this projector 2 3 3 Floor Mounting and Leveling For front projection without suspending mount the projector on a strong supporting structure or cart Take special care if using a mobile cart avoid sudden stops force and uneven surfaces that may cause the top heavy cart to lurch and overturn Make sure your mounting structure is reasonabl...

Страница 32: ...ions Tilting For any installation you can tilt the front end of the projector up or down as much as 15 Likewise side to side tilt must not exceed 15 see This limit ensures safe lamp operation and proper position of the liquid cooling reservoir in the projector Tilt only as shown in Figure 2 18 and Figure 2 19 15 max 15 max 15 max Figure 2 18 Front End Tilt ...

Страница 33: ...e projection head can be hoisted and or suspended using its handles a set of rigging clamps 113 102101 xx and appropriate rigging and safety cables If desired the lamp ballast can also be flown from its integral rigging bars To hoist stack or fly a stack of projectors you must use the optional FredFrame Refer to Using the FredFrame described below Read the following safety warning before hoisting ...

Страница 34: ...ment of the clamps on each side of the handles is strongly recommended 3 Secure the other end of each clamp to the primary support structure 4 Secure the projector with an additional two safety straps Using one safety strap per crossbeam route the strap through the bottom 2 eyebolts and bring them up and around the outside of the handles Refer to Figure 2 21 5 Install the projection lens and secur...

Страница 35: ... hoisting rigging Allow between clamps to ensure stable hoisting rigging Symmetrical placement of clamps recommended mandatory at least 12 inches between clamps TOP VIEW BOTTOM VIEW rigging zone Use 4 bottom eyebolts to secure an additional two safety straps BOTTOM VIEW Route a safety strap through both eyebolts on crossbeam Use two safety straps one per crossbeam for additional security Route saf...

Страница 36: ...m of the FredFrame accommodate forks from a forklift and are mandatory for this method of transport Do not lift the projection head with equipment unless the FredFrame and forklift rails are installed The projector s handles must be removed when installing the FredFrame Follow the instructions provided with the FredFrame kit Stacking To stack two projection heads together you must first secure eac...

Страница 37: ... so could result in damage to the lens mount the projector or the projection lens To calibrate the lens select the Configuration Diagnostics and Calibration Lens Calibration Reference Calibration option from the Main menu This allows the lens to find the center points of each axis focus zoom horizontal and vertical the end stops and other motion parameters Figure 2 24 Diagnostic and Calibration Me...

Страница 38: ...rojector At the front of the projector install the anamorphic lens mount hardware as described in the instructions provided with Christie s Anamorphic Lens Mount Kit 2 Install the 1 26x Anamorphic Lens Clamp the 1 26x anamorphic lens mount in place following the instructions provided with the anamorphic lens mount kit 2 4 2 Install First Lamp Explosion Hazard Wear authorized protective clothing wh...

Страница 39: ... reservoir which is located in the Igniter compartment is factory filled and does not require draining for transit Check regularly 2 5 Connecting Sources Sources connect to the Input Panel located on side of the projector closest to the lens Refer to Figure 2 27 The upper left corner INPUT 1 typically accepts an RGB signal from an external analog RGB source or it can also be used for YPbPr signals...

Страница 40: ...l connections Control ports Input 5 Opt 1 Input 6 Opt 2 Ethernet Input 4 S Video Input 3 Video Input 2 DVI RS422 RS232 IN GPIO OUT RS232 Remote Input 1 Red Green Blue Hor Comp Vert Sync Analog Graphics or Component Video INPUT 1 Analog or Digital DVI INPUT 2 Composite Video INPUT 3 S Video INPUT 4 includes decoder includes decoder Various see Appendix INPUT 6 ACTIVE SIGNAL FROM Dual SD HD SDI 38 8...

Страница 41: ...ource provides a composite sync output connect it to the SYNC input labeled HOR COMP If the source provides separate horizontal and vertical sync outputs connect horizontal sync to the SYNC input labeled HOR COMP and connect vertical sync to SYNC input labeled VERT See Figure 2 28 Connecting an RGB Source NOTES 1 If for some reason the projector fails to recognize a signal as an RGB signal specify...

Страница 42: ...n INPUT 5 or 6 only 2 5 3 Composite Video INPUT 3 and INPUT 4 provide simultaneous connection of both a composite video source INPUT 3 and an S Video source INPUT 4 Refer to Figure 2 30 NOTE Unlike previous Christie projectors composite video and S Video cannot connect to any other locations on the Input panel Connect as shown in Figure 2 30 Input 5 Opt 1 Input 6 Opt 2 Ethernet Input 4 S Video Inp...

Страница 43: ...deo Either input can be set as the active primary or secondary part of a Picture in Picture PIP display and either input can be looped through to one or both of the module s BNC outputs NOTE Selection of these inputs is described in Section 3 2 Using the Built In Keypad or Remotes Connect a compatible SMPTE 292M or SMPTE 259M C source s to one or both of the inputs located on the left side of the ...

Страница 44: ... compatible to any of the two RS 422 ports Older Input cards not listed may be supported by the Roadie HD 35K NOTES 1 Connect analog HDTV signals directly to INPUT 1 or to any other RBG Input module installed the optional HDTV Input Module used in earlier projectors is not needed or recommended 2 See Section 2 Installation and Setup for a brief description of each interface 2 6 Connecting Communic...

Страница 45: ...rd or the 3 5mm phono jack on the side of the projector depending on which type of cable you are using with this remote NOTE Response to a wired remote must also be enabled in the Communications menu Refer to Section 3 8 Adjusting System Parameters and Advanced Controls for more information Figure 2 32 Remote Options NOTE If both wired remotes are connected communications via the side Input panel ...

Страница 46: ...n adapter or external converter rather than the more common RS 232 standard RS 422 communication has differential transmits and receives and is generally better suited for long distances than is RS 232 communication NOTE RS 422 is not compatible with RS 232 connecting an RS 232 compatible PC to RS 422 can damage the equipment at either end Consult the documentation provided with your PC if you are...

Страница 47: ...ll projectors are initialized before sending further commands Commands sent during initializing will be lost Do not use an RS 422 port unless you are using equipment with RS 422 capability The voltage levels of this signal can damage incompatible equipment To computer 2 Way Controller or previous proj 9 pin D style Connector 6 pin XLR Connector Side Input Panel From computer Two Way Controller or ...

Страница 48: ...work Refer to Section 3 7 Adjusting System Parameters and Advanced Controls for further information about setting up and using a projector connected via Ethernet The GPIO Port The General Purpose In Out GPIO port enables integration of the projector within an established control system so that other devices connected via the GPIO can operate in tandem with the projector or vice versa ASCII command...

Страница 49: ...gure 2 36 Figure 2 36 Typical RS 232 Network RS 422 Network To control multiple projectors with a computer controller having an RS 422 interface first set them all to the same baud rate as the controller then chain the projectors together by connecting an RS 422 port of the first projector already connected to the computer controller to an RS 422 port on the next projector in the chain Use any of ...

Страница 50: ...e before connecting as a network Refer to the documentation that came with your controlling device in order to determine the proper baud rate Refer to Section 3 8 Adjusting System Parameters and Advanced Controls if you need help changing the projector baud rate NOTES 1 To avoid damage connect only properly wired serial communication cables Refer to Appendix A Serial Communication Cables for detai...

Страница 51: ...s IP address and port appear in the Status menu as well as the Ethernet Settings secondary menu Figure 2 40 Setting the Projector s IP Address It should be noted that if a networked projector s IP address is anything other than the default of 0 0 0 0 shown as 000 000 000 000 in the Ethernet Settings menu or if a DHCP server is not available the automatic DHCP server function for supplying a valid ...

Страница 52: ...tors 2 Set each projector s Broadcast Key to OFF 3 Remotes cannot broadcast when networks are separate use controller s instead 4 Do not use a split network when downloading new projector software By default communications originating from one type of serial controller RS 232 vs RS 422 stay on the corresponding network path rather than being broadcast to the other network This separation is someti...

Страница 53: ...posite direction using the other standard NOTE This configuration requires that both standards be available from a single controller or that you use an RS 232 RS 422 adapter B Split Network with Two Controllers If you have two controllers one RS 232 and one RS 422 and want one to be a back up connect each controller to the appropriate port on the first projector in the network Then connect project...

Страница 54: ...connected PC for working with a network of projectors linked via their RS 232 in out ports In this case select the All Joined option for Network Routing in the Communications menu so that all messages reach all ports throughout the network RS 232 RS 232 RS 232 RS 232 RS 232 RS 422 RS 422 RS 422 RS 422 RS 422 RS 422 Controller with both RS 232 and RS 422 capability Connect both network cable types ...

Страница 55: ...ications menu Messages from the Ethernet will reach the RS 232 network and vice versa but RS 422 messages will not To isolate your Ethernet from the serial networks select the RS232 and Ethernet Joined option so that all serial messages will be relayed to all serial ports but Ethernet communications will not and vice versa To keep each network communication links separate from each other select th...

Страница 56: ...his ballast includes an internal Input Power Range Switch for toggling to the level of AC available at the installation site i e either 200 or 400 VAC The line cord plug must also match From the factory the ballast s switch and line cord are both set for 200 VAC use Used rented ballasts shipped from other installation sites may be set to either depending on where they were last used check the stat...

Страница 57: ... defined which lamp type is installed 1 Press MENU The Status Display at the rear of the projector displays a Lamp Size of 2000 3000 4500 or 6000 watts depending on its last setting factory default 6000 2 Enter the Lamp password See Figure 2 46 NOTE Unless the Enable Password service option has been turned off you must enter a password 3 Click POWER and use the UP ARROW to locate and select which ...

Страница 58: ...re options Upon powering up the projector with a newly installed replaced lamp adjust lamp position to help ensure optimized operation as well as peak brightness at the screen you do not need an image displayed yet Once you have done this LampLOC adjustment the lamp will be well centered and distanced correctly from the remainder of the illumination system It can be re adjusted as needed at any ti...

Страница 59: ...stment NOTES 1 Projector must be installed and powered up in its final location Install the anamorphic lens if it will be used at the site 2 You will need a 3 16 Allen wrench 3 Boresight may need slight adjustment after installing a new lens To ensure proper offset for your site and consistently good focus in all areas of the screen a primary lens must be installed and its lens mount precisely adj...

Страница 60: ...s that the right side of the image is focusing behind the screen GOAL If the image comes into focus on both sides simultaneously left right boresight is fine Skip to Step 6 3 Adjust the horizontal boresight bolt Figure 2 49 as necessary to direct or aim the lens toward the side of the image which focused too close to the lens When both sides appear equally blurry re focus on the left side of the s...

Страница 61: ...al is good focus at center and on all sides 2 Focus anamorphic lens If horizontal focus in the image needs improvement focus the anamorphic lens too rotate its barrel as needed For more information refer to Section 3 14 Working with the Lenses 2 13 Internal Optical Adjustments In rare instances shipping and handling may affect the precise factory alignments of one or more optical components as a f...

Страница 62: ...s throughout the image and one or more poorly converged individual colors may appear adjacent to some or all of the lines A Christie accredited service technician can correct as described on the color Convergence Instructions label provided inside the projection head NOTE Custom Convergence Kit required available separately 2 13 5 Fold Mirror Adjustment If a corner or edge of an image is missing t...

Страница 63: ...e the remote The IR remote protocols A G are generally used for multiple projector applications For example you might want to change a remote s protocol if you need to control multiple projectors independently see Figure 2 53 When Remote A operates under a different protocol than Remote B or others each remote communicates only with the projector s having a matching protocol defined in memory NOTE...

Страница 64: ... nose pliers to remove and replace each jumper as necessary J1 jumper Set between 1 and 2 or 2 and 3 as required for the desired protocol J2 jumper Set between 1 and 2 or 2 and 3 as required for the desired protocol J3 jumper Set between 1 and 2 or 2 and 3 as required for the desired protocol J4 jumper For IR use always set between pins 1 and 2 see A G below Figure 2 55 Locating and Setting the Ju...

Страница 65: ...utes 4 Plug the remote cable supplied into the empty battery compartment Pack with foam as an internal strain relief Make sure that the battery cover is notched smoothly to accommodate the cable without pinching it 5 Set the remote s protocol to wired jumper setting refer back to Figure 2 55 Make sure to set jumper 4 between pins 2 and 3 as shown in the last example shaded 6 Replace battery compar...

Страница 66: ......

Страница 67: ...fly described and listed in alphabetical order in the following section 3 1 1 Air Filter Intake air flows through the filter before circulating in the front compartment to cool the main electronics Replace the air filter whenever the lamp is replaced or sooner in dusty dirty environments Refer to Section 4 4 Replacing the Lamp Filter for complete instructions IMPORTANT Check condition monthly Anod...

Страница 68: ... Control Panel Rear of Projector The rear control panel includes the built in keypad IR sensor 2 digit status error code display window and the LCD status display as described in Table 3 1 Figure 3 2 Rear Control Panel Table 3 1 Rear Projector Control Panel Control Panel Area Description Built In Keypad Provides access to all software controls needed for working with the projector For more conveni...

Страница 69: ...s mount may be added adjacent to the primary mount This provides a mechanism for positioning a 1 26x anamorphic lens in front of the primary lens This type of lens horizontally spreads a pre squeezed image back into its wider 2 39 1 scope image and is most typically used in side masking displays 3 1 7 Lens Mount and Projection Lenses The projector is built with a motorized lens mount that allows f...

Страница 70: ... can be removed 3 1 11 DC Power Cables Heavy duty DC lamp cables between the ballast and the projection head are 6 100 feet 2 30 meters in length The ballast and projection head include their own North American line cords 3 1 12 Projection Head The projection head houses all critical illumination and optical components as well as the DLP processing technology responsible for combining light and in...

Страница 71: ...to connect RS 422 compatible equipment such as a PC for serial communication The port also provides loop through connection of a serial network Refer to Section 2 7 Connecting Multiple Projectors for details Unlike the 9 pin RS422 port on the side of the projector the rear RS422 port cannot be used for downloading new software to the projector REMOTE For connecting the wired remote VOLTMETER Durin...

Страница 72: ...ther for your specific installation and application 3 2 1 Built in Keypad To control the projector when signals from a standard IR remote cannot reach the projector you can use the projector s built in keypad located at the rear of the projector Two nearby windows provide feedback indicating current status and activities of the projector Because the built in keypad has fewer keys than the standard...

Страница 73: ...ote is recommended when The rear built in keypad is inaccessible The lighting conditions are unsuitable for proper IR transmission Figure 3 5 Standard IR Remote Keypad Help Display context sensitive help toggle Arrow Keys Navigate within menu Adjust asetting up down PIP Turn picture in picture on off Swap Swap PIP images Brightness Adjust amount of light in image Menu Display menus toggle Lightbul...

Страница 74: ...The closer you are to the screen the brighter the laser beam appears The laser pointer works best in an environment where the ambient lighting can be controlled Test Display a test pattern Power Turn projector ON or OFF Display from this source NOTE If PIP is ON Input keys affect the PIP window only Turn picture in picture ON or OFF NOTE N A on WU Models Displays menus Inputs PIP Menu Arrow Keys A...

Страница 75: ... IR remote useful if you are unsure of the present state of the projector press the POWER key twice quickly to toggle from the projector s present ON OFF state The main PROJ STATUS light at the rear of the projector should now be green on the projector to indicate that the projector is up and running For best results let the projector warm up for about 5 minutes NOTES 1 After powering down the lam...

Страница 76: ...bled in the Menu Preferences menu You can choose to use a scrollable list of channels when you press the CHAN key or you may prefer to enter the desired Channel number blind i e without on screen feedback Refer to Menu Preferences later in this section Input 1 Key BNC Press the INPUT 1 key to display from the data input source connected to BNCs labeled INPUT 1 If PIP is enabled press INPUT 1 to as...

Страница 77: ...press INPUT This switches to either INPUT 6 or INPUT 8 depending on which of the Dual SD HD SDI Module inputs A or B was last used Press INPUT again to display from the other Dual SD HD SDI Module input Input Key Standard IR Remote Only Press INPUT n where n 1 2 3 4 5 or 6 7 and 8 optional as an alternative method for selecting which source to display Six source locations are identified with input...

Страница 78: ...s Menu system during use To see the Menu system again do one of the following Press and hold OSD for a second or two Press and release OSD followed immediately by the UP Arrow key Press OSD twice quickly Invisible menus are fully functional enabling hidden access to numbered features and image adjustments by entering the corresponding sequence of keypresses on the remote NOTES 1 With OSD ON you ca...

Страница 79: ...indicates which projector is currently listening to commands and matches the projector number that has been defined in the Menu Preferences menu The Projector check box read only shows whether or not the projector physically connected to a remote is listening to commands from that remote A check mark means that connected projector is listening if there is no check mark you are communicating with a...

Страница 80: ...ing PIP source image adjustments can be made location and resizing to the secondary image only To adjust the main image instead press the PIP key before the adjustment For example press GAMMA PIP the RIGHT and LEFT Arrow keys to change the gamma level of the main image To remove the secondary image from the display and return to a single image press the PIP key while no menus or slidebars are pres...

Страница 81: ...Power up procedure 1 Make sure that ballast is properly configured for the AC at your site and that it is connected via 4 cables to the projection head Refer to 2 8 Connecting the Ballast 2 Connect the head to AC power The voltmeter on the back of the projector indicates the incoming level of AC and the main PROJ STATUS light on the rear of the projector should glow a steady yellow At this point t...

Страница 82: ...all fans including the heat extractor to cool the lamp Make sure to wait for the fans to cool 2 Turn the breaker power switch OFF 3 5 Navigating through the Menu System Most of the controls for the projector are accessed from within the projector s menu system There are several groups of related functions with each group selectable as a menu item in the Main menu see Figure 3 7 Press MENU on eithe...

Страница 83: ...Menu system and returns to the presentation 3 The Status menu is read only When finished with a Function menu do one of the following Press EXIT to return to the previous screen Press MENU on either the built in keypad and standard IR remote to leave the Menu system and return to the presentation 3 5 1 On line Help If at any time you are uncertain what to do next or what a particular menu option d...

Страница 84: ... GAMMA etc For blind access hide the entire Menu system refer to OSD On Screen Display Key above and or direct slidebarslidebars activated by their own key such as CONtrast BRIGHTness etc Control by using the proper keypress or numerical sequence of key presses Once selected change the setting as desired see below Changes take effect immediately and are saved upon exit from all menus or after 15 m...

Страница 85: ... desired Figure 3 10 Example of Pull down List Or if you prefer to quickly scroll through an option list without using its drop down list you can use the LEFT and RIGHT Arrow keys to locate and highlight the desired option NOTES 1 Press the RIGHT or LEFT Arrow keys to jump between pages in an extra long drop down list 2 Press EXIT while in a drop down list to cancel any change s and exit 3 5 6 Edi...

Страница 86: ... character or space press FUNC the LEFT Arrow key Figure 3 12 Editing Text Press Enter when Finished To accept all edits made and close the Edit window press ENTER NOTE Press EXIT at any time to cancel changes and redisplay the previously defined text 3 5 7 Editing Numerical Values Enter numbers directly from the built in keypad or standard IR remote in order to specify numbers representing projec...

Страница 87: ...e Menu system available for certain display parameters only For example press CONT to access the Contrast slidebar immediately Press EXIT to return to your presentation NOTES 1 To hide these direct slidebars disable the Display Slidebars check box in the Menu Preferences menu 2 To hide the entire Menu system from view turn OFF the on screen display by pressing the OSD key 3 6 1 Before You Begin Us...

Страница 88: ...esolution of 2048 x 1080 or to optimize the width or height of your display Size Position and Blanking parameters automatically adjust accordingly Or if Blanking is set first which defines an Active Input Area Resize Preset scaling occurs in this region of interest only Figure 3 14 Resize Presets Drop down List What is the Resizing Default By default when displaying a new source your image utilize...

Страница 89: ...ably smaller than the projector s 2048 x 1080 resolution For example for a source with a native resolution of 800 x 600 the No Resizing centers a small image within a black border The black border areas are unused areas When Custom Appears The Custom re size descriptor automatically appears in the Size and Position menu when any of the values for Size Vertical Stretch H Position V Position or Blan...

Страница 90: ...age Depending on the source data at the top and bottom may be discarded cropped or the display may have black borders at the top and bottom Full Height Option Select Full Height to fill the display from top to bottom Depending on the source this may create borders 1080 2048 With 1400 x 1050 input Full Size 2048 1080 1080 2048 With incoming Cinema scope 2048 1080 1080 2048 1152 2048 With incoming 2...

Страница 91: ...hat the image quality is consistent across the screen that aspect ratio is maintained and that pixel phase can be optimized described below Tracking determines the frequency of the pixel sampling clock indicated by the number of incoming pixels per line so that all pixels generated by a particular source are sampled NOTE By default the projector samples at the correct frequency for most sources Fo...

Страница 92: ...le adjusting V Position Option Select the V Position option from the Size and Position menu This option moves the image up or down within the area of available pixels NOTE The value shown represents where the approximate center of the image lies in relation to the total number of pixels available vertically This varies widely according to the signal watch the image while adjusting Advanced Size an...

Страница 93: ...y EDID source outputs a signal according to the EDID information provided by the projector To override this information and display in a different format for example if your Plug Play EDID device does not support the projector s resolution and or frequency select the desired Plug Play EDID resolution from the list Any daisy chained projectors also displays according to the chosen Plug Play EDID fo...

Страница 94: ...t determines what gray shades are displayed between minimum input black and maximum input white for all signals A good gamma setting helps to optimize blacks and whites while ensuring smooth transitions for the in between values utilized in other colors Thus unlike brightness and contrast settings controls the overall tone of your images can be lightened or darkened without changing the extremes a...

Страница 95: ... 4 the color space function is entirely automatic and the drop down list disabled The current color space appears in the Image Settings menu Press ENTER to select a different option Select RGB unless you are using component video at INPUT 1 2 5 or 6 Select YPbPr Video with a standard definition televised signal SDTV Select YPbPr HDTV with a high definition televised signal HDTV NOTE When certain R...

Страница 96: ...ear dark gray By default the projector automatically determines the best setting according to the type of incoming video signal 0 IRE Used for DVD output with enhanced black SECAM most PAL standards and Japanese NTSC 7 5 IRE Used for most NTSC video signals For some types of video you can override the setting The control is disabled for other types of video and all graphics sources Generally if bl...

Страница 97: ... is not necessarty to make further adjustments to obtain proper blacks or whites NOTE This automatic adjustment requires at least 6 12 consecutive white pixels in the image Without these pixels input levels may produce skewed colors particularly in non video images However for a very unusual source exhibiting one or more overly high blacklevels typically caused by a noisy source causing blacklevel...

Страница 98: ...hic sources For almost all sources the projector automatically selects the best clamp location Use the normal Back Porch location if the image is either sufficiently bright or overly bright Select Sync Tip if the image appears unusually dim if there are horizontal streaks across the image or if there is significant color drift This moves the clamping pulse from the normal backporch location which ...

Страница 99: ...olors When each primary color shows one optimized black band and white or colored band the input levels for this source are correctly set Upon exiting the Input Levels menu the Peak Detector check box is cleared Figure 3 18 Adjusting Input Levels Using the Peak Detector RED EXAMPLE SHOWN Advanced Image Settings Use the Advanced Image Settings secondary menu to adjust lesser used options used for m...

Страница 100: ...h multiple projector applications Select the color adjustment producing the best color accuracy for your application and installation To configure a User color adjustment gamut use either the Color Adjustment by X Y or Color Saturation secondary menu NOTES 1 Color Temperature defaults to 6500K until changed All four User options default to SD Video unless the user has redefined them 2 Factory defi...

Страница 101: ... images that did not originate from film or for moving computer generated images 4 Film For video images that originated from film This will optimize image quality and stability Film Mode Threshold This setting determines how sensitively the projector can detect if an incoming video signal originated from film or not Detail Threshold Use Detail Threshold to define at what frequency level the Detai...

Страница 102: ...ee below Using an INPUT key automatically recalls this channel along with all associated setup parameters and updates the display accordingly If more than one channel exists for the input the image displays according to the setup parameters for the first channel with matching characteristics If PIP is enabled press INPUT n to change the PIP secondary image source and INPUT PIP n changes the main p...

Страница 103: ...the projector are searched for matching input and signal parameters If no match to the incoming input signal is found in currently defined channels a new channel is temporarily created based on factory defined defaults for this type of signal The channel number assigned is the lowest available number from 01 99 NOTES 1 An automatic channel is discarded unless one or more of its parameters are chan...

Страница 104: ...e Channel Setup menu appears see below with the active channel highlighted Figure 3 21 All Channels Appear in Channel Setup Menu What Appears in the Channel Setup Menu This menu lists all channels currently defined and indicates where they connect on the projector s side input panel The far left column lists channel numbers currently defined The values in the far right columns indicate horizontal ...

Страница 105: ...e selected channel Refer to Section 3 7 7 Editing a Channel Setup 3 7 5 Copying a Channel Making a copy of a channel is a quick way to duplicate a channel that contains most of the settings you need without creating a new one from scratch This then allows you to adjust the settings specific to the new presentation required To make a Copy of an existing channel highlight the desired channel in the ...

Страница 106: ...o open the Channel Copy Delete secondary menu Select Delete Unlocked Only and press ENTER to delete all unlocked channels To Delete all channels from the Channel Setup menu select Delete All Channels from the Channel Copy Delete secondary menu and press ENTER This performs a deletion of all channels including those that are locked NOTE Once deleted the current highlighted channel remains but is re...

Страница 107: ...nt channel which can be defined and or changed as desired Channel names can be upto 12 characters in length 1 If you enter a channel number that already exists a dialog message appears indicating that this number is already in use Assign a different channel number 2 You can define up to 99 channels Number A 2 digit channel number Input Enter a numeric value 1 to 8 corresponding to the projector s ...

Страница 108: ...ctor s menus The change takes effect immediately Image Orientation Set the orientation of the image according to the orientation of your projector If the setting is incorrect projected images are reversed and or upside down NOTE While the projector s image orientation can be changed the projector itself cannot be inverted Auto Power up Enter a check mark to enable the projector to automatically po...

Страница 109: ...list and input dialog box while switching channels and sources during a presentation clear the check box NOTE The Channel List and input dialog box cannot be hidden during use of the menus Display Sliderbars Enter a check mark to superimpose a small slidebar over the current image whenever an adjustable parameter is selected directly with a key such as CONT or BRIGHT If Display slidebars is unchec...

Страница 110: ...arity Projector Enter a three digit number such as 001 to assign or change a number to the projector currently in use If the current projector already has a number assigned that number appears here for example 004 in above Numerical identity for projectors enables you to communicate with a single projector within a multiple projector application see also PROJ key in Section 3 2 Using the Built In ...

Страница 111: ...o relayed to the Ethernet port and vice versa Any RS 422 communications are isolated All Joined All messages reach all ports regardless of type Ethernet Settings Secondary Menu NOTES 1 Not used for stand alone projectors 2 Recommended for network administrators only DHCP Select this check box if you want a DHCP server to automatically change the projector s default IP address 0 0 0 0 to one that i...

Страница 112: ...ped by Artistic Licence It is used for controlling lighting staging equipment from a lighting console or PC application It is based on the popular DMX512 control protocol ArtNet Subnet This is the highest level address for a device Typically it is set to 0 ArtNet Universe Each packet of data is broadcasted to all devices plugged into a universe up to 512 devices channels ArtNet Channel There are 5...

Страница 113: ... is capable of sending data to the projector in either one of seven different protocols called A G depending on its internal jumper settings default A Likewise the front and rear IR sensors on the projector can be set to accept IR data accordingly responding to one of the A G protocols all or none The projector s Always default is adequate for most single projector installations Select a specific ...

Страница 114: ...nector or the side input panel optional Lite remote with phono jack connector The projector will then respond to incoming commands from either port To disable the wired remote you must use a different either the built in keypad or another IR remote to select OFF This safeguard prevents you from accidentally disabling the wired remote during use 3 8 3 System Configuration Geometry Color In the Conf...

Страница 115: ...tion to choose from several different uniformity maps Please refer to documentation included with your Christie TWIST module Edge Blending Secondary Menu The Edge Blending secondary menu provides a range of controls for smoothing together the overlapping bright edges of multiple adjacent projected images to create a single larger seamless image These controls which primarily affect whitelevels are...

Страница 116: ...djust color slidebars and judge image color by eye or meter A user defined color adjustment can be applied for a source by selecting the desired User option in the Select Color Adjustment list accessed in the Advanced Image Settings menu Color Adjustment By X Y Secondary Menu Use this secondary menu if you want to alter add or copy a color gamut i e color adjustment Controls in this menu define th...

Страница 117: ...of it in relation to the other colors Apply at any time in the Advanced Image Settings menu NOTE A Color Saturation adjustment defines the corresponding x y coordinates shown in the Color Adjustments by X Y secondary menu These x y coordinates remain stable for this User gamut until they are changed again via either menu Values displayed in the Color Saturation menu however will likely fluctuate a...

Страница 118: ...ources you may need to adjust the normal gain or offset of odd pixels in relation to even pixels This smooths out very narrow 1 pixel wide checks or vertical stripes that indicate adjacent on and off pixels Although Offset and Gain slidebars can be adjusted individually and manually using the Level Detector simplifies this process see 1 Use an external analog native sized continuous grayscale test...

Страница 119: ...es until both bands are just visible Images from this source then display blacks and whites correctly without crushing or washing out Level Detector The Level Detector check box enables a specific thresholds for blacks and whites input levels that fall below a specified Level Value see below are displayed as black and all others are displayed as white It aids in Odd Pixel Adjustment To use 1 Enabl...

Страница 120: ...physical input loops through to which output and 2 which functional input main or PIP signal loops through to which output 3 9 Working with PIP NOTE Seamless switching is not currently supported in this projector PIP Picture in Picture and Seamless Switching are independent but related projector features that both utilize two image processing paths within the projector In the case of Picture in Pi...

Страница 121: ...n interlaced source in the PIP window Seamless switching may affect image quality in some cases Seamless switching is not currently supported in this projector 3 9 1 Controlling Your PIP Image NOTE Controls for the primary image are all accessed through the Main menu To control the secondary PIP image access picture controls through the PIP and Switching menu Signal Type Description Input Location...

Страница 122: ...imary source only This check box turns the secondary source ON and OFF NOTE Disable PIP for Interlaced sources 35kHz PIP Size and Position Secondary Menu Controls in the PIP Size and Position menu affect the PIP secondary image functioning in the same manner as the main controls in the Size and Position menu Refer to Section 3 6 3 Image Settings Menu for descriptions Additional options unique to t...

Страница 123: ...hen PIP Active to activate number keys as Input keys only when PIP is in use NOTE Numbers Select Main Image remote functionality works only when menus are closed 3 10 Working with the Lamp Four different sized lamps can be used with this projector 2 3 4 5 or 6 kW To ensure that the required ignition and power level is supplied to the lamp you must define which lamp size is installed before power u...

Страница 124: ...scribed above passwords are shown in Figure 3 34 Always indicate current lamp size on the Lamp Installed label 3 10 2 Lamp Cable Lengths The high voltage DC cables connected between the lamp ballast and the rear of the projection head can be 2 30 meters in length depending on your site requirements and setup The length currently in use must be defined in projector software for any new installation...

Страница 125: ...rd service option has been turned OFF Refer to Figure 3 33 2 Turn the projection head and lamp ON by pressing the POWER key on either the projector s built in keypad or standard IR remote 3 For subsequent power ups of this lamp press the POWER key There is no need to reset the lamp size until a different sized lamp is installed NOTE Refer to Section 3 2 6 Keypad and Standard IR Remote Functions fo...

Страница 126: ...rk to prevent display of this message When your lamp expires only the status display on the back of the projector provides the visual warning to replace the lamp In addition the LED s next to the built in keypad flash LP when the lamp time has expired NOTES 1 It is recommended that the Lamp Message check box remain enabled 2 When a lamp warning message appears press EXIT to temporarily cancel the ...

Страница 127: ...ue and slidebar represents the current brightness of your lamp NOTE The number shown for intensity is not the actual lumen output but rather a correlated value only 9415 may represent 20 000 lumens for example To use Intensity mode to set the level as desired for your application remembering that higher settings can significantly shorten lamp life Over time the projector automatically increase the...

Страница 128: ...reduce your Intensity setting or replace the lamp Do not lower the Intensity so much that the corresponding Power value reaches its minimum and the intensity setting is inaccurate and cannot be maintained For best results in achieving uniform intensity amongst tiled images choose an Intensity setting that enables all lamps to operate at less than the maximum number of watts available in your proje...

Страница 129: ...y position the lamp for optimized performance and brightness at the screen utilizing filtering to eliminate signs of lamp flicker Progress status is displayed near the bottom of the menu When complete the lamp alignment is optimized for the current installation NOTES 1 A 10 minute warm up is recommended before adjusting LampLOC 2 Intensity mode brightness tracking LiteLOC is disabled during a Lamp...

Страница 130: ...dure watch the intensity feedback shown near the top of the menu if preferred 1 Adjust forward aft z until the brightness reading in front of the lens is maximized 2 Adjust left right x and up down y until the brightness reading in front of the lens is maximized 3 Re adjust forward aft z as necessary 4 Repeat Steps 1 3 as necessary 5 Reset Lamp Power or Intensity if desired 3 10 7 Stand by Mode Cl...

Страница 131: ...nd software installed the type size of lamp defined in projector memory its current voltage and hours logged in total and for a specific period such as a rental period and for your projector model name and serial number In addition the Status menu identifies the current channel its location its frequencies and other details Scroll the full Status menu using the UP ARROW and DOWN ARROW Use the LEFT...

Страница 132: ...nd consistency in a group of projectors It ensures a good starting point for further customizing and matching To return to the factory set color primaries such as when a projector is moved to different site you must access the Service menu password protected Select the Reset to Factory Defaults option in the Color Primaries secondary menu Then repeat the calibration process describe above if desir...

Страница 133: ...x Drives X Y Values NOTE MAGENTA CYAN AND YELLOW ARE NO LONGER USED 5 In each projector select a User color adjustment 1 4 to enable Color Adjustments by X Y changes Then enter your recorded x y values into each menu Figure 3 39 Copy X Y Values into All Projectors NOTE MAGENTA CYAN AND YELLOW ARE NO LONGER USED ...

Страница 134: ...ttainable by all projectors in your group Adjust only as necessary to ensure the resulting color palette is as large as possible When done you may need to adjust lamp power slightly 7 All screens should now be color matched Apply this new User gamut to a source at any time by selecting it in the Select Color Adjustment list accessed in the Advanced Image Settings menu Using the Color Saturation Me...

Страница 135: ...r 100 hours Light output and Brightness Uniformity can vary significantly during the first 100 hours of lamp use For best results with new lamps either set up Brightness Uniformity after this period or do an initial setup and re check at 100 hours Set lamp power Make sure each Lamp Power setting is as high as possible for your application while still maintaining a good overall match of light outpu...

Страница 136: ...the White Uniformity menu set the Overall output level to 50 0 and all remaining slidebars to 0 0 This decreases the light output just enough throughout the screen so that any color level can then be increased later as necessary for matching light output from zone to zone Do not exceed 50 0 for Overall A higher level will likely interfere with achieving brightness uniformity and is not recommended...

Страница 137: ...Each corner is adjustable in either of its two adjacent side menus 11 When done all areas of a given screen should match Repeat Steps 2a and 2b for all remaining screens 12 Adjust LIGHT OUTPUT in 8 Zones a For each screen compare the light output of each edge and corner to that of the center If any of the areas differ use the White Uniformity menu to match edges and corners to the center as descri...

Страница 138: ...ckly and easily blend whitelevels along the edges of multiple adjacent projected images to create a single seamless larger image What is a Blend In simple terms a blend appears as a gradient strip along an edge of a projected image It is darkest along the extreme edge of the image and lightens nearer to the rest of the image see right This area runs along the edge of the projector s internal DMDs ...

Страница 139: ...uired Such a blend can vary along its length to compensate for curves Once downloaded to the projector simply apply the desired custom user blend by selecting it in the Blending Enable drop down list Edge blending software controls are located in the 2 page Edge Blending secondary menu which you can access via the Configuration menu Geometry and Color menu and select Edge Blending The More option ...

Страница 140: ...d Increasing the Blend Midpoint setting creates a blend that appears brighter than the rest of the image Decreasing the Blend Midpoint setting creates a blend that is darker than the rest of the image A setting of 50 means the midpoint is approximately 50 black for best results in most applications keep fairly close to this default Figure 3 45 Midpoint Examples Show Blending Overlap turns your def...

Страница 141: ... 25 along shared edges see Figure 3 46 Tiling is not built into this model of projector Physically align the projectors and images from your intended external source then match colors and Brightness Uniformity IMPORTANT For a shared edge all Blend procedures and settings should be identical on BOTH projectors 1 Start with 2 full screen projector images overlapping by approximately 12 5 25 each Dis...

Страница 142: ...h projectors 6 Check Blend If the blended region appears too dark or light in relation to the rest of the image Increase Blend MidPoint in both projectors to lighten the overall blend decrease to darken the overall blend Adjust Blend Shape in both projectors to fine tune change the amount of mid gray intensity as opposed to black white in the blend 7 Repeat with remaining projectors overlaps 8 Che...

Страница 143: ...s LAN Settings 2 Your PC must be Java enabled to v1 4 2 or higher to run ChristieNET 3 Depending on your projector model certain controls provided through ChristieNET are non functional 3 14 Working with the Lenses The Zoom Focus and Lens Offsets using either the built in keypad or standard IR remote as follows NOTE 1 The Zoom function does not apply to Fixed Lenses 2 Focus and Lens Offset apply t...

Страница 144: ... be notified via a serial communication only select the RS232 option To receive both types of notifications select All To disable error messages except for invalid user key entry which can t be hidden select OFF NOTE Text based status error messages also appear in the LCD Status Display window above the built in keypad at the rear of the projector They are accompanied by their corresponding 2 digi...

Страница 145: ...m warning indicates that a system malfunction has been detected see Status LED Codes below A system warning message replaces any input signal message and disappears when the input signal status changes While the projector will remain operational the message indicates the presence of a potentially serious problem that should be reported to the manufacturer You can press EXIT twice to remove the mes...

Страница 146: ...rrent lamp cables is not connected 26 Lamp door is open interlock 27 Lamp cannot ignite 28 Lamp has turned off unexpectedly 29 Lamp ballast is overheated 2C Lamp communications fault ballast is not detected SENSORS for COOLING 40 Lamp has shut down due to fan failure 46 The red TEC DMD has overheated 48 The blue TEC DMD has overheated 49 The prism has overheated 4C Projector has shut down due to c...

Страница 147: ... in keypad has re initialized IRAM a k a Panel Driver or IRAM TIPM Communications or EFIB or Modular Formatters 80 Unrecognized IRAM a k a Panel Driver 81 Unable to program a device on the IRAM 82 TI flash download fault critical error 83 TI flash download fault partial success 84 TI flash download fault partial success 85 TI I2 C fault write failure 87 Consecutive RDRAM faults from modular Format...

Страница 148: ...n 3 Operation BACKPLANE OR OPTIONAL MODULES A0 Unable to program the optional interface module A1 Unable to power the optional interface module A2 Unable to program the Backplane A3 Unable to program the Warp Module option Christie TWIST Table 3 9 System Error Codes ...

Страница 149: ...of the lamp Position all cables where they cannot contact hot surfaces or be pulled or tripped over NOTES 1 The American Conference of Governmental Industrial Hygienists ACGIH recommends occupational UV exposure for an 8 hour day to be less than 0 1 microwatts per square centimeters of effective UV radiation An evaluation of your workplace is advised to assure employees are not exposed to cumulati...

Страница 150: ...explode causing personal injury and or property damage NOTES 1 Christie s protective clothing recommendations are subject to change 2 Any local or federal specifications take precedence over Christie recommendations Cool the Lamp Completely The arc lamp operates at a very high pressure that increases with temperature Failure to allow the lamp to sufficiently cool prior to handling increases the po...

Страница 151: ...mix of distilled water and ethylene glycol Top up as necessary making sure not to over fill IMPORTANT Whenever coolant has been added or replaced check for a possible airlock at the next projector power up 4 3 Maintenance and Cleaning To help ensure optimized performance and reliability check electrical optical and other components regularly as described below Shock Hazard Disconnect projection he...

Страница 152: ...ms only Lens cleaning cloth microfibre such as Melles Griot 18LAB024 or equivalent Cleaning the Lens If Dusty 1 Brush most of the dust off with a camelhair brush and or blow dust away with compressed air 2 Fold a microfibre cloth smooth and gently wipe remaining dust particles off the lens Make sure to wipe evenly with the smooth portion of the cloth that has no folds or creases Do not apply press...

Страница 153: ...s of the projection head and ballast are unobstructed 4 4 Replacing the Lamp Filter The high brightness of your projector is provided by a Xenon lamp mounted at two ends within a reflector and housed in the locked lamp compartment of the projection head When the lamp approaches the end of its life it must be replaced do not exceed warranted lamp life by more than 20 as an old lamp becomes increasi...

Страница 154: ...nd only unscrew the lamp from the rear connector and carefully remove from the projector Immediately place the lamp inside the protective cover saved from previous installation and then seal it in a heavy carton on the floor where it cannot fall or be bumped Handle box with extreme caution the lamp is hazardous even when packaged Dispose of lamp box according to safety regulations for your area d ...

Страница 155: ...ositive lamp connector over the bulb end c Tighten setscrews in both negative and positive lamp connectors as shown in Figure 4 2 Figure 4 2 Secure Bulb at Cathode and Anode Connectors IMPORTANT Proper electrical contact prevents resistance in the lamp connectors If you accidentally touch the quartz body of the lamp with your bare hands clean the surface as described in 4 3 Maintenance and Cleanin...

Страница 156: ...ze in kilowatts as the previous lamp If your new lamp is rated higher or lower than the old lamp record the new Lamp Size 2 0 3 0 4 5 or 6 0 kW in projector memory as described below This setting establishes the proper range of power available for the installed lamp ensuring that the new lamp is neither underpowered nor over driven upon power up Do not attempt to ignite the lamp until its size kW ...

Страница 157: ...ox enter the serial number c Press ENTER on either keypad to record the number and to reset the lamp timer The timer now begins to log time for the new lamp 4 4 2 Filter Replacement Procedure Replace the air filter whenever the lamp module is replaced or more frequently if operating the projector in a dusty or dirty environment Check monthly in all cases The filter is located on the lamp side of t...

Страница 158: ...r filter compartment and slide all the way up behind the tabs then push the bottom of the air filter in 2 With the filter in place insert the bottom tabs of the filter door into the corresponding slots close the filter door and secure again with the 2 screws 4 5 Replacing a Lens A variety of lenses can accommodate different throw distances and specific types of installations Refer to the Christie ...

Страница 159: ...sult in injury or death Lens calibration must be performed each time a new lens is inserted or after performing manual lens mount adjustments This is critical to the projector functioning properly Failure to do so could result in damage to the lens mount the projector or the projection lens Make sure to secure with lens locking lever UP position and safety tether Refer to Figure 2 23 NOTES 1 Make ...

Страница 160: ......

Страница 161: ...re From the Status menu check the Alarms and Interlocks secondary menu From the web user interface check the Status System menu If there is any indication through the Status menu of a ballast communication problem re boot the projector and try turning the lamp ON again If a DMD temperature is too high the lamp will not ignite Cool the projector and try again Ensure there is proper ventilation If a...

Страница 162: ...by adjusting the XYZ values or use a light meter to check for changes in brightness Use a Minolta T10 illuminance meter hand held Position meter in center of screen to take reading Or Use a Minolta LS 100 luminance meter Point the lens at the center of the screen to take a reading Retake the reading each time an adjustment is made Always adjust XY values before adjusting Z values Repeat XY adjustm...

Страница 163: ...tion lens 5 4 Built In Keypad 5 4 1 Projector ON but No Backlight on Built In Keypad Check the following Confirm the harness is plugged into the back of the built in keypad accessible via the lamp compartment door Touch any key The backlight for the displays and keys should be present 5 5 Image Displays The following troubleshooting entries assume the use of a third party input source Before proce...

Страница 164: ... source connections again 5 5 5 The Display is Jittery or Unstable Check the following If the image display is jittery or blinking erratically ensure the source is properly connected and of adequate quality for detection With a poor quality or improperly connected source the projector repeatedly attempts to display an image however briefly The horizontal or vertical scan frequency of the input sig...

Страница 165: ...cably it is possible excessive voltage noise on the AC or ground input has interrupted the projector s ability to lock on to a signal Power down and up again 5 5 13 Colors in the Display are Inaccurate The color tint color space and or color temperature settings may require adjustment at your input source or in the projector 5 5 14 Display is Not Rectangular Check the following Check leveling of t...

Страница 166: ......

Страница 167: ...umens 13 000 Center lumens 2 0kW Lamp 6 1 3 Achievable Contrast Ratio With CDXL lamp and standard optical aperture installed With standard high brightness lens 2000 1 full field With optional high contrast lens 2800 1 full field 6 1 4 Colors and Gray Scale 6 1 5 Gamma Adjustable from 1 8 2 8 default 2 2 0 4 Pixel format H x V on 3 DMDs 2048 x 1080 Refresh rate 2D displays 23 97 65 Hz Refresh rate ...

Страница 168: ... displayed at a lower rate 6 3 2 Analog Video INPUTS 3 and 4 Total number of standard inputs 6 including Dual SD HD SDI Scan format Interlaced or Progressive Signal types color spaces RGB YPbPr Horizontal frequency range 15 120 kHz Vertical frequency range 23 97 150 Hz Pixel clock rate 13 220 MHz min Active pixels per scan line H 640 2048 Active lines per field frame V 200 1536 A D conversion reso...

Страница 169: ...ype for composite or separate H V Separate H and V Bi level or tri level sync on green Bi level or tri level composite Serrations and or Equalization pulses MacroVision for stnd prog video Polarity for composite or separate H V Positive or negative Maximum return loss VSWR 1 2 1 dB 200 MHz Interface standard DDWG DVI 1 0 Signal types color spaces RGB digital or analog YPbPr analog YCbCr digital no...

Страница 170: ... V 5 6 V or open Low 0 6V 0 9V 1mA Voltage output 5VDC 5 Current output 100 mA nominal 250 mA max Cable length 25 ft Number of IR sensors on projector 2 front and rear Wavelength of peak sensitivity 1000 nm approx Modulation carrier frequency 38 kHz nominal Encoding method bi phase Range using optional lite remote 100 ft 50 ft min Number of ports 1 Standard 100Base TX Connector type RJ 45 Max baud...

Страница 171: ... port Number of connectors 1 Interface RS232 Connector type 9 pin subminiature D male Number of connectors 1 Interface 5V TTL compatible NOTE Opto isolated at ballast end Connector type 9 pin subminiature D female Number and type of outputs 1 lamp enable low enable lamp 4 safety interlocks high disable lamp 1 5VDC for opto isolated interface Projection Compartment AC near Panel B at front Connecto...

Страница 172: ...note excluding lamp 50 A Power consumption max 14 4 kVA 9 1 kW all regions Current rating continuous of 3 phase AC input at breaker power switch 30 A all regions Breaker power switch rating 50 A Ballast Output to Projection Head Operating voltage range 18 46 VDC Start up voltage open current 125 155 VDC Operating current range 50 180 A Ripple 1 max 25 C Control ports Refer to 6 4 7 Control Port Fr...

Страница 173: ... B Class A Unintentional Radiators CISPR 22 EN55022 Class A Radio disturbance characteristics for Information Technology Equipment ITE 6 11 EMC Immunity CISPR 24 EN55024 All parts for immunity characteristics for Information Technology Equipment ITE 6 12 Operating Environment 6 12 1 Non Operating Environment Temperature 10 C to 35 C 50 F to 95 F Humidity non condensing 20 to 80 Altitude 0 3000 met...

Страница 174: ...ng Weights Installed Weight Figure 6 1 Overall Size Dimension Product dimensions W x L x H without lens including feet at minimum height position and without handles 1257 mm x 684 mm x 577 mm 49 5 x 26 5 x 22 7 Product dimensions W x L x H without lens including feet at minimum height position and handles 1362 mm x 800 mm x 577 mm 53 6 x 31 5 x 22 7 Packaging dimensions W x L x H shipped without l...

Страница 175: ... 804656 xx Roadie HD 35K User Manual Misc hardware including Allen Keys Projection Lenses The projection head is compatible with the following optional lenses 0 8 1 fixed throw ratio lens 113 104106 XX 1 1 fixed throw ratio lens 38 809071 XX 1 25 1 45 1 38 809073 XX 1 45 1 8 1 38 809074 XX 1 8 2 4 1 38 809075 XX 2 2 3 0 1 38 809076 XX 3 0 4 3 1 38 809077 XX 4 3 6 0 1 38 809072 XX 5 5 8 5 1 38 8090...

Страница 176: ...ry image warping and edge blending 108 103001 XX FredFrame Rigging Frame 38 814007 XX Rigging Clamps for flying projection head by handles 113 102101 XX 10 Bit KoRE Librarian Setup Software Website download password required High contrast internal aperture kit 38 813028 XX Analog and Digital Input Modules Refer to Section Appendix D Optional Input Modules Xenon Lamp 2 kW 3 kW 4 5 kW and 6 kW Servi...

Страница 177: ...wnloading new software to the projector requires RS 232 or RS 422 connected to the 9 pin connectors on the side of the projector only do not download using either of the 6 pin XLR RS 422 ports located at the rear of the projector NOTE Using a rear RS 422 port 6 pin XLR or Ethernet link for downloading new software to the projector is not supported A 1 3 RS 422 Connections Depending on your RS 422 ...

Страница 178: ...x Connect Tx to Rx Connect Rx to Tx Connect Rx to Tx 1 TXD 2 RXD 3 TXD 4 RXD 5 n c 6 12V 7 n c 8 GND 9 n c PROJ 1 From projector rear to RS 422 compatible computer Wiring Shielded Multi conductor Cable FEMALE Projector RS 422 male Rx 12V GND Tx Rx Tx 1 2 3 4 5 6 1 2 3 4 5 6 Male proj port 1 Wiring varies among computers Consult the documentation for your device Generally the 12V pin 5 is not conne...

Страница 179: ... Rx Tx PROJ 2 PROJ 1 Shielded Multi conductor RS 422 Cable with 6 pin XLR Connectors From projector to projector via RS 422 Projector RS 422 male Projector RS 422 male MALE FEMALE Shield Shield to another cable Wiring Extension cable Rx 12V GND Tx Rx Tx Rx 12V GND Tx Rx Tx 1 2 3 4 5 6 1 2 3 4 5 6 FEMALE FEMALE Shield Shield Wiring Swap cable Rx 12V GND Tx Rx Tx Rx 12V GND Tx Rx Tx 1 2 3 4 5 6 1 2 ...

Страница 180: ...al Communication Cables Shielded Multi conductor Cable MALE FEMALE From projector to projector via RS 232 Standard RS 232 cable with 9 Pin D Connectors Projector RS 232 OUT male Projector RS 232 IN female Shield Shield 2 2 5 4 3 2 1 3 5 3 5 GND GND Tx Rx Rx Tx PROJ 2 PROJ 1 ...

Страница 181: ... 1 01 2010 Appendix B Menu Tree B 1 OnScreen Menu Tree Provides a graphical representation of the software menu structure for the Roadie HD 35K This allows you to quickly locate and navigate to a specific menu and associated options secondary menus ...

Страница 182: ......

Страница 183: ...uts Simulation 3D Frame Delay Monitor 1 Frame Delay 2 Reserved 3 Reserved 4 Reserved 5 Reserved 6 Frame Lock Enable 7 Reserved Lamp Lamp Hours Lamp S N 1 Lamp Message 2 Lamp Limit 3 Lamp Mode 4 Power 5 Intensity 6 Reserved 7 Lamp History 8 Change Lamp 9 Cable Length m 0 LampLOC PIP and Switching 1 Swap Main and PIP images 2 PIP Enable 3 PIP Size Position 4 PIP Image Settings 5 PIP Border Width 6 P...

Страница 184: ...422 3 Projector 4 Network Routing 5 Ethernet Settings 6 Broadcast Key 7 Backlight 8 Front IR Protocol 9 Rear IR Protocol 0 Wired Keypad Protocol Ethernet Settings 1 DHCP Enabled 2 IP Address 3 Port 4 Subnet Mask 5 Default Gateway 6 Network Name 7 ArtNet Interface Settings Main Menu continued Pg B 4 Option 1 Card Dual SD HD SDI 1 Loop Thru Output Selection 2 Dual Link Format Selection Note Menu is ...

Страница 185: ... of Red 5 Blue Part of Red 6 Next Color 7 Copy From Green Color Adjustments 1 Select Color Adjustment 2 Color Temperature By x y equivalent 3 Red Part of Green 4 Green Part of Green 5 Blue Part of Green 6 Next Color 7 Copy From Blue Color Adjustments 1 Select Color Adjustment 2 Color Temperature By x y equivalent 3 Red Part of Blue 4 Green Part of Blue 5 Blue Part of Blue 6 Next Color 7 Copy From ...

Страница 186: ...eserved Main Menu continued pg B 6 Left Uniformity 1 Left Side R 2 Left Side G 3 Left Side B 4 Top Left Corner R 5 Top Left Corner G 6 Top Left Corner B 7 Bottom Left Corner R 8 Bottom Left Corner G 9 Bottom Left Corner B 0 Color Enable Right Uniformity 1 Right Side R 2 Right Side G 3 Right Side B 4 Top Right Corner R 5 Top Right Corner G 6 Top Right Corner B 7 Bottom Right Corner R 8 Bottom Right...

Страница 187: ...t Librarian user interface provides a graphical Helper to aid in the setup of the GPIO In addition Real Time events can be used to trigger different GPIO output states when certain events occur Refer to KoReLibrarian and the Serial Protocol manual for more details The GPIO connector can be configured to automate any number of events using the serial command code GIO Each pin is defined as either a...

Страница 188: ...IO C2 O Set pin 2 configuration to output GIO 2 H Set pin 2 to high state GIO Request the state and configuration of all pins GIO HHLLHLH OOIOOOI Reply of pin state and configuration GIO C2 Request configuration for pin 2 GIO C2 O Reply with pin 2 configuration as output GIO 2 Request the state of pin 2 GIO H Reply with pin 2 state as high Parameter Name Value P1 RTE type G Real Time I O Event P2 ...

Страница 189: ...l Visual Interface DVI single channel Supports VESA Extended Display Identification Data EDID Provides an active loop through using a DVI connector conforming to the DVI Specification D 2 Dual SD HD SDI Module NOTE Standard with this projector This module accepts one or two independent standard or high definition serial digital inputs decodes them for processing in the main electronics of the proj...

Страница 190: ......

Страница 191: ......

Страница 192: ...itchener ph 519 744 8005 United Kingdom ph 44 118 977 8000 Germany ph 49 2161 664540 France ph 33 0 1 41 21 44 04 Hungary Eastern Europe ph 36 0 1 47 48 100 Singapore ph 65 6877 8737 Shanghai ph 86 21 6278 7708 Beijing ph 86 10 6561 0240 Korea ph 82 2 702 1601 Japan ph 81 3 3599 7481 Corporate offices Worldwide offices ...

Отзывы: