Chapter 9
Software
78
6501288-EN / 04
pic. 15
1
Operation data memory (the last 50 inputs are saved in this ring memory)
2
Window selection (the current window is colour-accentuated)
Страница 1: ...6501288 EN 04 Commercial vehicle wash unit MAGNUM C5X00 Operation manual ...
Страница 2: ......
Страница 3: ...6501288 EN 04 2018 01 25 Otto Christ AG Wash Systems PO Box 12 54 87682 MEMMINGEN GERMANY Memminger Str 51 87734 BENNINGEN GERMANY 49 8331 857 0 info christ ag com Document Language Ident No Revision Date Postal address Factory office Telephone E mail ...
Страница 4: ......
Страница 5: ...ditional programs 20 4 2 3 1 Additional programs basic version 20 4 2 3 2 Optional additional programs 21 5 Technical data 22 5 1 Requirements on site 22 5 1 1 Climbing aid 22 5 1 2 Water quality 22 5 1 3 Wash hall installations room 22 5 2 Basic version 23 5 3 Operation terminal 26 5 4 External control cabinet 26 6 Transport and storage 27 7 Installation and commissioning 28 7 1 Basic setting 28 ...
Страница 6: ...rror memory 52 8 8 Storm protection 53 8 9 Shut down 54 8 9 1 General pointers 54 8 9 2 Dosing pumps 54 8 9 3 Shut down the installation 54 9 Software 55 9 1 Manual control 55 9 1 1 Turn the lateral horizontal brushes outwards inwards 55 9 1 2 Direction change 56 9 1 3 Manual control of the horizontal brush and the drive unit 57 9 1 4 Wash program interruption cancellation 58 9 2 Menu 58 9 2 1 Acc...
Страница 7: ...spray quality of the nozzles 98 11 7 2 Check the tilt safety device for lose screwing and damage 99 11 7 3 Check and grease the wire ropes 100 11 8 Quarterly check and maintenance 100 11 8 1 Check the guide pulleys for damage and wearout 100 11 8 2 Grease the driving device of the brushes 101 11 8 3 Clean and check the storage tank 102 11 9 Half yearly check and maintenance 104 11 9 1 Check the tr...
Страница 8: ...o the employees of Otto Christ AG Otto Christ AG reserves the right to change specifications executions and technical data held within this document without prior notice The installation was developed and manufactured in compliance with the valid European standards and directives The commissioning of the installation is prohibited until it has been ascertained that the installation on site complie...
Страница 9: ...s the activities to be carried out Describes the state after an activity has been carried out Describes the result after an activity has been carried out 2 1 Definition The trimming is the material which is in direct contact with the vehicle e g wash material drying material brush shells etc A detergent container is a container from which a dosing pump extracts the detergent for the vehicle wash A...
Страница 10: ...e operation Operation devices shall be placed at least 1 m away from the movement zone of the installation or spatially separated The operation devices shall be placed so that it is possible to see the installation while commissioning it In order to position and centre the vehicles correctly a guidance equipment shall be available The observance of every pointer contained in this manual is part of...
Страница 11: ...e passenger compartment during the automatic wash or the passage Ensure that nobody is in the operation area during the automatic wash Turn off the main switch before beginning the work and avoid reconnection There is a risk of injury due to the contact with electric voltage Do not spray water or use high pressure in the proximity of switchboard plants opera tion devices Ensure that the installati...
Страница 12: ...are suitable for the material Clean with appropriate means Observe the safety and usage pointers of the detergent manufacturer Rinse the installation with sufficiently fresh water after the cleaning Mixing strong acid and alkaline detergents together leads to chemical reactions Never mix different detergents together Respect the safety data sheets regarding the auxiliary and operating materials us...
Страница 13: ...ate such ones shall be available The operator shall place a prominent notice about this person Minors may not work in the installation If the training makes it necessary for minors to work in the installation suitable experienced and reliable persons having the permission shall supervise them Missing knowledge specific to the installation The work may only be carried out by trained personnel The s...
Страница 14: ...on If difficulties arise con tact the customer service Provide sufficient lighting The operating instructions of the installation shall be permanently available and visible for the user Deny the operation of the installation to unauthorised persons The operator shall permanently and clearly indicate the prohibition of unauthorised ac cess in the installation Prevent any slip hazard due to regular ...
Страница 15: ...ion C5000 C5100 pic 1 1 Motion rail 2 Drive unit with tilt safety device 3 Vertical left with switchboard plant and panelling 4 Vertical right with dosing system and panelling 5 Cross member with panelling 6 Lateral brush system left 7 Lateral brush system right 8 Horizontal brush system optional 9 Emergency stop switching device optional Brush watering equipment Rinsing equipment Control cabinet ...
Страница 16: ...eral brush system 1 right 8 Lateral brush system 2 left 9 Lateral brush system 2 right 10 Horizontal brush system optional Brush watering equipment Rinsing equipment Control cabinet external 4 1 1 3 Basic version operation terminal pic 3 1 Operation terminal VARIO L 2 Operation panel 4 2 Function description 4 2 1 Wash programs stationary wash Basic function of the wash pro grams Forward cycle of ...
Страница 17: ...h at the front and rear of the vehicle 800 mm 4 Bus mirror program Strong contact pressure of the brushes configu ration bus truck Cross over wash at the front of the vehicle Lateral brushes avoid the outside mirrors of the vehicle Horizontal brush inactive at the front of the vehi cle Cross over wash at rear of the vehicle Wash height of the horizontal brush at rear of the vehicle 800 mm 5 Truck ...
Страница 18: ...ck Medium contact pressure of the brushes config uration mini bus Cross over wash at the front and rear of the vehi cle Wash height of the horizontal brush at the front of the vehicle 800 mm Spoiler protection The horizontal brush is deactivated after the cab in and put into basic position Disposal vehicle Strong contact pressure of the brushes configu ration bus truck Cross over wash at the front...
Страница 19: ...sh at the front of the vehicle The lateral brushes avoid the outside mirrors of the vehicle The horizontal brush is inactive at the front of the vehicle Wash height of the horizontal brush between the vehicle and the trailer 800 mm Cross over wash at the rear of the trailer Wash height of the horizontal brush at the rear of the trailer 800 mm 4 2 2 Wash programs for semi stationary bus wash only C...
Страница 20: ...ded speed through the standing active unit for the horizon tal and lateral wash As the vehicle exits the light barrier for the positioning becomes free and the positioning lights indicate the stop symbol The vehicle stops and the unit washes the rear sides and roof until it reaches its basic position The positioning lights indicate the forward symbol and the vehicle exits the unit s action area Th...
Страница 21: ...sh device stationary nozzle cane laying across or underbody wash device stationary nozzle cane rectangular start and end of the underbody wash light barrier controlled underbody wash with fresh or recycled water during the passage of the vehicle High pressure lateral wash High pressure lateral wash device internal Forward cycle high pressure lateral wash with recycled water parallel to the brush w...
Страница 22: ...r Quality pH value 6 5 9 5 Conductivity max µS cm measuring value fresh water 1200 Filtered elements max mg l 50 grain size 0 025 mm Sedimentation max ml l 0 5 Odour free of bad odours Fresh water Quality drinking water Sewage according to local regulations 5 1 3 Wash hall installations room Designation Unit Value Temperature C 5 to 40 Lighting lx at least 150 Source of fresh air aerate and deaera...
Страница 23: ...85 3700 mm 3840 4385 3800 mm 3940 4485 3900 mm 4040 4585 4000 mm 4140 4685 4100 mm 4240 4785 4200 mm 4340 4885 4300 mm 4440 4985 4400 mm 4540 5085 4500 mm 4640 5185 4600 mm 4740 5285 4700 mm 4840 5385 4800 mm 4940 5485 4900 mm 5040 5585 5000 mm 5140 5685 Designation Unit Value Measurements Wash width mm 2900 3200 Wash width mm 3400 3700 Width mm 4600 4900 Depth C5000 C5100 with rotating horizontal...
Страница 24: ...1845 1870 2045 2070 3600 kg 1860 1885 2060 2085 3700 kg 1875 1900 2075 2100 3800 kg 1890 1915 2090 2115 3900 kg 1905 1930 2105 2130 4000 kg 1920 1945 2120 2145 4100 kg 1935 1960 2135 2160 4200 kg 1950 1975 2150 2175 4300 kg 1965 1990 2165 2190 4400 kg 1980 2005 2180 2205 4500 kg 1995 2020 2195 2220 4600 kg 2010 2035 2210 2235 4700 kg 2025 2050 2225 2250 4800 kg 2040 2065 2240 2265 4900 kg 2055 208...
Страница 25: ...0 3475 3500 4800 kg 3250 3275 3500 3525 4900 kg 3275 3300 3525 3550 5000 kg 3300 3325 3550 3575 Designation Unit Value Noise emission 1 Emissions acoustic pressure level LpA dB A 75 Motion rail Type with tilt safety device Electric connection with external control cabinet Nominal power 2 3 brushes kW 4 5 6 Nominal power 4 5 brushes kW 7 5 9 Motion speed m min 5 18 Water connection Connection NW 2 ...
Страница 26: ...antity piece 39 2 Key operated switch piece 1 Electric connection Control voltage V DC 24 Protection type IP 65 Surrounding tempera ture C 10 to 40 5 4 External control cabinet Designation Unit Value Measurements Width mm 600 Height mm 600 Depth mm 210 Electric connection Connection 3 N PE Voltage V 400 5 Frequency Hz 50 1 Protection type IP 65 Nominal power kW according to order see rating plate ...
Страница 27: ... installation is performed by Otto Christ AG or a subcontractor commissioned by Otto Christ AG who is exclusively responsible The installation shall not be stored outside for a long period The storage surface shall be reinforced and accessible with a forklift truck Cartons and electric devices shall be pro tected against the wetness Store the detergents according to the information of the safety d...
Страница 28: ...g the installation is carried out by Otto Christ AG or by a commis sioned subcontractor who is exclusively responsible 7 1 Basic setting 7 1 1 Water system Basic setting Pressure reducer fresh and recycled water 3 5 bar Pressure switch fresh and recycled water 1 bar 7 1 2 Dosing pumps Dosing pump Stroke length Shampoo M7 100 Drying aid M8 100 Pre wash chemistry M9 100 Active foam M34 100 Stroke fr...
Страница 29: ...e installation is fixed with the storm protection If the wind speed exceeds 50 km h ensure that the installation is not taken into opera tion 8 2 General pointers INFORMATION Ensure that the persons who carry out the activation the monitoring the care the check and the maintenance are acquainted with this kind of work the operation manual and the danger in conjunction with the installation INFORMA...
Страница 30: ...n their supports 5 Switch on the main switch The control boots up 6 If the function lock the unit is assigned to the key operated switch of the operation panel release the installation with the key operated switch The installation is operational If the installation is operational then the following will be displayed CHRIST MAGNUM xx yy yy yyyy zz zz Select wash program Acknowl xx day yy yy yyyy da...
Страница 31: ...teral brushes 5 Button drive unit 6 Display 7 Key operated switch function according to the order 8 Knowledge key 9 Start button 10 Program keys according to the order 11 Program keys according to the order pic 5 vertical detergent side 1 Button Dosing pump ON All the dosing pumps are switched on for approx 1 minute Press the button again within the switching duration to deactivate the dosing pump...
Страница 32: ...k 8 5 Operation panel pic 7 The keys on the operation panel are assigned as follows Increase a value Set the value to ON Scroll up in a list Decrease a value Set a value to OFF Scroll down in a list Scroll forward in the current menu level Scroll backward in the current menu level Go back to the previous menu level Confirm settings Select a menu level Delete reset settings Input digits Key assignm...
Страница 33: ...to the card reader XX C Current temperature of the printed circuit board of the CPU yy Status of the card reader zz Current event of the card reader Softkey P set the connection protocol with the control of the installa tion Carry out the connection protocol only in consultation with the customer service If the setting of the connection protocol is wrong no connection with the installation will be...
Страница 34: ...ast Cancel Return Resume The keys on the operation panel are assigned as follows Increase the contrast with the softkey Decrease the contrast with the softkey Accept modifications permanently with the OK softkey Exit the operation panel with the Cancel softkey Go back to the previous menu point with the Return softkey Go to the next menu point with the Resume softkey 8 5 1 3 Test the card reader C...
Страница 35: ... and deactivates the bar code scanner during the testing mode The reading quality is displayed in percent in the abc field The Bar code scanner softkey activates the bar code scanner for a reading process The read bar code is displayed in the abc field X Status of the bar code scanner 0 inactive 1 automatic mode 2 activate a reading process 3 activates the testing mode The Config softkey enables t...
Страница 36: ...rmed with the key E Input digits Save the code Exit the operation panel with the Cancel softkey 8 5 1 6 Set the service code to access the CPU menu Cancel Return Resume The keys on the operation panel are assigned as follows xxxx Service code Softkey open the card slot The red light emitting diode next to the button shines during the signal s duration Set the indication to 0 The code cannot be del...
Страница 37: ...tkey 8 5 1 8 Open the card slot pic 9 operation panel 1 Softkey Middle 2 Softkey Below 3 Key C Open the card slot Requirement The installation is operational 1 Press the button C 2 Press the softkey Middle 3 Press the softkey Below 4 Input the operator code for the CPU menu by means of the numeric keypad Set modify the operator code for the CPU menu 8 5 1 5 Set the operator code for the CPU menu p...
Страница 38: ...ction with operation panel No Wash program 0 Drive into basic position no wash program 1 Car 2 Minibus light commercial vehicle 3 Bus 4 Bus mirror program 5 Truck 6 Articulated lorry 7 Truck with trailer 8 Cabin Additional program Loading ramp protection Windscreen mirror Pre wash optional Underbody wash optional HP lateral wash optional High pressure wash optional HP chassis wash optional Attenti...
Страница 39: ...cknowl Alternating with the indication CHRIST MAGNUM xx yyyy E C 0 9 Start Acknowl xx program number yyyy program name sss program section INFORMATION After the wash program selection the Start key on the operation terminal and the light emitting diodes next to the key of the selected wash program light up If desired input the additional program s number by means of the numeric keys or scan within...
Страница 40: ... the keys and z additional program No INFORMATION The selected wash and additional programs can be deleted with the the key C 8 6 2 2 Manual program start Press the lit key Start CHRIST MAGNUM xx yyyy running sss DW SW 0 FW H man C Acknowl 8 6 2 3 Automatic program start Warning Automatic wash course Risk of injury due to moving components of the installation Do not leave the vehicle in case of di...
Страница 41: ...the external devices are activated They automatically start as the vehicle reaches their operation area INFORMATION In case of automatic start the wash program will start automatically after the positioning of the vehicle 8 6 3 Wash program interruption cancellation CHRIST MAGNUM xx yyyy running sss Acknowl xx program number yyyy program name sss program section Proceed as follows on the operation...
Страница 42: ... defined exit position If the wash program is over the button Start on the operation panel lights up the installation is in basic position or in a defined exit position 8 7 Manual operation INFORMATION In order to activate the manual operation put the key operated switch onto manual opera tion and make sure no wash program is running Depending on the configuration the following devices are selecta...
Страница 43: ...e E key CHRIST MAGNUM Drive unit H E Enter Acknowl The keys on the operation panel are assigned as follows Scroll in the current menu Select the menu Exit the menu progressively 8 7 1 Drive unit Select the menu Drive unit with the key or CHRIST MAGNUM Drive unit H E Enter Acknowl Confirm with the E key CHRIST MAGNUM Drive unit xxx cm Backward Forward H Acknowl xxx Current position Access Key assig...
Страница 44: ...zontal brush with the key or CHRIST MAGNUM Horizontal brush H E Enter Acknowl Confirm with the E key CHRIST MAGNUM Horizontal brush Lift Lower C H Acknowl The keys on the operation panel are assigned as follows Lift the horizontal brush Lower the horizontal brush Provided that no program is selected deactivate the hori zontal brush Exit the menu progressively 8 7 3 Lateral brushes Select the menu ...
Страница 45: ...Provided that no program is selected deactivate the lat eral brushes Exit the menu progressively 8 7 4 Horizontal beam support for horizontal nozzles Select the menu Horizontal beam nozzle support with the key or CHRIST MAGNUM Horizontal beam nozzle support H E Enter Acknowl Confirm with the E key CHRIST MAGNUM Horizontal beam nozzle support Lift Lower C H Acknowl The keys on the operation panel a...
Страница 46: ... MAGNUM 4 Water 5 Water 6 Water H 1 M7 2 M8 3 M9 C Acknowl The keys on the operation panel are assigned as follows Switch on the dosing pump for shampoo M7 Switch on the dosing pump for drying aid M8 Switch on the dosing pump for pre wash chemistry M9 Switch on the water supply of dosing pump for shampoo M7 Switch on the water supply of dosing pump for drying aid M8 Switch on the water supply of t...
Страница 47: ...assigned as follows Switch on the water supply for the forward cycle wash Switch on the water supply for the backward cycle wash and rinsing Switch off the water supplies Exit the menu progressively 8 7 7 High pressure portal Select the menu High pressure portal with the key or CHRIST MAGNUM High pressure portal H E Enter Acknowl Confirm with the E key CHRIST MAGNUM 1 Lateral HP 3 Chassis HP 2 Hor...
Страница 48: ... CHRIST MAGNUM Pre wash H E Enter Acknowl Confirm with the E key CHRIST MAGNUM 1 Pre wash water H 2 Pre wash chemistry C off Acknowl The keys on the operation panel are assigned as follows Switch on the water supply of the dosing pump for pre wash chemistry Q9 Switch on the dosing pump for pre wash chemistry Q9 Deactivate the dosing pump and the water supply Exit the menu progressively 8 7 9 Osmos...
Страница 49: ...off the osmosis water supply Exit the menu progressively 8 7 10 Active foam device Select the menu Active foam device with the key or CHRIST MAGNUM Active foam device H E Enter Acknowl Confirm with the E key CHRIST MAGNUM 1 Foam water H 2 Foam chemistry and air C OFF Acknowl The keys on the operation panel are assigned as follows Switch on the water supply for the active foam Switch on the dosing ...
Страница 50: ...Confirm with the E key CHRIST MAGNUM 1 Under chassis wash ON H C Under chassis wash OFF Acknowl The keys on the operation panel are assigned as follows Switch on the water supply for the under chassis wash device Switch off the water supply for the under chassis wash device Exit the menu progressively 8 7 12 Water emptying Select the menu Water emptying with the key or CHRIST MAGNUM Water emptying...
Страница 51: ...ing Exit the menu progressively 8 7 13 Doors Select the menu Doors with the key or CHRIST MAGNUM Doors H E Enter Acknowl Confirm with the E key CHRIST MAGNUM Access door Exit door H 1 down 7 up 3 down 9 up Acknowl The keys on the operation panel are assigned as follows Close the access door Open the access door Close the exit door Open the exit door Exit the menu progressively Key assignment Key a...
Страница 52: ... Home E Enter Acknowl Confirm with the E key CHRIST MAGNUM xxx Fyyy TTTT dd dd dddd zz zz zz Status Acknowl xxx counting number Fyyy error number TTTT short error description dd dd dddd date zz zz zz time Status error status empty time of occurrence acknowledged time of knowledge program combination as errors occurred during a wash The keys on the operation panel are assigned as follows Scroll thr...
Страница 53: ...s locked in place with the storm protection If the wind speed exceeds 50 km h ensure that the installation is not taken into opera tion pic 10 1 Plug in bolt 2 Floor support 3 Proximity switch 4 Bolt support INFORMATION Do not move the installation if it is locked in place by means of the plug in bolt The text Unit closed storm protection ON is displayed The program selection isn t possible any mo...
Страница 54: ...ATION Separate operation manual of the dosing equipment 8 9 3 Shut down the installation Take the installation out of operation 1 If the function lock the unit is assigned to the key operated switch of the operation panel lock the installation with the key operated switch 2 Close the gate valves in the water pipes 3 Close the gate valves in the air supply 4 If the option storm protection is availa...
Страница 55: ... by outwards inwards motion the horizontal brush and or the lateral brushes A star before the short designation of the component means that it has been deactivat ed The deactivations carried out during the program are reset at the end of the program INFORMATION Deactivating activating the horizontal brush or the lateral brushes before starting the wash program means that it they will not be activa...
Страница 56: ... 3 rd key activation lateral brush SW inwards The drive unit stands still during the outwards motion 9 1 2 Direction change INFORMATION The manual control enables the direction change during the wash program CHRIST MAGNUM xx yyyy running sss DW SW 0 FW H man C Acknowl xx program number yyyy program name sss program section Proceed as follows on the operation panel to change the direction or press ...
Страница 57: ... program name sss program section Press the key H The drive unit stops The lateral brushes and the horizontal one are still activated CHRIST MAGNUM Lift DW lower DW H Autom FW backward FW forward Acknowl During the manual control the keys are assigned as follows and carry out the motion as long as the corresponding key is actuated Lift the horizontal brush Lower the horizontal brush Put the drive ...
Страница 58: ...l to interrupt the wash program Press the key C The running wash program is interrupted CHRIST MAGNUM xx yyyy interrupted Program interrupted Acknowl Alternating with the indication CHRIST MAGNUM xx yyyy interrupted Start continue C cancel Acknowl Press the Start key Resume the wash program Press the C key Cancel the wash program 9 2 Menu INFORMATION The menu contains the following menu points whi...
Страница 59: ...1 Access Proceed as follows on the operation panel to access the menu Machine operation ter minal or Wash cards and theirs menus Press the key H CHRIST MAGNUM Manual H Home E Enter Acknowl Select the menu level Menu with the key or CHRIST MAGNUM Menu H Home E Enter Acknowl Confirm with the E key CHRIST MAGNUM Input code _ _ _ _ H E C 0 9 Acknowl Input the 4 digit operator code 1111 by means of the...
Страница 60: ...ower measurement value of the horizontal brush DW idle run 0 0 255 Last recorded power meas urement value of the horizon tal brush SWR current value 0 0 255 Current power measurement value of the lateral brush right SWR idle run 20 0 255 Last recorded power meas urement value of the lateral brush right SWL current value 0 0 255 Current power measurement value of the lateral brush left SWL idle run...
Страница 61: ...k Counter contents Counter contents menu Daily wash counts Daily wash counts menu Wash programs Daily wash counts for wash programs Total washes 0 0 9999 Total counter Wash program 1 0 0 9999 Wash program 1 Wash program 2 0 0 9999 Wash program 2 Wash program 24 0 0 9999 Wash program 24 Additional programs Daily wash counts for addition al programs Additional program 1 0 0 9999 Additional program 1...
Страница 62: ...ST MAGNUM Daily wash counts H Home E Enter Acknowl Select the desired menu level Daily wash counts or Total wash counts with the key or and confirm with the key E Select the menu level Delete daily wash counts with E in the menu level Daily wash counts with the key or Press the key E to delete the daily wash counts 9 2 1 Access page 59 9 2 2 3 Door control Level Value Unit min max Remark Door cont...
Страница 63: ...P lance free for wash 0 s 0 9999 Duration for the HP lances release in seconds Proceed as follows on the operation panel in the menu Machine to access the menu Release HP lances time Select the menu level Release HP lances time with the button or CHRIST MAGNUM Release HP lances time H Home E Enter Acknowl Confirm with the E key CHRIST MAGNUM HP lance free for wash xxxx s H C Clear Acknowl 9 2 1 Ac...
Страница 64: ...9 2 1 Access page 59 9 2 3 2 Menu Program selection Level Value Unit min max Remark Program selection Menu automatic program selection Select program again 0 Re select the program auto matically after the wash 0 no 1 yes Wash program 0 0 32 Wash program number for the automatic program selection after the activation Additional program 1 0 0 1 Additional program 1 for the automatic program selectio...
Страница 65: ...the menu Program selection Select the menu level Program selection with the key or CHRIST MAGNUM Program selection H Home E Enter Acknowl Confirm with the E key CHRIST MAGNUM Re select program OFF H C Clear Acknowl 9 2 1 Access page 59 9 2 3 2 1 Modify operator code Proceed as follows on the operation panel to modify the operator code in the menu Op eration terminal Select the menu level Program s...
Страница 66: ...tion panel in the menu Operation terminal to access the menu Modify time date Select the menu level Modify time date with the key or CHRIST MAGNUM Modify time date H Home E Enter Acknowl Confirm with the E key CHRIST MAGNUM Time date zz zz zz YY YY YYYY xx H C Acknowl xx day yy yy yyyy date zz zz zz time Press the key or C to activate the input As the time runs in the background the displayed one ...
Страница 67: ...r 9 Software 6501288 EN 04 67 INFORMATION The value mentioned between the flashing parenthesis can be reset to 00 with the key C or to the desired value with the key or The weekday is calculated with the date ...
Страница 68: ...2 Port number server 2 0 0 65535 Port number server 2 CIS Magnum status 0 0 65535 CIS Magnum status Remote access 0 0 2 Allow the remote access 0 no 1 yes until the end of the following wash 2 yes always In order to access the menu CIS Magnum proceed as follows on the operation panel in the menu Operation terminal Select the menu level CIS Magnum with the key or CHRIST MAGNUM CIS Magnum H Home E E...
Страница 69: ...cted opera tion terminals Select the menu UBT with the key or CHRIST MAGNUM UBT H Home E Enter Acknowl Confirm with the E key CHRIST MAGNUM Function switch BTx320 2 H C Clear Acknowl 9 2 1 Access page 59 9 2 4 Menu Wash cards 9 2 1 Access page 59 INFORMATION The display indications of the operation terminal regarding the currency the program name and the installation number relative to the menu Wa...
Страница 70: ...TION Every data belonging to this card is indicated on the display An exclamation mark instead of a number or after it means that this card does not match with this unit CHRIST MAGNUM Single card Unit xx CNo xx Total xx Credit xx PNo xx xxxxxx Acknowl CHRIST MAGNUM Multiple c Unit xx CNo xx Total xx Credit xx PNo xx xxxxxx Acknowl CHRIST MAGNUM Long term c Unit xx CNo xx Total 99 Credit 99 PNo xx ...
Страница 71: ...No xx Credit xxx xx x Code xx Acknowl Unit unit number CNo Card number Rest credit with currency Code code of the card Withdraw the card CHRIST MAGNUM Read wash cards Insert card H Home Acknowl Exit the menu progressively 9 2 4 2 Programme wash cards Proceed as follows on the operation panel in the menu Wash cards to programme wash cards Select the menu level Programme wash cards with the key or C...
Страница 72: ... card 99 The following is displayed corresponding to the input CHRIST MAGNUM Programme wash cards 1 1 Single card Card number 0 Acknowl CHRIST MAGNUM Programme wash cards 1 xx Multiple card Card number 0 Acknowl CHRIST MAGNUM Programme wash cards 1 99 Permanent card Card number 0 Acknowl Press the key Input the card number by means of the numeric keys INFORMATION The card number increases by 1 wit...
Страница 73: ...ge 38 Do not press the key Start Insert the card The card is written checked and returned Withdraw the card The card reader is ready to programme other cards with the same data Press the key H to modify the wash or the additional ones Press consecutively the keys C and Start to close the programming 9 2 4 3 Programme value cards Proceed as follows on the operation panel in the menu Wash cards to p...
Страница 74: ... of a free software VNC Viewer e g Real VNC via Ethernet PC network The VNC Viewer and the network connectivity are not part of the delivery extent The VNC Viewer can be downloaded free of charge from the Internet The following functions in the visualisation differ from one another operation terminal illustration of the operation panel with limited functionality depending on the activa tion wash c...
Страница 75: ...the archive folder User name e g ChristAG Password e g Magnum2013 Function Send e mail IP address of the SMTP server Port of the SMTP server E mail address of the sender control E mail addresses of the receivers Input the IP address of the control of the unit after the start of the VNC Viewer pic 11 1 IP address INFORMATION The current IP address of the control can be queried in the menu Operation...
Страница 76: ... basic position Depending on the configuration the key can be hidden 5 Keys indications as on the operation panel the activated keys indications are colour accentuated Depending on the configuration the keys can only be displayed as indications or completely hidden 6 Navigation keys Depending on the configuration the keys can be hidden 7 Numeric keypad Depending on the configuration the keys can b...
Страница 77: ...ash counts will be copied in the configured folder of the network Any existing file with the same name will be overwritten Status indication green function active Orange function not active yet White in process Red activation failed perhaps wrong parameters used 6 Send e mail provided that the status indication in the upper corner left of the key lights up green the current wash counts as well as ...
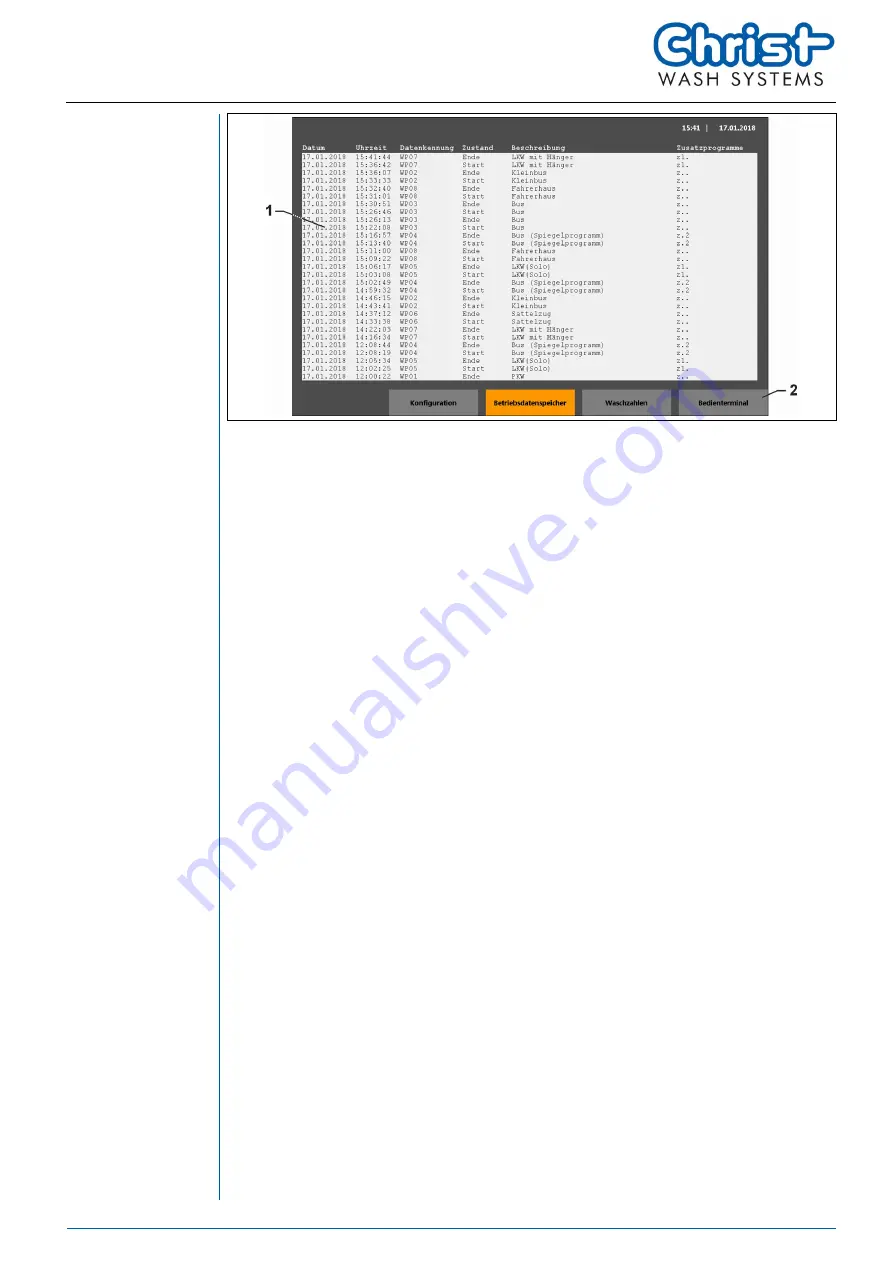
Страница 78: ...Chapter 9 Software 78 6501288 EN 04 pic 15 1 Operation data memory the last 50 inputs are saved in this ring memory 2 Window selection the current window is colour accentuated ...
Страница 79: ...e archive folder of the PC The con nection status will be represented in colour Status indication green function active Orange function not active yet White in process Red activation failed perhaps wrong parameters used 11 Connect The control tries to create a connection with the wash counts folder of the PC The connection status will be represented in colour Status indication green function activ...
Страница 80: ...s IP address e g 172 31 59 180 Subnet mask 255 255 255 0 INFORMATION Only the last two digits of the IP address for the PC and the PLC differ from each other for the subnet mask 255 255 255 0 The three other digits remain the same for both devic es Afterwards local user and an folder sharing shall be created Carry out the following steps to create a local user Windows 7 system control user account...
Страница 81: ...s Configuration and Wash counts to copy the archive folder of the CF card INFORMATION In case of network connectivity ensure that the PLC and the PC are in the same network 9 3 4 3 E mail function The e mail function serves to send the recorded data The following settings shall be carried out under the menu point Configurations 9 3 4 1 Configurations page 79 SMTP server IP address of a local e mai...
Страница 82: ...h start the wash end the selected wash program the selected additional pro gram and if the temperature module is available the outdoor temperature are saved in the file Nufa_Year_Month csv in one line with the date and time All the events occurrence of the error error knowledge wash start wash end wash cancellation are saved in the file LOG_EVENT_Year_Month csv in one line with the date and time T...
Страница 83: ...SB drive with 100 MB free storage location is connected to the USB interface of the control the content of the archive folder stored on the memory card will be automatically copied on the USB drive Any existing files with the same name will be overwritten ...
Страница 84: ...ion YY total quantity of errors The keys on the operation panel are assigned as follows Scroll through the errors Acknowledge the error Ignore the error Ignore the error It concerns only errors that might be suppressed Remove the error as follows Remove the error Acknowledge the error with the key E or the softkey Acknowl key The error indication is reset The light emitting diode next to the softk...
Страница 85: ... displayed on the operation terminal it is possible to move the brushes upwards out wards by pressing the key Horizontal brush and or Lateral brushes The control will temporarily switch on the control voltage and the corresponding brushes might move As the activation of the control voltage takes some time until the brushes move keep the keys pressed The brushes move as long as the corresponding ke...
Страница 86: ...ess the Start key Resume the wash program Press the C key Cancel the wash program Put the installation into basic position as follows Press the button C The selected program might be deleted Press the key Start The installation goes into basic position ...
Страница 87: ...tallation Prepare the installation 1 Put the installation into an ergonomic position 2 Turn off the main switch and avoid its reconnection 3 If the function lock the unit is assigned to the key operated switch of the operation panel lock the installation with the key operated switch 4 Close the shutoff valve in the supply line of the water system 5 Depressurise the water system 6 Close the gate va...
Страница 88: ...lines 11 6 2 monthly Check the spray quality of the nozzles 11 7 1 monthly Check the tilt safety device for lose screwing and dam age 11 7 2 monthly Check and grease the wire ropes 11 7 3 quarterly Check the guide pulleys for damage and wearout 11 8 1 quarterly Grease the driving device of the brushes 11 8 2 quarterly Clean and check the storage tank 11 8 3 half yearly Check the trimming for wearo...
Страница 89: ... Clean the installation the action area and the motion rails 1 The detergent tolerance should be tested on a hidden surface 2 Clean with appropriate means 3 Rinse the installation with sufficiently fresh water after the cleaning 11 4 1 2 Clean the trimming DW Horizontal brush SW Lateral brush Sensotex if required at least monthly Sensomix if required at least monthly Sensofil if required at least ...
Страница 90: ...rgent with a dilution of 1 10 1 Spray detergent and let it work without drying 2 Rinse the wash brush with a lot of water to eliminate the foam completely 3 Spin the wash brush and let it dry Carry out a basic cleaning in case of mineral soiling in the trimming Tools Spray bottle Detergent Christ MACHINE CLEAN with a dilution of 1 10 1 Spray detergent and let it work without drying 2 Rinse the was...
Страница 91: ...tergents together Never mix detergents from different manufacturers together Observe the safety and usage pointers of the detergent manufacturer Consider the colour marking on the detergent container and on the pitcher Tools The detergent container and the pitcher have the same colour marking Storage container for detergent Use the personal protective equipment according to the safety data sheet o...
Страница 92: ...un container replacement Deaeration 11 4 3 Deaerate the dosing pumps page 92 11 4 3 Deaerate the dosing pumps INFORMATION The dosing pump shall be deaerated for an error free operation Deaerate after each dry run container replacement If there is no tube connected to the exhaust valve yet connect one leading back to the container pic 20 vertical detergent side 1 Button Dosing pump ON All the dosin...
Страница 93: ... the dosing pumps are switched on for approx 1 minute Press the button again within the switching duration to deactivate the dosing pumps 3 Operate the dosing pumps until the air completely escaped from their suction lines There are no air bubbles in the suction line 4 Screw the deaeration screw 11 4 4 Carry out the first oil change pic 22 1 High pressure pump INFORMATION The first oil change shal...
Страница 94: ... front rear left right Check the safety shutdown 1 Switch on the main switch 2 Actuate the emergency stop button device The emergency stop triggers An error message is displayed 3 In the case of malfunction shut down the installation avoid its reconnection and con tact the customer service 4 Reset the emergency stop button 5 Acknowledge the error The error message disappears 6 Check all the emerge...
Страница 95: ...aximum operating pressure will not be exceeded during the operation 3 Open the oil filling aperture 4 Check the oil level The oil level should be approximatively 6 mm over the metallic edging of the oil tank 5 Check the oil state If the oil is discoloured or dirty contact the customer service 6 Close the oil filling aperture 7 Check the tightness the wearout and the corrosion of the hoses and line...
Страница 96: ...f the light barriers Do not use scour powder Clean the light barriers with a humid cloth Check the light barriers 1 Check the degree of soiling of the light barriers visually Clean the light barriers Tools Humid cloth 1 Remove the light protection covers manually and cautiously 2 Clean the light barrier with a humid cloth 3 Replace the light protection covers manually and cautiously ...
Страница 97: ...r foreign objects in the trimming 1 Look for foreign objects in the trimming plastic particles dirt small stones etc 2 Remove the foreign objects 11 6 Weekly check and maintenance 11 6 1 Clean the suction filter pic 29 1 Deaeration screw 2 Filter cover 3 Filter casing 4 Ball valve emptying 5 Filter element 6 Sealing Clean the filter ...
Страница 98: ...ealing and replace it properly 10 Fill the filter casing with water up to the upper edge 11 Close the filter cover 12 Open the exhaust valve 11 6 2 Check the hoses and lines Check the hoses and lines 1 Check whether the hoses and lines are untight worn out or corroded 2 In case of leakiness wearout or pronounced corrosion contact the customer service 11 7 Monthly check and maintenance 11 7 1 Check...
Страница 99: ...ribution is insufficient clean or replace the nozzles 11 7 2 Check the tilt safety device for lose screwing and damage pic 33 1 Tilt safety device Check the tilt safety device for lose screwing and damage 1 Check the tilt safety devices on the drive unit frame left and right at the front and the rear for lose screwing and damage 2 If it is loose screw firmly 3 In case of damage contact the custome...
Страница 100: ...ease the wire rope 1 Grease with Aviacal 2 LD or any similar product from another manufacturer or grease spray 2 Apply the grease on the wire ropes with a cloth or use the grease spray ATTENTION Rope rupture Crash of the horizontal nozzle brush Have the wire ropes replaced after approx 15 000 washes or at the latest after one and a half year 11 8 Quarterly check and maintenance 11 8 1 Check the gu...
Страница 101: ...Check the guide pulley 1 Check the guide pulleys for damage and wearout In case of damage or wearout con tact the customer service 11 8 2 Grease the driving device of the brushes pic 37 1 Brush system left right pic 38 1 Gear wheel of the driving device 2 Gear rack ...
Страница 102: ...ct from another manufacturer Brush 1 Apply the grease by means of a brush on the whole length of the gear rack 11 8 3 Clean and check the storage tank pic 39 1 Emptying 2 Cover 3 Float switch overflow protection Clean the storage tank Requirement Turn off the main switch and avoid its reconnection Tools Water hose 1 Open the exhaust valve and empty the storage tank 2 Remove the cover 3 Wash the in...
Страница 103: ...e storage tank Requirement The installation is operational There is no program running 1 Press the button Open fresh water valve on the clamping box of the storage tank and keep it pressed until water flows via the overflow If the float switch Overflow protection storage tank is actuated the error message F059 Water level storage tank will be displayed 2 If the error message isn t displayed contac...
Страница 104: ... 1 Cover oil filling aperture 2 Oil drain screw Carry out the oil change Tools Open ended spanner SW 22 Oil collecting pan Oil according to the rating plate 1 Unscrew the cover of the oil filling aperture 2 Keep the oil collecting pan ready and unscrew the oil drain screw 3 Collect the old oil and dispose of it properly 4 Screw the oil drain screw 5 Refill oil according to the rating plate up to 6...
Страница 105: ...ice checked according to DIN EN 806 5 by an installation company and with a testing device 11 9 4 Check the drive unit pic 43 1 Greasing nipple bearing castor left right Grease the bearing Tools Use a cartridge to apply Aviacal 2 LD or any similar product from another manufactur er Grease gun 1 Insert 2 strokes grease in each greasing nipple by means of the grease gun ...
Страница 106: ... 1 Greasing nipple abutment horizontal brush Grease the bearing Tools Use a cartridge to apply Aviacal 2 LD or any similar product from another manufactur er Grease gun 1 Insert 2 strokes grease in each greasing nipple by means of the grease gun 11 9 6 Grease the JETSTREAM pic 45 1 Bearing below and above ...
Страница 107: ...n Grease the bearing Tools Use a cartridge to apply Aviacal 2 LD or any similar product from another manufactur er Grease gun 1 Insert 2 strokes grease in each greasing nipple by means of the grease gun 11 9 7 Grease the knuckle eyes pic 47 1 Knuckle eyes without lubricating nipples 2 Knuckle eyes with lubricating nipples ...
Страница 108: ...kle eyes with lubricating nipples Grease the knuckle eyes Tools Grease spray Use a cartridge to apply Aviacal 2 LD or any similar product from another manufactur er Grease gun 1 Grease the knuckle eyes with grease spray 2 Insert 1 stroke grease in each lubricating nipple by means of the grease gun ...
Страница 109: ...nd with a testing device 11 10 2 Check the cables and cable connections INFORMATION Cables and cable connections can be damaged because of environmental influences and shall for this reason be checked at regular intervals Check the cables and cable connections Check whether the cables are worn out have fissures and damages In case of wear out fissures or damages contact the customer service Check ...
Страница 110: ...allations and the equipment shall be checked at regular intervals Otto Christ AG has defined a check interval of 2 years Check the electric installations and the equipment Professional staff shall check the electric installations and the equipment according to the German Social Accident Insurance or national laws regulations directives or fac tory regulations Execution ...
Страница 111: ...edge and if necessary special tools Repairs on the installation shall only be performed by the customer service 12 1 Customer service Otto Christ AG Customer service headquarter Memminger Straße 51 87734 BENNINGEN GERMANY Telephone 49 8331 857 101 Fax 49 8331 857 240 E mail kundendienst christ ag com ...
Страница 112: ...bly of the installation requires special knowledge The disassembly and the disposal shall be performed by the customer service or a local entrepreneur with relevant experience Observe the applicable laws regulations directives and if available factory regulations effective on the operation site ...
Страница 113: ...nnexes 6501288 EN 04 113 14 Annexes 14 1 Overview Table of errors Form Confirmation of knowledge of the manual Confirmation of the check and maintenance work Index Declaration of conformity Circuit diagram Separate ...
Страница 114: ... neously activated B31 B32 B33 B50 K0 E41 7 K0 E41 8 K0 E41 9 K0 E45 1 0 1 1 1 F030 Data transmission error Data transmission error be tween machine control and operation terminal K1 SS1 internal F040 Measured value DW missing Power measurement value of the horizontal brush missing T61 internal F041 Measured value DW too high Power measurement value of the horizontal brush too high T61 internal F0...
Страница 115: ...al F070 FW control error status Error in the control of the drive unit internal internal F071 Wash program time monitor ing Program sequence too long internal internal F072 Shortage fresh water pump Water pressure for fresh water supply too low B160 K1 E2 10 0 F073 Door not closed Door not closed at program start K1 E3 5 K1 E3 6 1 1 F074 inclination SW2 left Lateral brush 2 left goes too far outwa...
Страница 116: ... free as the unit is switched on F143 Meas value SW2L missing Power measurement value of the lateral brush 2 left missing T62 internal F144 Meas value SW2L too high Power measurement value of the lateral brush 2 left too high T62 internal F145 Idle run SW2L wrong Idle run of the lateral brush 2 left wrong T62 internal F146 Meas value SW2R missing Power measurement value of the lateral brush 2 righ...
Страница 117: ...Chapter 14 Annexes 6501288 EN 04 117 14 3 Confirmation knowledge of the manual I hereby confirm to have read and understood the manual of the MAGNUM C5X00 Location date Surname first name Signature ...
Страница 118: ......
Страница 119: ... 14 4 Confirmation check and maintenance work I hereby confirm to have executed the check and maintenance work today on the MAGNUM C5X00 according the chapter 11 Maintenance Check and maintenance Location date Surname first name Signature ...
Страница 120: ......
Страница 121: ...y wash counts 62 Delete 62 Deaerate the dosing pumps 92 Declaration of conformity 8 Default removal 13 Detergent container 9 90 Disassembly 112 Display the software version 37 Disposal 112 Disturbance removal 84 Door control 62 E Electric installations 110 Emergency stop devices 94 End of the program 42 Equality 8 F First commissioning 28 Function description 16 Semi stationary wash 19 Stationary ...
Страница 122: ... 87 Pointers for the operator 13 Positioning 38 Preparation 38 Program Cancellation 41 58 Interruption 41 58 Program recording 82 Program selection 38 73 Manual 38 Program start 38 73 Programme cards Value cards 73 Wash cards 71 R Repair 111 Requirements on site 22 Residual risk 12 Rope rupture 100 S Safety devices 13 External 13 Internal 13 Safety pointers 11 Self service operation 13 Service cod...
Страница 123: ...uropean directives Maschinenrichtlinie Machine directive 2006 42 EG L 157 24 09 06 2006 Richtlinie Elektromagnetische Verträglichkeit Electromagnetic compatibility directive 2014 30 EU L 96 79 29 03 2014 Folgende harmonisierte Normen wurden angewandt The following harmonised standards were used EN ISO 12100 EN ISO 13849 1 EN 61000 6 1 EN 61000 6 3 Name des Dokumentationsbevollmächtigten Name of th...
Страница 124: ......