


62-11785
8–16
8.7.2
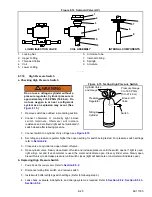
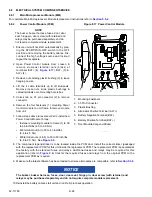
Condenser Coil
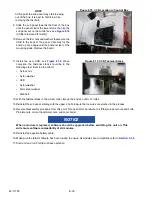
a. Cleaning
NOTE
Only Clean Water Should Be Used To Wash The Condenser. Do Not Use Any Detergents To Clean
The Condenser.
Remove all foreign material from the condenser coil by reversing the normal air flow. (Air is pulled in through the front
and discharges over the compressor.) Compressed air or water may be used as a cleaning agent. Take care so that
the fins aren’t bent during this procedure.
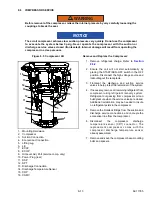
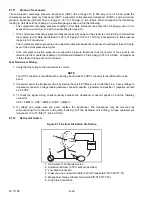
b. Condenser Coil Replacement
1. Remove the refrigerant charge. Refer to
.
NOTE
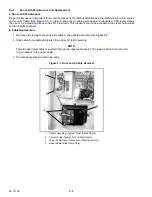
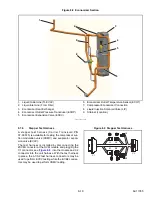
If the condenser coil (
) requires replacement, the entire condenser frame assembly (1) must
be removed from the unit and disassembled/reassembled on the bench.
2. Remove the surround with the grille attached. Refer to
.
NOTICE
Unit uses R404A and POE oil. The use of inert gas brazing procedures is mandatory for all
Carrier Transicold refrigeration units; otherwise compressor failure will occur. For more
information Refer to Technical Procedure 98-50553-00 Inert Gas Brazing.
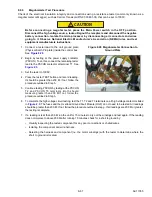
3. Unbraze refrigerant lines from condenser coil.
4. Disconnect the hail and bug screen sufficient to reach the ambient sensor (5) and wiring. Remove sensor and
wiring from condenser frame (4).
5. Remove the eight bolts (6) securing the condenser frame assembly to the unit.
6. Remove the condenser frame assembly from the unit.
7. Remove the eight bolts (7) securing the condenser frame to the venturi frame (2) and set condenser frame aside.
8. Remove condenser coil by removing the condenser coil mounting brackets (8).
9. Reassemble condenser frame assembly in reverse order using new coil.
NOTICE
Do not bend the copper tubing on the condenser coil when installing the new condenser. Bend
the unit tubing if tubes do not align correctly.
NOTE
Before applying heat to the new condenser apply a wet rag to the entire copper to aluminum transition
area to avoid melting the protective heat shrink or damaging the joint.
10. Reassemble condenser frame assembly into unit.
11. Leak check, evacuate and charge the system. Refer to Sections
,
, and
Содержание VECTOR 8100
Страница 2: ......
Страница 4: ......
Страница 12: ...62 11785 viii ...
Страница 16: ...62 11640 12 ...
Страница 18: ...62 11785 ...
Страница 24: ...62 11785 1 6 1 3 SAFETY DECALS ...
Страница 25: ...1 7 62 11785 ...
Страница 26: ...62 11785 1 8 ...
Страница 27: ...1 9 62 11785 ...
Страница 28: ...62 11785 1 10 ...
Страница 30: ...62 11785 ...
Страница 50: ...62 11785 ...
Страница 82: ...62 11785 ...
Страница 96: ...62 11785 4 14 ...
Страница 98: ...62 11785 ...
Страница 129: ...5 31 62 11785 ...
Страница 130: ...62 11785 5 32 ...
Страница 134: ...62 11785 6 4 ...
Страница 138: ...62 11785 ...
Страница 230: ...62 11785 ...
Страница 271: ...8 41 62 11785 ...
Страница 272: ...62 11785 8 42 ...
Страница 274: ...62 11785 ...
Страница 286: ......
Страница 287: ......
Страница 288: ...62 11785 10 8 ...
Страница 292: ......
Страница 293: ......