background image

Specifications are subject to change without notice. Pictures are just an example. For special features and/or customization, please ask to our sales network. 23/03/2011

31

F_18: Motor rated current = 50~100 %(0~200%: CPU version 

v1.9 and above)

1. The electronic thermal overload protection for motor:

(1) Motor rated current = Inverter rated current x F_18

F_18 = Motor rated current / inverter rated current

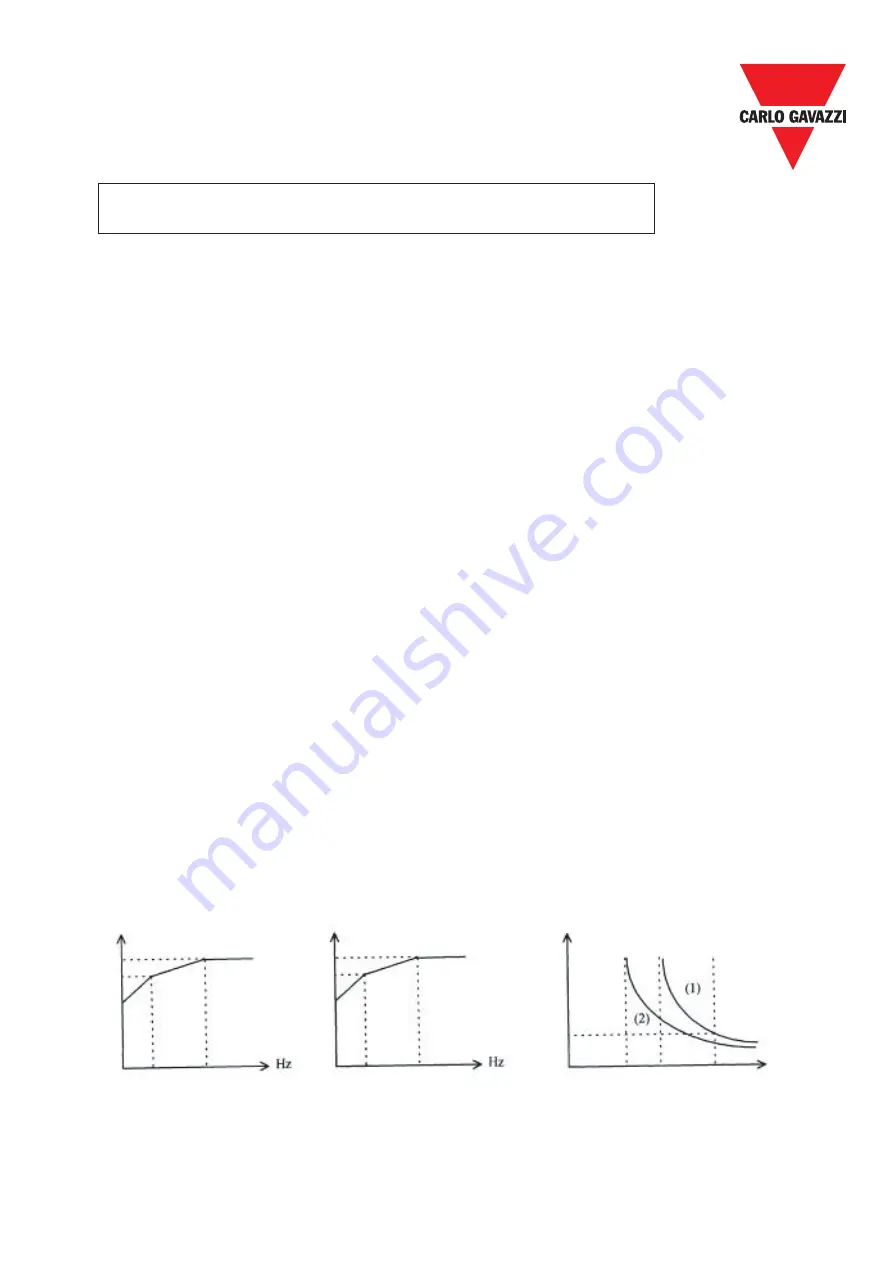
(2) When the load is within 100% of the motors rated current, the operation continues. When

the load reaches 150% of the motors rated current the operation is allowed to continue for
1 minute. (Refer to curve (1) in Figure 3)

(3) After protecting the motor with the electronic thermal switch activated, the inverter is cut

off immediately. The OLI light will flash. To resume operation, push the RESET button or
activate an external reset connection wired to terminal 2.

(4) When the motor is operating at low speeds, the heat dissipation efficiency is lower. The

electronic thermal activation level is also reduced. (to change from curve (1) to curve (2) in
Figure 3. Choose the appropriate F_05 setting according to the applied motor to reach the
desired performance.

2. The electronic thermal protecting for inverter:

(1) When the load is within 103% of the inverters rated current, the operation continues. When

the load reaches 150% of rated current of the inverter, the operation will continue for 1
minute. (Refer to curve (1) of figure 3)

(2) After the activation of the electronic thermal switch, the inverter is shut off immediately.

The OL2 light will flash. To resume the operation, push RESET button or activate an
external reset contact on terminal 2. 

F_05 = 1,2, 3
50 Hz 

s

tandard motor

s

%

F_05 = 4,5,6
60 Hz 

s

tandard motor

s

0

0

0

100

90

60

Decay

20

50

  (Figure 1)

20        60

                    100       150

               (Figure 3)

In Percentage of Current

                  (Figure 2)

1.0

%

 of 

current

Minute

y

%

RVDF Advanced User Manual

Содержание RVDFA110020

Страница 1: ...t o m a t i o n C o m p o n e n t s VariFlex2 RVDF Series Advanced User Manual 110V Class 1ph 0 20 0 75kW 0 25 1 0HP 220V Class 1ph 0 20 2 2kW 0 25 3 0HP Class 3ph 1 50 2 2kW 2 0 3 0HP 440V Class 3ph 0 75 2 2kW 1 0 3 0HP ...

Страница 2: ...ive environmental effects far outweigh the negative impacts of product manufacture and end of life disposal Nevertheless when the products eventually reach the end of their useful life they can very easily be dismantled into their major component parts for efficient recycling Many parts snap together and can be separated without the use of tools while other parts are secured with conventional scre...

Страница 3: ...Circuit Terminals 17 3 6 2 Control Circuitry Terminal Block TM2 Description 17 3 7 RVDF IP20 Type 18 3 7 1 DIN Rail mounting diagram 18 3 7 2 Additional DIN Rail Installation 18 3 7 3 RVDF IP20 Type Dimensions 19 3 8 RVDF IP65 Type 20 3 8 1 RVDF Size A Installation 20 3 8 2 RVDF Size A Circuit Diagram 20 3 8 3 RVDF Size A Connections 20 3 8 4 RVDF Size A EMC mounting 20 3 8 5 RVDF Size B Installat...

Страница 4: ...ral Multifunction Examination Method 38 Chapter 6 Troubleshooting Procedures 39 6 1 General procedure in case of malfunction 39 6 2 Error handling of malfunction indication of OC OL 41 6 3 Error handling of malfunction indication of OV LV 42 6 4 Motor inoperative 43 6 5 Motor over heat 44 6 6 Disturbing motor operation 44 6 7 Routine and periodical examination 45 6 8 Maintenance and Examination 46...

Страница 5: ...the PCB while the inverter operating Do not attempt to disassemble or modify internal circuitry wiring or components of the inverter The grounding terminal of the inverter must be grounded properly with 200V class type III standard This is a product of the restricted sales distribution class according to EN61800 3 In a domestic environment this product may cause radio interference in which case th...

Страница 6: ...er by the heat sink mounting chassis to prevent the inverter from falling this may cause personnel injury or damage to the inverter itself Install the inverter onto a firm metal base plate or another non flammable type material Do not install the inverter onto or nearby any flammable material An additional cooling fan may need to be installed if several inverters are installed into one control pan...

Страница 7: ...ch FWD REV button Attention the restart operation is irrelevant with F_23 F_24 1 When F_10 0 the inverter will not start after restart 2 When F_10 1 and the external switch FWD REV button is OFF the inverter will not start after restart 3 When F_10 1 and the external switch FWD REV button is ON the inverter will start automatically after restart Attention Base on safety reason please turn off the ...

Страница 8: ...ng that the power is off and the Power LED extinguished 1 1 4 When performing an examination or maintenance Caution Inverter environment should be within temp 10 C 40 C humidity under 95 RH without condensing Caution After the removal of shield sticker the environment temperature should be within 10 C 50 C and humidity under 95 RH without condensing Besides the inverter should be free from water d...

Страница 9: ...raps from entering interior Avoid electric magnetic interference soldering or power machinery Avoid vibration if vibration cannot be avoided an anti rattle mounting device should be installed to reduce vibration If the inverter is installed in an enclosed control panel please remove the shield sticker located at the top of the inverter This will allow additional airflow and cooling For proper Inst...

Страница 10: ... not use the inverter in an environment with the following conditions Direct sunlight Corrosive gas and liquid Oil Mist Salt Wind rain and water drops may get into Iron filings dust Strong vibration Extreme low temperature Excessive high temperature Electromagnetic wave and ultra high wave Near an electric welding machine Radioactive materials Inflammable materials oil salt RVDF Advanced User Manu...

Страница 11: ...proof switch 150 1 5kW 2 0HP 220 2 2kW 3 0HP 3 2 Type Selection 3 3 Connection Diagrams 10kΩ L1 R L P R L2 S L3 T N T1 U T2 V T3 W IM 3 FWD CON2 4 REV 6 SP1 7 RESET 5 12V 0 10V 0 10V 0 20mA 4 20mA 8 10V 9 VIN 10 0V FM 11 FM FM 1 2 Trip relay 250VAC 1A 30VDC 1A For factorty test only Grounding Multi function input 1 3 phase 200 240VAC 3 phase 380 480VAC 15 10 50 60Hz Braking Resistor 1 2 3 SW1 Grou...

Страница 12: ...tput Current 1 4A 2 3A 4 2A 7 5A 10 5A Rated Capacity 0 53kVA 0 88kVA 1 6kVA 2 9kVA 4 0kVA AC Supply Voltage and Frequency Single phase 200 240V 10 15 50 60Hz 5 Single Three phases 200 240V 10 15 50 60Hz 5 Output Voltage and Frequency Three phases 200 240V Proportional to input voltage EMC Specification Class A Single Phase Filter built in Dimensions WxHxD IP20 IP65 72x132x118mm 134x205x174mm 118x...

Страница 13: ...an be setup by constants Display Three digital LED display frequency inverter parameter fault record program version Operating temperature 10 C 40 C without shield sticker 10 C 50 C Humidity 0 95 RH non condensing Vibration Under 1G 9 8 m s2 EMC specification EN61800 3 A11 EN50178 Protection Function Overload protection 150 for 1 min Over voltage DC voltage 410V 100 200 series DC voltage 800V 400 ...

Страница 14: ...ing situations 1 Damage to the inverter caused by the lack of appropriate molded case circuit breaker or when a circuit breaker with too large of capacity is installed between the power supply and the inverter 2 Damage to the inverter caused by the magnetic contact phase advancing capacitor or surge protector installed between the inverter and the motor Use copper conductors only size field wiring...

Страница 15: ...ize external control automatic restart or breaking controller the magnetic contact must be added at the primary side Do not operate the magnetic contact to switch ON or OFF the inverter Power improvement AC Reactor If large capacity power source is applied over 600kVA additional AC reactor may be added to improve power factor Inverter Power supply input terminals L1 L2 single phase for 0 2 0 75 kW...

Страница 16: ...ce between the frequency inverter and EMI filter as short as possible 30cm if longer use a shielded cable with a metal coupling nut and a metal clamp to connect the shielded cable to the frequency inverter and metal grounding plate The only earth connection between the LISN and the test plate should be via the EMI filter Use a motor which equals the power rating or below of the inverter rating Ins...

Страница 17: ...end Wrapped with insulating To ground terminal refer to instructions of filter wiring To Inverter terminal To Control Machine C The grounding terminal of the inverter must be correctly grounded in compliance with 200V class type three grounding Grounding wire should be wired in accordance to electrical equipment AWG with the length of the grounding wire as short as possible The grounding wire of t...

Страница 18: ...l input terminal Pin 2 of potentiometer or positive terminal of 0 10V 4 20mA 0 20mA 10 Analog common point Analog signal common point Pin 1 of potentiometer or negative terminal of 0 10V 4 20mA 0 20mA 11 FM Analog output positive connection point Analog frequency signal output terminal Output terminal signal is 0 10VDC Fn6 Tightening torque for TM1 is 1 LBS FT or 12 LBS IN RVDFAxxxxxx Tightening t...

Страница 19: ...wdriver inserting it into the middle rib of DIN Rail and press the screwdriver in order to remove the DIN Rail from inverter middle rib STEP 1 STEP 2 3 7 2 Additional DIN Rail Installation Install Drive First place the groove on the back of module on the upper edge of din rail and then push the module down to lock up position Finally press the mouting plate upward into module Mounting Plate Dismou...

Страница 20: ...3 RVDF IP20 Type Dimensions Enclosed Metal Frame to screw all the inverter GND connection 132 5 20 116 4 57 130 5 12 118 4 65 TM2 TM1 M4 ground TM2 61 2 40 72 2 83 TM1 3xØ4 5 0 17 8 2 0 32 Enclosed Metal Frame to screw all the inverter GND connection 143 5 63 127 5 0 140 5 51 171 6 73 M4 ground 3xØ4 5 0 17 8 0 0 31 TM2 TM1 61 2 40 118 4 65 TM1 TM2 RVDF Advanced User Manual ...

Страница 21: ...er AC 100 120 or 200 240 50 60HZ NOTE 1 Input source single phase L1 L2 ensuring that it is connected to a 100 120 or 200 240 supply 2 Output Motor three phase T1 T2 T3 Caution Do not start or stop the inverter using the main circuit power Please always remain REV 0 FWD switch at 0 position In order to keep inverter has no running signal before power on again after power supply interrupted Otherwi...

Страница 22: ... 6 94in lb 2 Remote control wire 4kgf cm 3 47in lb 3 Outer Cover M4 8kgf cm 6 94 in lb 3 PHASE IM 10V VI 0V FW RE 12V L1 L L2 N L3 T1 T2 T3 POWER SWITCH REV 0 FWD SWITCH Potentiometer 200 240 380 480 50 60HZ NOTE 1 Input source single phase L1 L L2 N ensuring that it is connected to a 200 240 supply or three plase L1 L L2 N L3 ensuring that it is connected to a 200 240 380 480V supply 2 Output Mot...

Страница 23: ...e T1 T2 T3 NOTE L1 L L2 N L3 NOTE For ALL FILTER MODELS additional items will be find inside the box including 1 pc of EMC conformed waterproof IP65 ferrite core 1 pc of metal fastener 1 pc of MF Zin 5 C screw CAUTION if application use require to meet EMC regulation you MUST first constrain the motor cables close the ferrite core onto the motor cable outside the plastic enclosure as stated in the...

Страница 24: ...e just an example For special features and or customization please ask to our sales network 23 03 2011 23 RVDF Advanced User Manual 3 8 9 RVDF IP65 Type Dimensions S T O P 0 1 R RUN ENT DATA FUN DSP RESET F 0 116 57 102 41 117 23 133 57 188 96 204 82 133 00 173 38 ...

Страница 25: ...r 4 Software Index CAUTION Do not operate keypad by screwdriver or other sharp ended tool to avoid damaging keypad 4 2 Brief Keypad Operation Flowchart FREQ 1 FREQ X X X X X X X X X X 2 After 0 5s Write Read Note 1 Displayed setting of frequency when stopped Display output frequency when running Note 2 The setting of the frequency can be modified either when stopped or when running RVDF Advanced U...

Страница 26: ... to stop 1 0 1 0 15 DC braking setting DC braking time 0 1s 0 0 25 5s 0 5s 16 DC braking injection frequency 0 1Hz 1 10Hz 1 5Hz 17 DC braking level 0 1 0 0 20 0 8 0 18 Electronic thermal Overload protection Protection base on motor rated current 1 50 100 0 200 4 100 19 Multifunction input connection point Multifunction input terminal 1 SP1 function 1 Jog 2 Sp1 3 Emergency stop 4 External Base Bloc...

Страница 27: ...eceleration time 0 1 999 sec Accelerate time F_01 x Setting Frequency 60 Hz Decelerate time F_02 x Setting Frequency 60 Hz F_03 Operation mode selection 0 Forward Stop Reverse Stop 1 Run Stop Forward Reverse NOTE 1 F_03 takes effect only when F_10 1 external operation control 3 FWD Stop 4 REV Stop 5 COM 3 Run Stop 4 FWD REV 5 COM F_03 0 control method F_03 1 control method F_01 F_02 Hz Time TM2 PI...

Страница 28: ...ot be set to 1 The keypad indication would display LOC F_05 V F pattern setting 1 6 Selecting F_05 1 6 to select one of the six preset V F patterns Refer to the following tables Specification 50 Hz System Application General Application High starting torque Decreasing torque F_5 1 2 3 V F pattern Specification 60Hz System Application General Application High starting torque Decreasing torque F_5 4...

Страница 29: ...r will output a minimum speed according to the setting in F_07 F_08 SP1 frequency 1 120Hz 1 200Hz CPU version v1 9 and above F_09 JOG frequency 1 120Hz 1 200Hz CPU version v1 9 and above 1 When F_19 or F_20 2 and the multifunction input terminal is ON the inverter operates at sp1 frequency F_08 2 When F_19 or F_20 1 and the multifunction input terminal is ON the inverter operate at jog frequency F...

Страница 30: ...ing the contact closure of the jog function the keypad control remains in a sleep state until the jog contact connection is re opened 0mA 0V 4mA 20mA 10V F_11 1 F_11 2 F_12 Carrier Frequency 1 10 F_12 Carrier frequency F_12 Carrier frequency F_12 Carrier frequency 1 4kHz 5 8kHz 9 15kHz 1 2 5kHz 6 10kHz 1 10 16kHz 1 3 6kHz 7 12kHz 1 4 7 2kHz 8 14 4kHz 1 NOTE 1 Available for CPU version V1 9 and abo...

Страница 31: ...op 1 free run to stop F_15 DC braking time 0 25 5 sec F_16 DC braking starting frequency 1 10 Hz F_17 DC braking level 0 20 If F_14 0 When the inverter receives the stop command it decelerate to the pre set frequency setup by F_16 after this the output voltage level that is set in the F_17 will determine the amount of DC voltage that s injected into the motor The time duration to perform this stop...

Страница 32: ...eset connection wired to terminal 2 4 When the motor is operating at low speeds the heat dissipation efficiency is lower The electronic thermal activation level is also reduced to change from curve 1 to curve 2 in Figure 3 Choose the appropriate F_05 setting according to the applied motor to reach the desired performance 2 The electronic thermal protecting for inverter 1 When the load is within 10...

Страница 33: ...hen the external emergency stop signal is activated the inverter proceeds to decelerate and stop ignoring the setting of F_14 The inverters E S light will flash after stopping After the emergency stop signal is deactivated turn the RUN switch OFF and then ON again to cycle it F_10 1 Or push the RUN key F_10 0 The inverter will then resume operation and restart If the emergency stop signal is remov...

Страница 34: ... 2 F_22 2 At Frequency Speed Signal 3 F_21 3 Fault signal Terminal1 and2 of TM2 are activated at CPF OL1 OL2 OCS OCA OCC Ocd Ocb OVC LVC OHC Time F_21 1 Terminal 1 2 F_21 2 Terminal 1 2 ON ON F_22 Reverse Lock Out 0 REV command 1 REV command Lock out NOTE When F_04 is set to 1 reverse F_22 cannot be set to 1 in order to properly lockout a motors direction F_04 must be set at 0 before setting F_22 ...

Страница 35: ...ong the inverter must be restart manually The operation of the inverter is based on the setup of F_10 and the condition of external switch 4 When restart the inverter the operation of the inverter is based on the setup of F_10 and the condition of external switches FWD REV button 1 When F_10 0 the inverter will not start after restart 2 When F_10 1 and the external switch FWD REV button is OFF the...

Страница 36: ...emote Run command on 1 Direct start disable when remote Run command on CPU version V2 1 and above When F_28 1 and control mode is remote control F_10 1 Inverter can not start if RUN switch is ON when power is engaged Must be turned the RUN switch OFF and turned ON again Then Inverter can start F_29 CPU program version F_30 Last three faults 1 Last three faults indicate the sequence of the occurren...

Страница 37: ...t starting machine 1 Motor coil short circuit with external casing 2 Motor connection wire short circuit with grounding 3 Transistor module damaged 1 Examining motor 2 Examining wiring 3 Replace transistor module OCA Over current at acceleration 1 Acceleration time setting too short 2 Improper V F feature selection 3 Applied motor capacity exceeds inverter capacity 1 Adjust acceleration time to lo...

Страница 38: ... Motor direction locked 1 Attempt to reverse direction when F_22 1 2 Attempt to set F_22 to 1 when F_04 1 1 Adjust F_22 to 0 2 Adjust F_04 to 0 Er1 Keypad operation error 1 Press or keys when F_11 1 or under sp1 operation 2 Attempt to modify F_29 3 Attempt to modify parameter that is not allowed to be modified during operation refer to parameter list 1 Use or keys to adjust frequency setting only ...

Страница 39: ...el Motor operation at speed too high or too low Is the specification of motor poles voltage correct Reduce loading Is the gear ratio correct Reconfirm motor specification Is the highest output frequency setting correct Reconfirm gear ratio Is the voltage on motor side reduced extremely Reconfirm highest output frequency Abnormal speed variation at operation Is the loading too heavy Reduce loading ...

Страница 40: ...n Three malfunction record in Fn_30 The malfunction indication is Any sign of burnt of breakage Is the primary circuitry DM normal Is the primary circuitry I G B T normal Replace defective board Is LED2 illuminate Is the DC input voltage of control power supply normal Is the control power source 5V normal Replace control board digital controller Is replacing control board solve the problem Examini...

Страница 41: ... any abnormality indication Detail examination is required The inverter is out of order YES Carry out parameter initialization Designate operation control method Frequency instruction setting Does the controller displays frequency setting Is there voltage output on UVW terminals The inverter is normal now Replace control board Replace control board Is replacing control board correct the problem Ye...

Страница 42: ...uction Replace I G B T Is the current detector normal NO YES NO ABNORMAL Is there any malfunction indication Input frequency setting Is there output voltage on UVW terminals Connect motor and proceed with operation Is there any malfunction indication Is output current of all phases in balance condition The inverter is normal now Replace defective PCB Replace control board Replace detector Replace ...

Страница 43: ...s out of order Is there any abnormal breakage on appearance Input operation instruction Replace defective board NO NO Is there any malfunction indication Input frequency instruction Is there output voltage on T1 T2 and T3 terminals Connect motor Is the motor operating Is there any malfunction indication Is output current of all phases in balance condition The inverter is normal now Replace control...

Страница 44: ...ver load Defective motor Poor wiring RVDF malfunction RVDF malfunction YES Can you switch ON the MCCB Power source abnormality Poor wiring Place the operation switch to RUN position Is the T1 T2 T2 T3 T3 T1 output voltage in balance condition ABNORMAL NO YES YES When the motor is not connected and the voltoge differences between wires are within 3 can be treated as in balance condition Normal with...

Страница 45: ... NO YES YES RVDF malfunction Poor connection between RVDF and motor Is there over loading condition or the load current exceeds rated current NO YES YES NO NO Is there any excess vibration at transmission parts like gears Increase or decrease acceleration deceleration time Is there any loading variation condition YES Reduce load Increase RVDF and motor capacity Reduce loading variation or install ...

Страница 46: ...0Ω Improve grounding Input power source voltage Is the voltage of the primary circuitry normal Measure voltage by multi meter Voltage level conforming specification Improve input power source Inverter external terminal mounting screw Is the tighten parts secured Visual inspection Use screwdriver to verify screw tightness No abnormality Tighten loose screw or return for repair Is there any sign of ...

Страница 47: ... charges in the internal capacitors 1 Clean out internal dust and dirt 2 Check out mounting screws on every terminal and parts Tighten loose screws 3 Dielectric strength test a Remove all conducting wires between Drive and outside world Power must be turned OFF b The dielectric strength test inside Drive should be carried out only for RVDF major circuitry Use DC 500V high resistance meter Measured...

Страница 48: ...criterion Input voltage VI Moving iron Input current Ii Moving iron Input power Pi Power meter P W1 Input power factor PFi Calculate power factor by the input voltage input current and input power PFi Pi 3Vi Ii x 100 Output voltage Vo Rectifier Moving iron not allowed Maximum voltage difference between wires under 3 Output Current Io Moving iron Under the inverter rated current Output power Po Pow...

Страница 49: ...f braking Input AC Reactor Current A Inductance mH RVDFA120020F 20 3 0 7 0 RVDFA120040F 20 5 2 4 2 RVDFA120075F 20 9 4 2 1 RVDFB120150F 20 19 1 1 RVDFB120220F 20 25 0 71 RVDFB340075F 20 2 5 8 4 RVDFB340150F 20 5 0 4 2 RVDFB340220F 20 7 5 3 6 Built in Without Built in NOTE 1 Without transistor and resistor built in 7 3 Specification of Braking Resistor Model of Inverter Rate of Motor kW Specificati...

Страница 50: ...011 49 Chapter 8 Parameters Table Customer Inverter Model Using Site Contact Phone Address Parameter Code Setting Content Parameter Code Setting Content Parameter Code Setting Content F 00 F 11 F 22 F 01 F 12 F 23 F 02 F 13 F 24 F 03 F 14 F 25 F 04 F 15 F 26 F 05 F 16 F 27 F 06 F 17 F 28 F 07 F 18 F 29 F 08 F 19 F 30 F 09 F 20 F 10 F 21 RVDF Advanced User Manual ...

Страница 51: ...o Gavazzi SpA Via Milano 13 I 20020 Lainate Tel 39 02 931 761 Fax 39 02 931 763 01 info gavazziacbu it NETHERLANDS Carlo Gavazzi BV Wijkermeerweg 23 NL 1948 NT Beverwijk Tel 31 251 22 9345 Fax 31 251 22 60 55 info carlogavazzi nl NORWAY Carlo Gavazzi AS Melkeveien 13 N 3919 Porsgrunn Tel 47 35 93 0800 Fax 47 35 93 08 01 gavazzi carlogavazzi no PORTUGAL Carlo Gavazzi Lda Rua dos Jerónimos 38 B P 14...

Отзывы: